12.30.2022

Inspired by a Clock

 It's that time of the year when you start to think about time again. Maybe a little more than usual I think New Years as it approaches seems to bring out all the watching the clock in all of us. And this week Amy is sharing a Pinterest board filled with clocks of all kinds. And I chose this one seen here.  I seen that as pink lace at first glance. I think part of why it struck me was I had received this Sizzix Tim Holtz Doily embossing folder for Christmas this year from my friend at work and it was laying on the table waiting for an idea to strike.

I decided to try it with some not cotton watercolor paper ( Strathmore 400 series) and then I basically cleaned the palette that had some various Daniel Smith browns and coral on it with this, and a lot of water. I did end up running this panel through the big shot probably 3 time between getting it wet and letting it dry. I did not tape it down. And when it was totally dry ( this panel is A6 in real life) I spent a bunch of time trying to figure out what sentiment would fit in that little corner I had.

I wanted to use something I had not played with before or recently and most of those were too big to fit, but this one is from the Stamping Bella Posh has a present set and it fits. The painted panel is up on foam tape over the Stampin Up petal pink base that was finished out at A7 in real life. I did go along and add some pink and cream liquid pearls just a few here and there for a bit of shine, And I realized I got this way more pink than the clock but, I think the lace pattern of the doily edge mimic's that pattern to the clock. I hope you are all doing well and looking forward to the new year. If you'd like to play along with us you can find this challenge here at Splitcoaststampers. Thanks for stopping by.


12.27.2022

watercoloring drybrush grass

 For the final water coloring tutorial challenge of the year Linda has shared this using a dry brush for quick grass backgrounds from Wendy Powell-Jones seen here on YouTube

I had watched the video and then set out to recreate something similar without really doing it in a step by step type thing as I did this stealing time between the holiday events so, I think it turned out ok.


 The first step was to do a soft wash of yellow and purples for the background. I am not a fan of either color but, I gamely did so and let it dry. ( This is on Strathmore 400 series wc paper) 

Funny true story, on the practice strip I got really cool dry grass blades, on this taped off sheet I got some big blobs of paint. 


at this point I decided to start dropping in color blades with a rigger brush and I remembered there was supposed to be flowers in the grass, so I started adding some in over the grass without having masked some blank space before hand. oops. ( also did not sketch a thing either) 

Pulled the tape off added a Riley & Co. sentiment to the corner and then added just a few splatters to the grass and more red blooms. of course some went into the dry sky and I decided they were flying bugs rather than stray splatter. ( that's my story)

When the paint was dry I did run it through the big shot in a Spellbinders rectangle die and used some textured green Bazzill for an A6 base under it. ( this one is flat to the cardfront) 

I probably should have used some foam tape as even though I did tape this to a board, its not perfectly flat it has a twist going on. might stick it under some books for a while. That's about if from me, Hope you are all doing well. Thanks for stopping by. If you'd like to play along with us, you can find this challenge here at Splitcoaststampers.


12.24.2022

A Cottage Tag Making Factory {ha ha}


What my desk looked like a couple of hours ago. Yep, I was done wrapping a week ago but, the mood to make tags is happening now so, a stash is being built for next year. I have taken some Tim Holtz and Recollections printed diecut Christmas images out of their packages and tossed them in an old bread tin to try and use some of them up. Along with randomly cutting up mainly red & white scraps with various dies. 

One of the finished ones so far, the base is a Poppy Stamps Mainstreet pinpoint tag, the tree is from Sizzix, the birdhouse is from Quickutz, the Sentiment is from the Ton Blizzard Hugs set, the Red diecut letter S is from the Memory Box Twiggy Alphabet set, The crepe paper is a scrap that was just torn for the bottom to ground the scene. 


 One of the VSN fashionista challenges was to use white pigment ink on kraft paper, and I really don't have good luck with white pigment ink. not sure if its the climate, as I have bought many different brands over the years so, this really old Stampin Up Christmas stocking was heat embossed with white on the kraft and cut out with scissors. The sentiment here is from the Simon Says Stamp Joy for you set, the Letter B was cut from some shimmery opal stardream with a Ellen Hutson classic block letter B. The base tag on this one is using the Frantic Stamper jumbo Merry Christmas tag die. 


 Another of the VSN challenges was to do an Ugly Sweater project, and I really don't have or wear them so, it was a lucky thing to find this printed sweater in that bin of printed die cuts from Recollections. It did start out with a white halo around the image and I trimmed it down with scissors. The base tag is an Sizzix "Shortie" tag that was run through the big shot inside an Anna Griffin slimline snowflake embossing folder. The sentiment I want to say is Hero Arts but, I have not come across it again yet. ( I randomly stamp and diecut sentiments through out the year so, its one of those) 

During the Fallidays challenges there was an Swan Lake challenge so, I had stamped off this Inkadinkado Nutcracker on some Neenah solar white and barely colored him with some Daniel Smith watercolors. the Gold texture was a scrap, that evidently was embossed with an Tim Holtz Damask? folder a long time ago. the base tag here is also an Frantic Stamper jumbo Merry Christmas tag. 

Izzy says Hello and she is ready for Santa to come, so I hope you are all continuing to do well and Have a beautiful Christmas, Thanks for stopping by.


12.23.2022

Inspired by {Puzzle Warehouse}

 This week Amy has chosen Puzzle Warehouse as the Inspiration Destination. And as I was looking at the site in the back of my mind I am still in make gift tags mode even though, I do not need anymore for this year it's nice to have a little stash ahead of time before you start wrapping in my world as every year I do things slower. With that in mind I chose this puzzle of Red & Green candies as I knew the colors would work for tags that work with the left over rolls of wrapping paper I have. 


 This is a size 8 kraft shipping tag that ran through an Crafts Concepts secret garden folder and was stained with green Distress inks. The banners were cut from scraps but, I am pretty sure the foiliage one is Tim Holtz. The sentiment is from the Concord & 9th O Christmas tree set die cut with an Poppy Stamps Mainstreet pinpoint tag die. The Merry Christmas is a really old one from Hero Arts on a sentiment strip, so one end I cut it off closer to the words to poke a hole through and the other end I ended up cutting a dovetail with scissors. The Poinsettias here are diecut printed chipboard things from Tim Holtz. ( I have a bin of this stuff to use up) 

So with that thought, I decided to keep going. The tag base here is a Memory Box Tag You're it rectangle die the base is some hmm coredinations and the plaid is a print from MaJa designs. The Merry Christmas here is from the SU set called Many Merry Messages. The door print is chipboard from a package from Micheals crafts store. The lace is vintage, the red burlap string is May Arts and the from me to you I have not found in evernote but, I really think its a SU one or maybe Hero Arts. ( hard to say) 


 The square tag on the left is a die from Papertrey ink called Tag Sale Quilted tag and the base is Cherry Cobbler, the white woodgrain is Micheals or hobby lobby ( thin stuff) and the Holly here is from that Tim Holtz pack of diecuts, the Just for you is from the Altenew set called Holiday Tag Sentiments, the tag on the right the red corrugate is from Fancy Pants, the poinsettia diecut is from Micheals, the sentiment is from the Hero Arts Snarky Christmas messages set die cut with a My Favorite Things stitched dome die, the tag shape here is a Sizzix Shortie Tags die. The lace is vintage, the burlap string and iridescent sheer are May Arts. I hope you are all continuing to do well and You have a beautiful Christmas with your family. If You'd like to play along with us you can find this challenge here at Splitcoastampers. Thanks for stopping by.


12.20.2022

Watercoloring a Snowy Slope

 This week Brenda has chosen a tutorial from Sisa in Wonderland on a snowy winter landscape watercolor painting seen here on YouTube. YAY for a 5 minute video, its so busy at this time of the year and so, I was excited to see the content and the quick and easy of this one. 


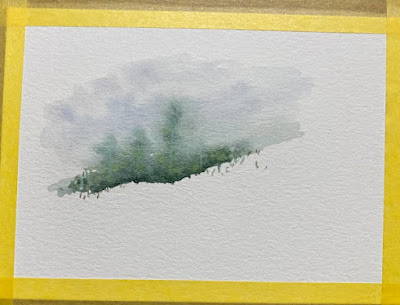
First layer of paint wet on Strathmore 400 series wc paper. Daniel Smith watercolors. 

Second layer, I did when this was dry ish and the tape came off decide to add just a little more paint to the trees and grass areas.

I die cut the watercolor panel with a Penny Black zig zag die and this is up on foam tape over the Soft Seafoam base. It was originally an A7 design but, it just looked odd so I took an 1/2" off the landscape side of the base so, its really 5" x 6 1/2" now. That's about it from me, I hope you are all doing well and if you'd like to play along with us you can find this challenge here at Splitcoaststampers. Thanks for stopping by.


12.18.2022

Red & White Tags

 
Today is the day they share a Featured Stamper to case at Splitcoaststampers, and right at the top of her gallery I seen this red and white Poinsettia card and I loved that. I don't need more Christmas cards at the moment but, I found this year as I was wrapping that I have a ton of really 3-d Huge tags. I have shared that before that everyone hands them back to be after they open things so, some of them are really old and also heavy, mixed media style tags. and some of them, the colors just did not really work with any of the Christmas wrapping paper or bags I have bought over the years. One thing I noticed this year is, I tend to buy Red, White , Green & Gold for Christmas papers with some grey mixing in the last couple of years. And it  just felt like it was time for some new ones.  And this year there was a lot of small things like gift card sized things to wrap. So, so far these are smaller tags.

So, I spent hours this afternoon pushing around and die cutting things from red and white scraps to make some new tags. 

A few of them went off in left field with some greens and blues and blacks mixed in. Which is OK as all of these will work well enough with wrapping papers I have.


This most recent batch finished is more red and white than the first 6 so, It's going to be the one that loads to the gallery. If you're really curious about what die is made by whom shoot me an email, I am going to go see if hubs needs a hand with dinner and such so, will edit with die names later if needed. Hope you are all doing well, Thanks for stopping by.


12.16.2022

Inspired by { Cake Central}

 Hello & Happy Friday, It's my turn to host the Inspiration challenge at Splitcoaststampers this week and I picked Cake Central. ( their web site is here and their pinterest boards are here) I ended up choosing this particular cake seen here for its colors. 

I had originally thought I was going to use up an inky embossed resist panel I had made during fallidays for that color combo but, the background was just too busy so, after mentally fighting with it. ( and wanting to keep the colors as they are a little different for a Christmas card with all the brown) 


I grabbed the box of Foliage dies and fished out this Memory Box Silverdale branch as I just love it. Cut it a couple of times from scraps of Strathmore 400 series watercolor paper and added some Daniel Smith watercolors to it real quick. The frame here is from Penny Black it really cuts the design into the base you are using so, then I used a Hero Arts die to cut the outside edge of the white for a "frame" found this printed paper in the brown hanging file ( which means I have no clue anymore who makes it sorry) and cut that with a hero arts rectangle die also. taped it back together on the back sides and trimmed it down to fit an A6 card front. ( which then I noticed it was off, I had cut too much off the length and not enough off the sides so, I kept trimming it and such as I went a long.) The Joy script diecut is an really old one from Memory Box and there are some random glue dots holding the berry branches on the cardfront. I might tuck a few more in later. I did pull the top right leaf over a bit so that it disguises the fact that there is not really a branch connecting the two diecuts. ( know what I mean?) At any rate, I love the colors of this one and may just make another. I hope you are all doing well. If you'd like to play along with us you can find this challenge here at Splitcoaststampers. Thanks for stopping by.

12.13.2022

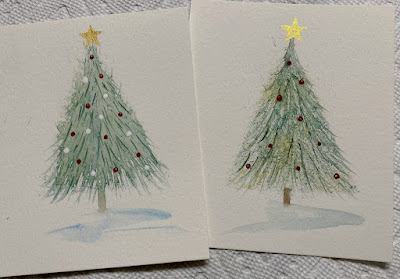
Watercoloring Splatter Trees

 This week Angie is sharing a tutorial that goes really quick for Christmas trees seen here on YouTube From Diane Antone Studios called "how to paint Christmas trees The easy way beginners watercolor tutorial Quick simple Xmas cards" 


I still do not have a toothbrush in my jar of brushes but, I did find this tiny stencil brush that seems to have fairly sturdy bristles so, I decided it would work. first layer of paint on two. ( Daniel Smith watercolors on Strathmore 400 Series wc paper) 


More paint with ornaments and stars on top done with some Coliro gold & silver set along with Windsor & Newton red. 


Finished these as A2 cards very simple, one postage stamp to mail designs and I really like them. I will probably do more of them esp. as a last minute design. The sentiment here is from the Stampin' Up Regal Reindeer set. Done with some Versafine Nocturn after the paint was dry in the Misti. That's about it from me, I hope you are all doing well. If you'd like to play along with us this Challenge can be found here at Splitcoaststampers. Thanks for stopping by


12.10.2022

A do - Over

 Jean has a recycle an old Christmas card into something new challenge for the Fallidays where you are to start off with a photo of your original card. And my original card, is actually one I made that came to me in the mail in 2016. (the original blog post is here) It was one of those simple things that, was one where as soon as you shoot the shot, you see the goof. ( I had the printed paper on the cardbase upside down from the hanging "Joy" diecut tag. And I had made this to be a filler card for the booth. And I must have said something to June about it, because I didn't know this at the time but, she always helped me do the booth and sold cards and such too. but, that year for Christmas this card came back to me in the mail from them. 

So, Jeans challenge was to recycle one. And I started playing with this tag thinking, ok you could doctor that up or something. and as I played with it, I realized the ribbon would slide right off that half the printed paper as it was just looped around the gatefold on the left side. 


 as you can see I have barely a square foot left to work in since the piles have grown around the edges of the desk as Fallidays continues.


I had recently bought this stamp on ETSY from Laddstamps ( seen here ) and when it came in the mail I had stamped off a few on scraps on the table then painted the leaves and berries. This particular one was die cut with a wonky stitched circle die from picket fence studios. So, I picked it up and decided to drag some paint around the edges in a wonky way since its not a perfect circle to begin with grabbed a box of previously die cut from cheap watercolor paper scraps box and started digging for flowers. Didn't find that but, did find some sprigs. Added some paints to those. I did have a diecut doily on the other side of the table I had been pushing around the other day making gift tags and used that for a backer to tie the hemp string to. 

I did end up pulling up the ends of the printed paper on the left hand side to tuck that vintage lace behind the glitter paper. Lucky me, I did it without ripping it. ( happy side not the bazzill and dcwv papers tend to have plastic in them, so they are easier to move things after the fact) ( which is handy when you glue things on upside down eh?) slipped the original green ribbon back on and just tied it into a knot this time, trimmed the ends and used some foam pop dots under the doily on the left half of the card so the panel does not wiggle much. And I think I will pop this back in the mail on Monday to them again. I am debating if I want to just draw a line on the liner and write a note across the other half of the inside or totally make it a new piece. I am leaning towards writing in the blank space so she can laugh about it too. If you'd like to see what all the fun is about with the Fallidays Challenges you can find them here at Splitcoaststampers to play along. Thanks for stopping by.


12.09.2022

Inspired by { The Spirit of Christmas}

 This week Kia has chosen a Christmas store called the Spirit of Christmas for the Inspiration Challenge and I happened across the Jim Shore Santa's. ( yes, I live under a rock and just seen these for the first time last month, where I bought two then) and so, I did get sucked into looking at everyone of them in the store and I loved the colors in particular of this Austrian Santa


I stamped this Annette Allen Watkins Santa from 1995 (the number on the side of the block is J1438) on a scrap of watercolor paper and proceeded to paint him with mostly Daniel Smith watercolors. ( the red is Windsor & newton) There is also some Dr. PH Martins bleed proof white over the top of the grey in the beard for extra texture. 

The sentiment here is from the Unity Stamps no limit to love set stamped on some scrap. The jingle bells I've had a while & all of mine are in a tiny bell jar together so, I don't know the mfg. info or exact size of them anymore. the red ribbon is Stampin Up' and the banner/bells are tied to that with some natural hemp string. The frame was done using a Metric Heffy Doodle Whimsically wonky stitched rectangle die that I cut the center out of the mat to make it a frame. This one finished out at A7 in real life. I hope you are doing well & I appreciate that you took the time to stop by. If you'd like to play along with us you can find this challenge here at Splitcoaststampers.


12.06.2022

Painting Gnomes

 This week Kia, has shared with us this video from ocean spice on doing 3 Christmas cards, and honestly I only watched the part of the video for the Gnome. and it kicked my behind good so, I never seen the other two options.

she is one of those people who makes it look easy, and so I decided I could do this, I started with a scrap of good Arches wc paper and did draw a line for where its feet would go, and mostly just winged it.

The hat bled too much into the beard area for my tastes, I do have this propped  up on angle so the paint can travel down. 


I kept adding paint to it making it worse and finally decided to start over with some ( cheaper) wc paper. Fabriano? ( something will edit) and did not use my fingers for the shoes on the second one either. but, I did use wet stickles crystal glitter glue and that smeared the paint a little.

So, I got him wet again and added another layer of paint trying to get something usable to post. The sentiment here is from the Stampin' Up! set called North Pole Mischief. The painted panel was cut out with a Simon Says Stamp wonky stitched rectangle die and the base is some Kraft and this one finished out at A2 in real life. Every time I added more paint to the hat trying for folds, I really didn't like how that was drying either so, in the end I picked up this scrap of gingham ribbon that was nearby, tied a knot in it and plunked it on the hat. that I like. and I laughed at my self. but, I am more into textiles as embellishments over loose glitter and such. I hope you are all doing well, and If you'd like to play along with us you can find this challenge here at Splitcoaststampers. Thanks for stopping by.


Painting Poinsettias

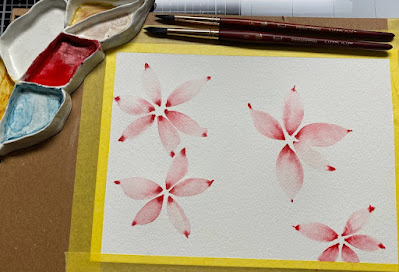
 There are fallidays challenges going on now, and I have more than half of them done, will work on more uploads soon. But, a few of them have a lot of photos so, since this card done for Holly's floral challenge has a gorgeous IC photo in the chat thread seen here. I decided I would do a blog post for the process. a little bit before I seen Holly's challenge I had come across this Painting poinsettia cards for the holidays from Creationsceecee on YouTube ( seen here) and decided to kinda do something along the lines using the colors from Holly's challenge and the transparent petals from ceecee's video.

first layer of paint, this is Windsor & newton red. ( its a real red shade for color, I am reaching for it a lot lately) 


 The greens are a couple shades from Daniel smith, one of them is called ocean? ( its sucha  shimmery color) this is wet.

And this is dry what I came home to monday after work. This one made it onto instagram.


Second layer of petals painted along with some gold dots to the centers ( which mostly faded and or bloomed into the petals) I did end up splattering this whole piece with Dr. PH Martins bleed proof white too before I cut it up, and more gold to the centers.


I decided that white space would work really well to tuck in a sentiment so, I did ink this a few times in the Misti because, the white splatter were already dried into that space too ha ha. the whole painted panel is up on foam pop dots. This is A7 in real life. Hope you are doing well & thanks for stopping by.


12.02.2022

Inspired by {Paper Heart Design}

 This week Julie has shared with us the Paper Heart Design's site and pinterest boards where I found this pin with the color combo that stopped me in my tracts. So I stamped this Penny Black Snowy Homes on Arches hot press with Morning Mist versafine ink.

This is like the third layer of Daniel Smith paints here I kept adding more to where I wanted the shadows darker and trying to lighten the sky, getting it rewet and blotting it with a paper towel ( which really didn't create a bokeh look, I think that must be one of those things you have to do on the first round of wet paint. So, I did keep adding water drops to the sky hoping they would break it up a little but, I really can't see it when they dried either. ( probably too small of drops)


A little more paint in a few crevices here and there is also slight amounts of stickles crystal glitter glue on the snow and snowmen. 


I am hoarding that sheer teal ribbon and so, when I do use a piece of it I want it to shine so I kept placing it both above and below the painted panel trying for a way to show it off and finally settled on one corner under and one over. I did use real pinking shears on the painted panel and then mini pinking shears deco scissors for the sentiment. The grey corrugate is from Die cuts with a view and the textured base here is Bazzill. This one is A7 in real life. I also uses a teeny micron pen on the snowmen faces and eyes. That's about it from me, If you'd like to play along with us you can find this challenge here at Splitcoaststampers. Thanks for stopping by.


12.01.2022

A Few Fallidays Projects

 There are fallidays challenges & tutorials going on now at Splitcoaststampers that started earlier this week and so far I have the first days challenges done and am still hunting for my gilding flakes to try the tutorial.

The very first challenge is to include a bird on a holiday card from Lydia. So, I chopped up some Arches watercolor scraps with these Poppy Stamps Whittle birds and Pine Wisps from the Greetery and painted them with Daniel Smith (mostly) watercolors that were on the palette. ( I did swipe the backsides of the sprigs as they are only glued near the stems.)


I knew I wanted to keep the background simple and I almost lost the birds in this design as the branches are so much large scale wise but, I am liking how this turned out. The background is an older Gel Print done from a fern clipping in my yard with Acrylic paints. The base here is PTI dk. Chocolate and finishes out at A7 in real life.

Next Up Dina has a color challenge that needs sweets and stripes to go along with it. So, out came this Cute Whipper Snapper Designs Ginger Berry Basket image ( I stamped it twice to paper piece the top one into the design on the bottom one and not cut out those bitty bows on the candy canes) It's painted with mostly Daniel Smith watercolors on Arches cotton wc paper.

And when I had red her challenge I grabbed my box of scraps and started die cutting a small pile of these tags from the Frantic Stamper Jumbo Merry Christmas tag die set (because, I love the stitching along the edge ) and it's size is nearly A2 in person. The berry basket panel was die cut with a Paper Rose lots of squares die and taped backtogether. The Joy is from the Taylored Expressions farmhouse sentiments set and I wanted to mat it but, didn't want a huge frame so I ended up using a paint brush to give the edge of the diecut a red frame. 


Lori has a white on white challenge with a subtle color sentiment. (not sure if aged patina is subtle or not ) but, the size of it is small enough that maybe it will pass. The pierced snowflake is a My Favorite Things diecut and the Merry Christmas here is from the Simon Says Stamp Joy To you and Yours set. same tag die, used a piece of Hobby Lobby crepe paper for the texture. That's about it from me so far, if you'd like to play along all the challenges that have gone live so far are here in this collection of threads

Thanks for stopping by.


11.30.2022

December Dirty Dozen Christmas Card

 Can you believe it is already crunch time for Christmas card making? I cannot, don't ask me where this last year has gone but, tonight I am loading my 12th sample for the Dirty Dozen Christmas card challenge where you can find this months prompt here in the special forums set aside for Splitcoaststampers fan club members. 


To Start with, I stamped this Annette Allen Watkins snowman K1240 with Versafine Clair Nocturn on some Neenah solar white. I figured it would not need much paint so, I could get away with using a heavy non watercolor paper for her.  I did laugh at my self after she was done because, I knew I had this tiny Endless Creations B88 sentiment and I realized after that I think she is a "Snow Lady" with that hat... Such is life eh? the painted panel was cut out with an PinkFresh studios blanket stitched rectangle die and is up on foam pop dots as the May Arts crochet lace is kind of thick. The printed paper is both sides from the same sheet out of the Maja Designs Christmas Wonderland set and This is A6 in real life on some Stampin' Up! Kraft cardstock. Just a simple one but, I do love how this turned out. I did consider adding some stickles glitter glues for bling but, felt like since the paper is a little rustic that maybe bling does not go over so well with that kraft look. That's all she wrote for this time, Thanks for stopping by.
11.29.2022

Re-Creating an Older Watercolored Christmas card

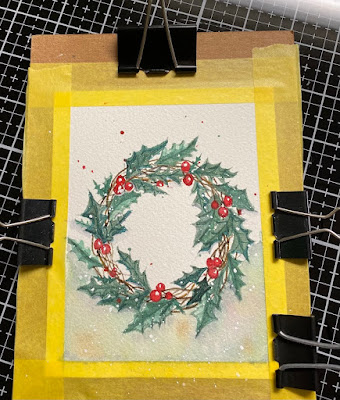
 It's my turn to host the Water coloring challenge this week. I recently came across this video from Emma Jane Lefebvre Re-creating my old Holiday Cards. And the gist of it is that she is re-doing some Christmas foliage she painted 3 years ago. And as I watched it I had assumed that I had painted those same things and I got all excited about seeing what they would look like now. ( the funny part here is, she has a really distinctive loose painting style that I mostly recognize as hers and I did Not paint that bunch of foliage, but I did play along with Linda's wreath challenge WCW072 last year in November and so, I decided to just roll with it and re-do the holly wreath from that challenge. My Original blog post with those mug shots are seen here. 

So first round of paints on Arches cotton watercolor paper with some Daniel Smith and Windsor Newton paints.


One of the things I have picked up along the way is using these binder clips on the edges of drying papers. I do take them off to paint when they are in the way and leave them on until its totally dry otherwise.

next round of paint, I did vary the sizes of the leaves and I realized painting this that I have not practiced holly leaves since last year so, that was NOT something I improved on learning ha ha.


Very recently we did some Christmas cards where the paint was blurred at the bottom of the berry branches and I just so totally loved that when it was done, so I decided to do it to this one too.


Using the clips to keep it flat while drying.


Tossed on some splatters the last round of paints and this is what it looked like when the tape came off, there was so much water doing the "blurry" bottom it leaked.

So, I trimmed it down in the paper trimmer and then ran it through a Spellbinders hem stitched rectangle die ( my absolute hands down favorite) and that I thought distracts the eye from the blurry paint line on the bottom. 


When you see it as a finished card. the cardbase here is something red from a recent Simon Says Stamp kit that came in the mail. ( not sure on the color name I only had this one piece so, it was sitting on the table to get used up.) The sentiment here is from the Stampin' Up Set called Many Merry Messages its stamped with Versafine on Neenah earthstone & cut out with a Simon Says Stamp sentiment strip die. 

That's about if from me, I hope you are all doing well. If you'd like to play along with us you can find this challenge here at SCS. Thanks for stopping by.