1.31.2018

WOYWW #452 {Backgrounds & Ornaments}

Happy Desk Peeking Day! To play along and or see more
 this hop starts here at our hostess Miss Julia's Blog.

 If you had walked up the stairs after work on Tuesday, plopped down your coffee ( tall grey travel mug, well its got to be 5 am somewhere right?) and pulled your phone out of your pocket to take snap shots this is what you would have found.  I had spent some time Sunday and Monday afternoons heat embossing a few background stamps on some 140# Mixed Media paper and adding some color to the resist with distress oxide inks.

 a closer look to the left. I did jot down notes on the scrap edges of the sheets because, if it takes me a while to use these I will no longer remember the stamp name or ink colors. (true dat)

 and on the right. what you cannot see is how many background stamps that are piled up on the file cabinets to keep going with this project. ( but, the mess I hit my limit so, after these were shot I cleaned) and got a sample done for next weekends Inspiration challenge coming up and then remembered I promised to shoot the snow in the daylight.
 so I grabbed the tree off the coffee table. ( no more ornaments were made since last week but, I have 5 weeks to get this done and the stuffs wrapped)

 This is all three layers of the snowflake dies in an aqua blue shimmer paper with some neenah white.

This one is Neenah white with some silver glimmer paper (the glimmer papers are a pain to cut because, they have this like clear film between the glimmer part and the paper backing ( kind of like foil papers if you know what I mean) so, this one I did poke a lot of those holes in the silver die cut with a needle and sharp scissors. so, I probably wont use the glimmer paper for intricate dies anymore but, it does cut. the sentiment on this one is from Tim Holtz.
So, that's about it for me thanks for stopping by.

1.30.2018

Dainty Tea Cup

 This is how that Sizzix Tea Cup 3-D die turns out ( on the right) The papers used here are from Authentique. the little cream resin flowers are from Tim Holtz The lace is vintage. This is not quite big enough to hold a gift card unless you tilt it catty corner inside of the cup. and even then it will not go all the way to the bottom of the cup because of the shape of it. ( that is OK) it is bit enough to hold say tea bags or little treats, earrings, cash. that kind of a thing.


on the card version of this that background was cut with a lil'inker designs leaf pattern coverup die. I did ink the edges of the teacup on the card with an antique linen distress oxide pad. The sentiment came in the Hero Arts November 2017 my hero kit. that tag was cut with a pinpoint mainstreet tag from Poppy Stamps. The tag on the tea cup handle is part of that sizzix die that makes the cup.

1.28.2018

Embossing Resist notecards

 This week's featured stamper is Karen and has this neat card that I have admired for a long time in her gallery and I thought well why not... so, changes were the stamps, color and I moved the sentiment down the card and switched out the pearls/pop dots for sheer ribbon. ( all of these cards are A2 in real life. ) For this one I heat embossed the SU fern lace background on some 140# strathmore Mixed Media paper and then scribbled some oxide distress twisted citron and peeled paint over the top. I swiped it with a baby wipe trying to get the clear embossed parts "clearish" again and it felt like it was making the card very pale. The sentiment on this one is from Impression Obsession and has been laying on the table for a while now.

 Same background & embossing powder with some broken china and pistachio oxide inks topped off with an Inkadinkado kid quote sentiment. again just really simple. this one is more like the colors of Karen's card.

 And since the mess had already happened. I ended up making 4 more backgrounds which became these two cards with 2 for the someday pile. this one is Ocean tides with cracked pistachio oxides over the top of some Ranger Verdigris powder. The background on this one is also from SU called fine lace. The sentiment is from Two Lips stamps.

now this was the very last one I tried also with the fine lace background and after I had swiped on some Candied Apple and spiced Marmalade oxides, it really faded into the lawn fawn rose gold embossing powder... so I swiped more ink onto a craft mat and dunked and drug this through the puddles. and wiped it with a baby wipe. and you really cannot see the embossed pattern except when its tilted just right, it lost the contrast. so, I probably won't do it this way again. ( depends on how long it happens before I emboss a pile of backgrounds again, I tend to do a bunch at once and it's very possible I will forget I didn't like this one haha. ) It probably would have been just fine with clear powder. That sentiment is also from Two Lips Stamps.

1.27.2018

Inspired by {Needlepoint.com }


So I have had this Unity Stamp set called the other side of fear for a while now and it has never been inked and when I started poking around in the Needlepoint  site I came across this fun Whale wearing a red Santa hat and I thought oh, if you do those flowers red... and it went from there. I  just rubbed some distress oxide inks onto the cardstock with foam pads, colored the whale and ship with markers and then added some shading over the top of it all with pencils and gel pens for sparkle and pop.

 A closer look at the whale, I did try to keep him that green-ish color and I added slashes of water to the "water" part of the card trying for that snowflake effect from the piece. the Bottom of the card is some aqua colored textured paper from Micheal's that kind of looks like some papers I had a long time ago from provo craft. it has an almost fabric feel to touch it. I cut it with a My Favorite Things Homespun stitched lines die and ( used scissors on the top edge to cut it, the die just makes stitching lines)
That's about it for me, we actually woke up to measure able snow this morning and ( it wont last its supposed to rain today) but, it all looks so white and magical at the moment and it's nice to have the time to enjoy it ( that it happened on a weekend) :) thanks for stopping by.

1.24.2018

WOYWW #451 {Happy Mail & images}

Happy Desk Peeking Day :) If you'd like to play along or see more
this hop starts here at our hostess Miss Julia's Blog.

ha, you remember how I said I Ordered from Poppy Stamps on boxing day right, I laughed and laughed when the package came... it came from Birch Press ( which is part of Memory Box just like Poppy Stamps is) anyways this is what I did spend part of that gift card on. the top layers make a gorgeous snowflake and the bottom row builds to look like this. ( see below I did cut some)

 I did not shoot the snowflakes yet, I had this "bright" idea that since our son has been deployed the last two Christmases that I would make paper ornaments for this tiny fake "Easter" tree I picked up in a hallmark cardstore a long long time ago and set it up in his room before the next time he gets leave so, I started making ornaments for it after this card and I have not quite enough but, will shoot it soon. ( it's too dark still this morning to do it)
and then after that, I got side tracked by the idea that I wanted to color some things that were not Christmas images... so I dug out some spring/bunny things to color and stamped those off monday night and left them out to dry so, this is what I walked upstairs to on Tuesday after work.

 So on Sunday AM Mary's little lamb had two boys. (that is what hubs named that particular Ewe when she was born since he had named her mama Mary lol)

That's about it for me Thanks for stopping by!

1.20.2018

Inspired by {Frederique Morrel }

Good Morning, its my turn to host the Inspiration Challenge at SplitcoastStampers this week. and I have chosen this online art gallery belonging to Frederique Morrel.
The entire site is filled with mixed media pieces done in various shapes with scenes and pops of color inside of them. Knowing that I fully intended to stamp a plain bunny shape and then build a scene in it haha. and when I started looking at my dies for something else I thought you know, these would work really well since they have the blooms built into them already.  I have been recovering from being ill and feeling a little bit lazy. :)
 
 
 Both of the piece I made were both inspired by the Bonny Bunny form seen below. this one is more focused on the colors and the mixed media more so than the bunny shape it self. that bird is a die from Simon Says stamp called Bird of roses and I cut it from some recollections red glimmer paper. the mixed media behind it was originally a sheet of kraft cardstock that was in the bottom of my ink catcher cardboard box and then it looks like at some point it had some poinsettia's stenciled over that and then some crackle paste over the top. ( sometimes when I want to try something I try it on these sheets. there is nothing to lose right) so, it then sat in my scraps bin on my table since that point. and as I was looking at the IC piece the more I decided the colors would really work for this.

 The finished card, I kept the pop of red, all those greens, the black framing and left it simple.

 This one was done mostly because, I really had it in my head to do a bunny card and then I found this die ( from wild rose studio called bunny love) and just decided OK its going to be real simple but... I like this one. the sentiment is from Hero Arts ( as is the one above) the color was added to the swirls with an aqua brush and that stitched wood grain die is from Lil' Inker Designs. this one is also A2 in real life.


the piece that started it all for me I love the combination of the stitching, the fur, the vibrancy of the reds and so. I hope you enjoyed this and thanks for stopping by.

1.18.2018

Kissin' Toads

 The first moment I seen this image go through one of the Penny Black newer release emails, it hit high on my wish list... so, one arrived in the mail last week and I stole some time to color it over the last few days. the frogs, stump, mushrooms are all prisma pencils, the girl's base is copic markers with pencils over the top. tiny bit of white gel pen on the frogs eyes.
when I was done I had to smile, her hair looks a great deal like my auntie Vivian's. :)

The sentiment I stamped and diecut a long time ago, so this particular font in this sentiment is not in my evernote inventory as of yet, so if you recognize it please let me know. I do know that is NOT the one from the old SU set called classic captions, that set that had the Mona Lisa and a Gibson girl with this sentiment had a typewriter font on it. Anyways. the color challenge this week is two shades of pale pink with green and so when I started this it was with the intentions of doing something for that and then all the browns, yellows and orange came along and I tossed that thought out the window. :) thanks for stopping by.

1.17.2018

WOYWW # 450 {loot & a mess}

Happy Desk Peeking day, to play along with us and 
see more spaces the link up starts here at our hostess Miss Julia's Blog

 Last Wednesday night I went down for the count with a flu bug that is lingering, or rather I have now caught someone's cold on top of it. (gross and tmi I know sorry) but, there really hasn't been much to show. so over the weekend I did unpack the box of Christmas goodies from Papertrey Ink. ( I have multiple gift cards and I have not spent them all as of yet) one used at Poppystamps on boxing day shipped yesterday and should arrive sometime this week.

now, this was a oh what is that word. impulse buy I had seen an email from scrapbook. com that they had tossed these Misti tote bags into their clearance section. so, out came part of the Visa gift card, the snowmen were also on clearance and the kissing frogs was just a little bit on sale but, what the heck. I am coloring it now. ( well, I started to last night anyways) The bag has three sections and lots of zippered pockets and such and I think this is going to be really handy for taking things for on the go type coloring type projects. I am not really an on the go stamper but, I will color anywhere there is enough light.  Sometimes I will cut die cuts at work instead of color or read. things like that. I very rarely go out to eat for lunch. and we have a portion of the day in the office that is just
 hurry up and wait. (on my husband who is waiting on customers ha ha)

This is what my desk looked like Tuesday afternoon before I started coloring the frogs. the art panel I remembered to flip upside down just before it was shot. ( its going to be an inspiration sample in a couple of weeks) The sentiments were ones I had tried out on a previous card and then decided to do some extras and they have been sitting there drying for a while ha ha. so, that is about it for now I am hoping to get the sample finished in the next day or two but, I will be driving all day for work today so, it may be tomorrow before I start making the rounds. thanks for stopping by! :)

1.16.2018

Featured Stamper CASED cards

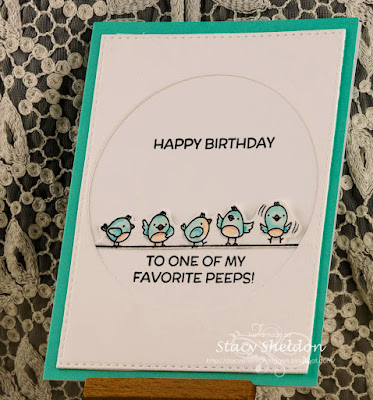
 A week or so ago the featured Stamper challenge went to Tracy's gallery where I found this Sweet card and loved it, I needed a Birthday card for my mom who spends a big chunk of time peeking out her windows at the tweety birds she feeds so, I thought this was a perfect one for me to pick for her.
so Changes were to switch the stamps, flipped it to an vertical A-2 card from a square and made the aperture a circle. My card was done from my scrap bin believe it or not I had stamped the birds and cut them out with scissors and was messing around trying to decided how big of a window hole they would need. ( they are taped to the backside of the top circle framed piece) and they fit in this, so that was handy. :) Her birthday was yesterday and I mailed this a week ago so, it should be safe to post it now.

 A closer look at the Your Next Stamp birds. These were colored with zig clean brush markers and have a little shading from polychromos pencils.

This week's Featured Stamper is Lisa where I found this gorgeous snow card that I loved every detail. and I have been fighting off a flu bug and really wanted to play so, I thought if you go more simple maybe maybe. changes were to flip the snow print to the bottom and the smooth to the top, and to make the layered snow a snow cup. other changes were to dangle the sentiment off the handle and to keep the layers of diecuts flat. there are no foam dots between layers or gems on my version of Lisa's card. That cup/snow is from the Penny Black what's in your cup die set and the sentiment is a really old one from Savvy Stamps. The border on the vintage cream was cut with the concord & 9th select a size border die and the tag die was from a set spellbinders made for justrite a long time ago. Anyways, I am feeling better every day just that lingering tired thing is continuing. Thanks for stopping by!

1.13.2018

Inspired by {Uncommon Goods}

Today the Inspiration site was chosen by Angie to head to the Uncommon Goods store. Where I found so many things that would make awesome gifts for people in my life, if only they had not hit their personal clutter limits haha.
So, then I started looking harder at things I could CASE easily as cards and there were quite a few things I have saved. but, the winner for me this week were these real map Hearts. ( see below) 
I fully intended to do mine from vintage maps because, those were the colors I was drawn to most on their choice list and I spent some time Tuesday afternoon poking around for them, ( could not find where i hid them) and found this unopened pack of printed papers from Stampin' Up. ( I am not sure what it's name is but, it has black and cream text papers, maps things like that)
 So I used that Hero Arts infinity heart die to cut a heart from one sheet of the map print and one of a book page print and ( cut them in half) so, there were the drop pieces... and I ended up with two cards. The bases on both of these are Papertrey Ink Vintage cream. the sentiment on the top one was from a Tim Holtz 2017 stamptember set. the inking on the printed papers is Oxide broken china. the square frame is a drop piece from some other previous project. (I'd have to look for the die) and the enameled brad is unknown. ( all of mine are in a canning jar together all mfg's) This one is 5 1/2" square in real life.

This one that sentiment is a two piece die from Technique Tuesday from Ali Edwards handwriting. it was cut eons ago when it was new to me and the base is Kraft, the top was cream but I rubbed some of the broken china on it also to give it that vintage map colors vibe. This one finished out at 4 1/2" X 6" in real life.

Inspired by piece. they use real maps for their art. I thought it was very cool especially because, today is Angie & her hubs Wedding anniversary. I think this could translate into I miss you cards very easily also and may do that somewhere down the road. Thanks for stopping by!

1.10.2018

WOYWW #449 {Curious Cat}

Happy Desk Peeking day, if you'd like to play along or see more spaces the link up
 happens here at  Our Hostess Miss Julia's Blog.
This is the card that created the mess on the desk. 
 and what I have noticed about my blog is, if I click on the first picture in a post. it will not open up larger for me like the other following photos do. so, I decided to pop this in first rather than at the bottom because, I am guessing you can see all the details at this size. this card is 3" square in real life. Judy has this crazy challenge of choose one of these and one of those and its a laundry list. so my choices ended up being. Burgundy & black ( you got one color and one neutral), you had to have a background technique. ( polished stone on yupo), you could have a one word sentiment ( memory box die) you could have one texture ( black cord) you needed one embellishment ( darice gem) and it could only be ATC, Tag or 3" square when you were done. (that kitty is called large curious cat from Poppy Stamps and it was RAK'd to me a long time ago from Janice, Thanks Chickie!)

So after creating that bitty card on Monday after work, this is what I came up the stairs to on Tuesday after work and I cannot show you yet what I did then because, its for the Inspiration Challenge thread that does not go live until Saturday. So, there is not much to see the things that were used on that card some were still out and it did not take long to put them way and start playing again.
so anyways, I almost had a Christmas order come but, they decided to take it from UPS to the Mail yesterday morning so, it will not arrive until today sometime. Thanks for stopping by!

1.09.2018

#yougotthis!

So, this was a hard one to do just because, I don't know about you but, the whole time I am making cards I am thinking about the person ( or a person ) when I buy the stamps or make things with them. So, this particular card was done for a lady I know whose college children were passengers in a vehicle that was hit by a train just before Christmas. ( they are all alive!) but, her daughter was in the front seat and spent a while in a hospital and was recently moved to a rehab place ( she has a brain injury) and so the whole enormous OMG OMG thoughts were just rolling through me while I was making this one.
I have been waiting to hear that it was received but, I mailed it to her mama's house and I think they spend more time with her at the place than at home so. at some point I may ask if its OK to include her for a teapotter destination but, in the mean time. Hopefully it will bring a smile. I have heard she is trying to rush her recovery.
Her son was in the backseat and physically was in much better shape.

The daisy's were from an Club Scrap set called Oopsie Daisy. the banner sentiment on the cover and the hashtag on the inside were from a Simon Says Stamp set called you got this and the top inside sentiment is from Pretty Pink Posh ( thoughtful greetings?) something like that.
anyways just a simple one. thanks for stopping by.

1.07.2018

A few more Christmas & Winter Cards

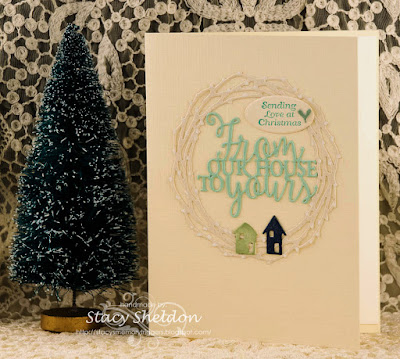
 This one was done as a Featured Stamper case of this card in Heidi's gallery a few weeks ago. I had changed the theme from stamped autumn to diecut Christmas. The Wreath is from Hero Arts, The center diecut sentiment is from Sue Wilson Creative expressions line and the tiny houses are from the Memory Box Tiny village dies. the stamped sentiment is from Justrite's deck the halls set.


 This Was done for a color combo challenge that was garden green, cherry cobbler and silver... the tree is a die cut from Taylored Expressions called trim the tree, the sentiment is from Unity stamps.


 This was done one day just messing around with a marvy snow marker. ( you heat set it to floof it like liquid applique) only it stays white instead of turning cream colored.
The deer I did scribble some pencil on to make it slightly darker than the kraft tree trunks ( that is one die from Memory Box called Deer in the tree's.

This the sentiment was heat embossed with some liquid platinum Powder on cream and the tree is that same trim a tree die from TE and this whole card base with those glitter framing ( and under the sentiment) was something I did for a VSN challenge ( years ago) that I really was unhappy with. ( it was a sparkly sympathy card) and so, I took the with sympathy off of it, and there really was nothing wrong with the card ( it didn't say rip or tear) and I have a pile of these stamped sentiments ready to go and noticed it fit that center panel perfectly and thought what the heck. at least the whole card did not end up in the bin.

1.06.2018

Snow Scenes


So, there is a Challenge this week for the ways to use it, to use something "new" and I have this ( its pretty big) Dressed in Snow stamp from Penny Black. ( this was stamped on 5 1/2" and 6" pieces of blue paper) and trimmed a little bit with dies. The Christmas card challenge ( which is more like a goal list) has January with add a silhouette to the scene/card/design... so, I tried most of the bitty deer and critters I have from Hero Arts and most the scale just did not work but, I decided this sledder did. (it's from the Winter Silhouettes set) This I did do in my Misti and inked all the scene's twice. Then I added some simply white nuvo drops (more like sketchy lines) to the tree branches, fence and snowline. and let it dry over night. Then I added some clear wink of stella and after the sledder was stamped on white and cut out with scissors I added a sprinkle of white gel pen to the very bottom of the card for some more texture to the drifting snow. 
 A closer look at that.

 This was actually my first try at this, I need a few Birthday cards this month and hubs likes this one well enough for his dad so... the scene was stamped on thin printed paper for this and I did not want to get it too wet. the sentiment is from the Altenew beautiful inside set. This one I trimmed the scene down with the waffle flower stitched square die.

This one uses up the other half of the bashful blue sheet I had cut for the second (dashing) card and also has the same steps as the others above. They are all 6" square in real life.

Inspired by Design Sponge

 Today Julie sent us hunting inside the Design Sponge site for inspiration where I came across this article about building fresh wreaths. It was more like a refresher for me, I have done this in the past but, tend to choose to support highschool kids who do it on the local level now a days. This was shot just messing around, I thought about making it the blog header for a while and then, its been so many years since I have changed that mug shot I forgot exactly what Godelieve told me to do to make that happen. So, that's OK I am just sharing the toy scene with you anyways. the little trees were all picked up after Christmas as was the metal sleigh ornament in clearance bins because, my Amy Tsuruta fan girl is showing hahahaha.. did you notice all the little tree's she shot in the background with her Christmas cards this year? every email I seen them in I thought, I love that! :) and so, when I seen some I decided to rescue them and bring them home.
 This wreath die is a brand new one for me from Kaiser Craft, its called Christmas Wreath, I did cut it twice here once with the copper shimmer card and the green shiny card and layered them. the dots are Nuvo drops autumn red & simply white. The sentiment die is from Sizzix. and the printed wood grain paper was a scrap so, ( I forgot already sorry) this is 4 1/2" x 6" in real life.
A simpler version. this was actually the first card I made trying this out and then I thought oh, do another it looks good and came across the woodgrain and liked that version best.
It's also A2 in real life.  So, that's about it from me for today. Happy Saturday! & thanks for stopping by!
1.05.2018

A few Sympathy Cards

I recently remembered that I sold most of my sympathy cards in November and had since forgotten about that so, This was an attempt at a catch up on those and to try and keep postage costs down make them a little flatter ( no lumps) 

The printed papers on this one are from Die Cuts with a view and the darker cream is an opal stardream shimmer card. the lace is vintage and this one is 5" X 7" in real life. This sentiment is an older one from Stampendous.


This is a newer one to me from Unity Stamps, its an Itty Bitty and the striped print is from DCWV and the mat was a scrap so, I don't remember who makes that one but, this is also A7 in real life.

This sentiment is from Our Daily Bread designs, its up on foam pop dots as the velvet across the print is pretty thick in real life. the printed paper is from Authentique. This one is 5 1/2" square in real life.

This one the velvet flocked print is from DCWV and the sentiment is from a clear set of Sympathy sentiments from Impression Obsession.


This Psalms is from Our Daily Bread Designs, the printed paper I have forgotten who makes it and the felt ribbon is an older one that I found at Micheal's one year at Christmas.


This the printed paper is an older one from Basic Grey, the lace is vintage and the sentiment is from Stampendous. It is 6" square in real life.


That Unity Sentiment again, I think I will get a lot of use out of this one for later down the road cards.
I have forgotten on these printed papers.

This is the one I actually mailed out the poppies although not red are for remembrance right? the sentiment on the inside and out is from the Altenew Beautiful inside set. the flower (Crafters Companion Sheena Davis) were done with the vintage watercolor technique that Heather shared a while back.