11.30.2021

Watercoloring Christmas Tree's

 This week Kia has shared with us a Christmas tree with glowing lights tutorial seen here on YouTube


This is a trio of Tree's stamped on Arches 100% cotton cold press wc paper. the tree in the top left is a Penny Black tannenbaum stamp done with Distress Oxide, I did stamp this with the Misti and I was totally OK with it being such an partial image knowing I was going to need to add the detailing with the paints. the tall skinny tree is an Norway Spruce from Impression Obsession. one three was done with Distress Oxides and one was done with Versafine Clair.  So, this was the first shot with some Daniel Smith masking fluid drying on them. 

One of the things that I really loved about how these trees look in the video is that whole glowing sky thing going on. and I do not know what Indigo paint they used but, mine has a definite navy type tone to it more than the brilliant color in the video.  So, this is first round or paint drying views.

I decided to keep the tree done in the Versafine ( since all the branches were more defined on it) as just a snowy tree rather than a Christmas bulbs covered tree. this is maybe round 2 or 3 of paints. from Monday night. ( I did give my self more time knowing it is taking the paint a lot longer to dry here now that the heater is on.) 

today after work I did remove all the masking fluid, I did add more white gouache over some parts of that exposed paper. and also, all the painted panels on these are up on foam tape. 

This one I finished off as A2 and its on a shimmery green cardbase from Joanns. The sentiment here is from the Tim Holtz great outdoors set. 

This one finished out at a 4" x 9" slimline. The sentiment here is from the Mama Elephant holiday messages set. 

This one is the same size, and the sentiment on it is from A Muse. ( it was a single wood mounted stamp not from a set) You can find this challenge here at SplitcoastStampers to play along with us. Thanks for stopping by.


Inspired by {The Jolly Christmas Shop}

 Last weekend Amy had us looking at the Jolly Christmas shop where I came across these chickadee ornaments and decided to use them as a color cheat sheet for these Penny Black birds cut from some Strathmore 400 series watercolor paper.


These have some Daniel smith watercolors on them. and eventually I added some silver to the highlights on the berries. 

one thing about this, the colors are all wonky. that is on Neenah earthstone cardstock. the frame is a My Favorite Things frame and the two on the left have some white gouache "snow" splatter as the liquid glue I used on the branches decided to leak a little and although it dries clear it also dries SHINY. so.. I eventually added snow splatters to the ones on the right but, I never got around to photographing that. 

My space is a wreck at the time this was shot so the table top with the over head lights was about all I could get to. You can find this challenge here to play along with us. Thanks for stopping by.


11.24.2021

WOYWW # 651 {new Work desks}


Happy desk peeking day, if you'd like to see more spaces or play along 
the link up for this blog hop starts here at our hostess
There is also a new Instagram hashtag of #WOYWW
 

 So I did a thing on Sunday afternoon. found these work benches made for guys garages at home depot. ( and two of them followed me home) which if you could see the rest of the room, it now looks like an episode of hoarders wannabe special. (all the storage that used to be under the shelves, and under the plastic desk and all the metal filing boxes are all downstairs waiting for a coat of white paint. so there will be before and after shots later. that card on the end you can find the details about it in the post before this one. and the booth shots are here. Stay safe out there and thanks for stopping by. Happy Thanksgiving to your families if you are celebrating this week.

11.23.2021

watercoloring a winter scene

 This week the water coloring tutorial is doing a winter landscape with people walking through the snow down a tree lined path/road. I traditionally start making my own to mail out Christmas cards on Thanksgiving weekend and I looked at this and thought, OK a lot of people will have the long weekend to play around with this perhaps. The tutorial video is on Youtube here.


 So this was first round of paint late on Sunday night while it was wet.

I did pick up some new masking fluid ( Daniel smith kind this time around) and it was more liquid like for using.


next layer of paints. I had used the Indigo & burnt Sienna from QoR paints and the Moonglow from Daniel smith. The trees are a mix of Indigo & burnt sienna and after a while I added some Daniel Smith Sepia to the mix. the white gouache is from Windsor & Newton. 


After the masking fluid came off on Monday night. I did add some white gouache splatters here. 


an angled shot, the sentiment is from the Tim Holtz cozy Christmas set. it's stamped with Versafine on the drop piece of Neenah earthstone. 

The watercolor paper is some strathmore 400 series as I had tore my room apart on Sunday afternoon before I started this painting and I hid my paper trimmer from my self, so this was off a sheet that was maybe 5X8? I tried to tape it down a lot so that it would fit an A7 sized card front. ( which it does) the painted panel is up on foam tape. You can find this challenge here at Splitcoaststampers to play along with us. Thanks for stopping by.


Shepherd's Market 2021


This year I had the bright idea to put the check out table into the center of the space with a couple of small suitcases on it. (which cut down on some of the I am using your booth as a shortcut to the exit situation) 

This booth is 12' X 12' and so, there is room for people to stop and read cards without being run over in the isle by strollers and such.

The other wall. there was more space as we used a plastic tv type tray sized table for the check out.
These were shot friday am just before it opened.

and yes, I had a mask on. ( they mandate it here) but, the majority of the people did not.

The first raffle gift I donated to the school. I did a second one on Saturday AM but, inside a gift bag because, I did not have a second basket on hand. 

and I made the decision that 12 years was a good run with this, and I am going to retire from doing the booth sale. Its kind of a bittersweet thing as I "finally" got into the gym 4 years ago (this booth started in the hallway near the front doors) and I am pretty pleased with how the display looks. But, its time. 99% of the people who buy my cards also know where my office is and are comfortable going there to poke through them to find one. So, I am looking forward to being "retired" from it haha. Thanks for stopping by, stay safe out there.

11.19.2021

A few more 3by3 notes


Colored with Daniel Smith watercolors and each of them have some clear stickles glitter glue on them too.

these were done on Wednesday.

it was faster to shoot them like this every time the table started getting crowded but, they really do not look so good to me as cell phone shots here. 

and that concludes Wednesdays batches of notes.


with a few more from after work on thursday before we headed down to the school to set things up.


11.17.2021

WOYWW # 650 {painting & tags}


Happy desk peeking day, if you'd like to see more spaces or play along 
the link up for this blog hop starts here at our hostess
There is also a new Instagram hashtag of #WOYWW
 

 What my desk looked like before I went to bed last night. The newest addition to my painting "tools" the wood thing is actually a soap dish to hold paintbrushes on, I have been putting them on the paper towel but, sometimes they roll and then I get a flat spot so, this keeps the bristles off the table.

what the coffee table across the room looked like last night.

Simon Says Stamp holly tag dies from scraps with clear stickles glitter glue on them. the tiny tags are the smallest size in the poppy mainstreet pinpoint tags set.

Spent some time peeling cardboard last weekend from a package that came in the mail and did a few primitive tags ( Sizzix die) the cardboard ones I traced around the hole in a drop piece cut from the kraft cardstock and cut those out with scissors to not smoosh the ribs. 

various scraps and dies and I will edit later if there is something you have a question about.


These were done to tuck gift cards in for Thanksgiving for people at work this year. ( Sizzix card, tag die) the embossing is an anna griffin slimline and the acorn is an PSX cut with scissors the sentiment is from Unity Stamps.


while that die was out cut a few more from scraps. 

Lee has a fallidays challenge to do gift card holders... the pine embossing folder is a slimline sized one from Altenew and the Poinsettia one is from Nellies Choice. I left off sentiments on these.


The bits and pieces for these snowmen were already cut and embossed so, really all I had to do was glue and add the sparkle. the size 8 shipping tags were run through the big shot in an Anna Griffin snowfall folder. and inked over the top with salvaged patina.


these are little 3" x 3" done using scraps and stickers and what ever was laying around. 

The plan was to do a few more with last minute stamps that arrived in the mail. so, we shall see if it happens tonight. I have to finish that painting at the top of the pile first as we set up the booth tomorrow night after work and I will be there Friday and Saturday at the school. if you hit the home button it will show you previous posts with more photos of tags and Christmas cards and such if you are curious. I may not make it around anywhere this week either. Stay safe out there and thanks for stopping by.


11.16.2021

Watercoloring a Luna Moth

 So, who knew there was such a thing? ( not me ) I have to tell you this could very well be the hardest thing I have painted in this weekly challenge tutorial to date. I think its mostly a mental thing. I know this is a "real" critter and since I have no idea what it really should look like and the video was hard for me, I did watch it over and over and I painted and blotted over and over. ( So, I have a green paper towel to show for it lol) 


We will not discus how long it took to sketch this. and I knew there should be white highlights and I decided to use this silicone tipped brush with some Windsor & newton masking fluid. and truthfully, I should have practiced that step a million times. it went on gloopy and too thick. but, I decided that it was just a practice notebook so I'd press on because, it took forever to sketch said moth. I did use some rare green earth on some of the pencil lines before I did the masking fluid. ( that may have been the first mistake. it turned out to be a much darker shade of green then all the others that came later.)


what it looked like after the first two or three layers of paint that had multiple steps of blotting going on.

Next layers of paint, was trying to get that darker overlapped wings darker section. the shades of green were just not right. ( well not much like the video anyways) I think this may have been the time when hubs took a glance and said oh, you did a butterfly with frog legs. yeah.

On Monday more paint went over the top. along the shadow edges. not sure. tried to do some of the white feathering but, it mostly just bled into the painting parts. 

later Monday night I really thought I was done with this, tossed the brushes I had been using into the shot and walked away.


Tuesday evening came along and found me adding yet another round of paint and blotting. I think I would be happier with this if I knew more of what I was doing. So, it had a steep learning curve. I assume sometime I will smile later down the road the way the pages of c curves do now. That's about it from me, you can find this challenge here at Splitcoaststampers to play along with us, thanks for stopping by.


11.13.2021

A few Christmas cards


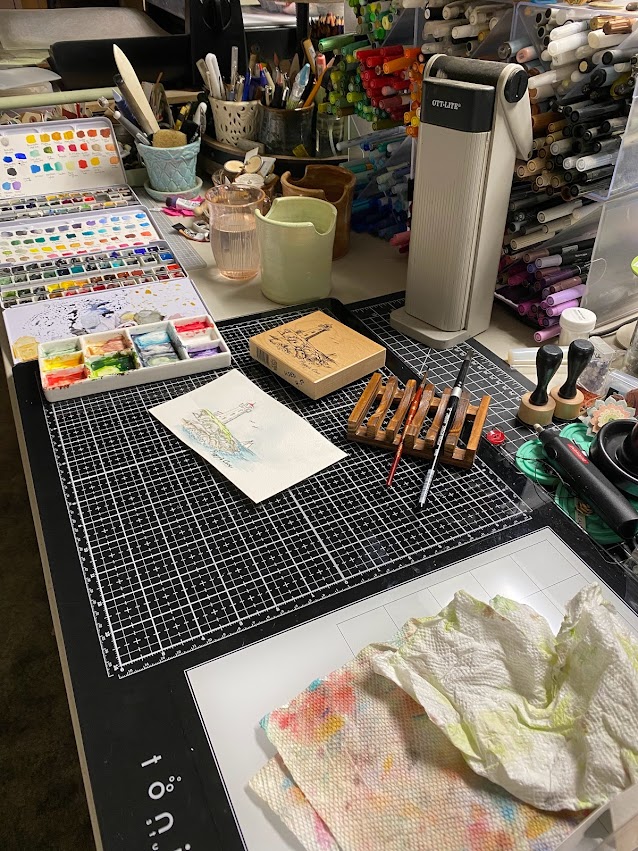
This was done totally inspired by this umbrella after my brain focused in on the upside down bird on the line. So, I just flipped this paper upside down after stamping the bird and I started out using colors similar to the umbrella and then once I got to the Santa hat I started going darker. added in some squiggles of paint to the body for feather movements. There is some stickles glitter glue on the hat trim also. This one is A6 in real life. The sentiments from Riley & Co. and the bird is from Woodware's fuzzy robin line.
 

Now this was done jump started by the October dirty dozen Christmas card prompt. the tall leaf is a Simon Says Stamp die etched tall leaf, and the shorter eucaluptus is a stitched one from paper rose. these have watercolor paints on them. the texture panel (TH engraved folder) was inked and cut in to strips to layer. this one is a full sized slim line 4X9.

This Emerson chick (American Art Stamps) was a gift from Hubs as he has been seeing me collect them lately. so, I colored up a couple of her and did two versions. the sentiment on this one is from Hero Arts.

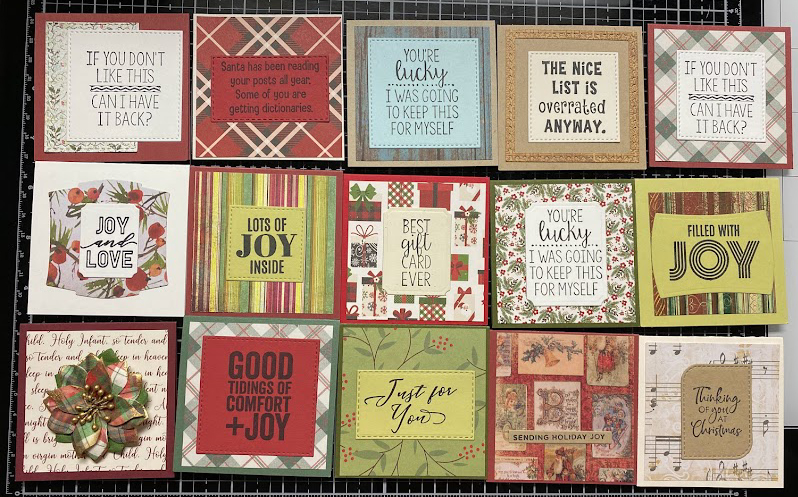
The sentiment on this one comes with the image.

this was done from scraps on the table the white parts were cut from watercolor paper and the sentiment here is from the Simon Says Stamp fa la la set.

This one the dog is from Impression Obsession ( baxter) and he was painted with wc paints. and this was done after seeing this cute card inside Ema's gallery when she was featured stamper this week. the Sentiment here is from Stampendous. 


This old Elyzbells stamp was dug out after seeing Jocelyn's card here when she was Featured Stamper. the sentiment on this one is from the Simon Says Stamp Joy for you set. 

Now this was done because, I bought this pad of Memory Box printed papers and thought really you could just let it shine ( so added stickles to them) and silly sentiments. The sentiment on this one is from Impression Obsession.

The Sentiment on this one is from Our Daily Bread Designs.

The Fallidays tutorial on November third is a disappearing 9 patch from scraps project. (tutorial seen here) So, I ended up using deco scissors to trim the outside edges of the mat I gave mine and they don't cut completely anymore after all these years so, I took the point of some other scissors trying to "fix" the cuts, and after a while just grabbed some Antique linen distress Oxide to color dust along the edges. The holly here is a sticker that has an almost "felted" texture to it, it was a gift from June for my birthday this year, it came with some Poinsettias in the pack too from Hobby lobby. The sentiment here is from Tim Holtz great outdoors set.

This I finally finished from earlier in the week, I did add a smidge more paint to the bottom right corners of the top to bulbs to mimic the shadow I gave the bottom bulb when it was wet. The sentiment here is from the Altenew Holiday tag sentiments set. I added more of the white gel pen in a few spots where it was more of an outline rut from the first time around too.

This week Kia has us looking at the Putti fine furnishings for inspiration and I came across this metal tree.  And I had seen that Lydia has her first Fallidays challenge to do one of the old Watercolor Wednesday prompts that you may not have already done. and I knew there was a Christmas tree in a pot one seen here. ( I only did the one that looked on the Charlie Brown side) and while I was waiting for the last minute to make this, I had also seen Cathy issue an "Mini" slimline card challenge, so this fits that too. ( the cardstock was cut to 7" x 6" and scored at 3 1/2" on the 7" side) I know this will fit inside an A6 envelope but, I am also thinking I may have picked up a mini You can find this challenge here at SCS to play along with us. Thanks for stopping by.