5.31.2022

Watercoloring { A dragonfly }

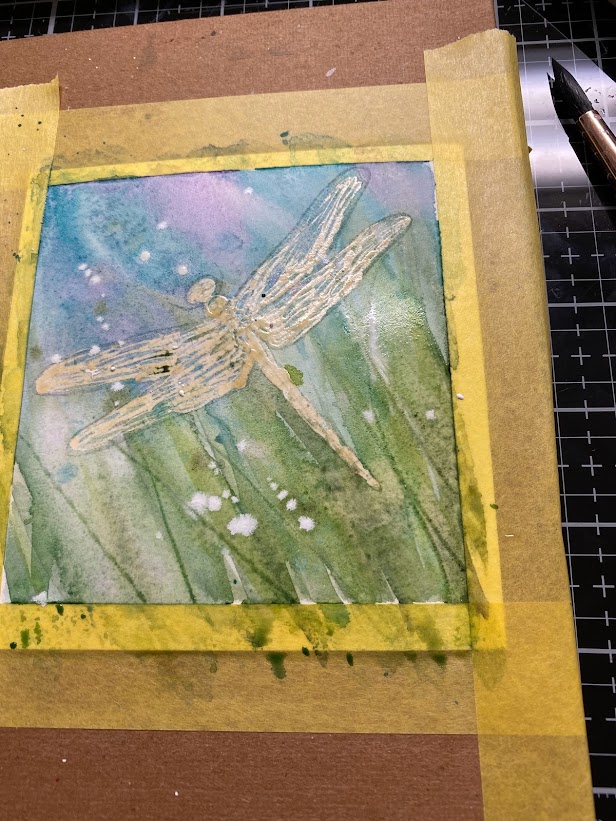
 This week Kia has shared with us this dragonfly water coloring video that takes place on fast forward mode. I had seen the lady had traced a dragonfly image into her painting and so I felt perfectly free to stamp one for my sample project. 


I stamped this Peddlers Pack dragon fly with some Adirondack mist on Arches hot press and used this silcone brush end to apply the Daniel Smith masking fluid over that. 

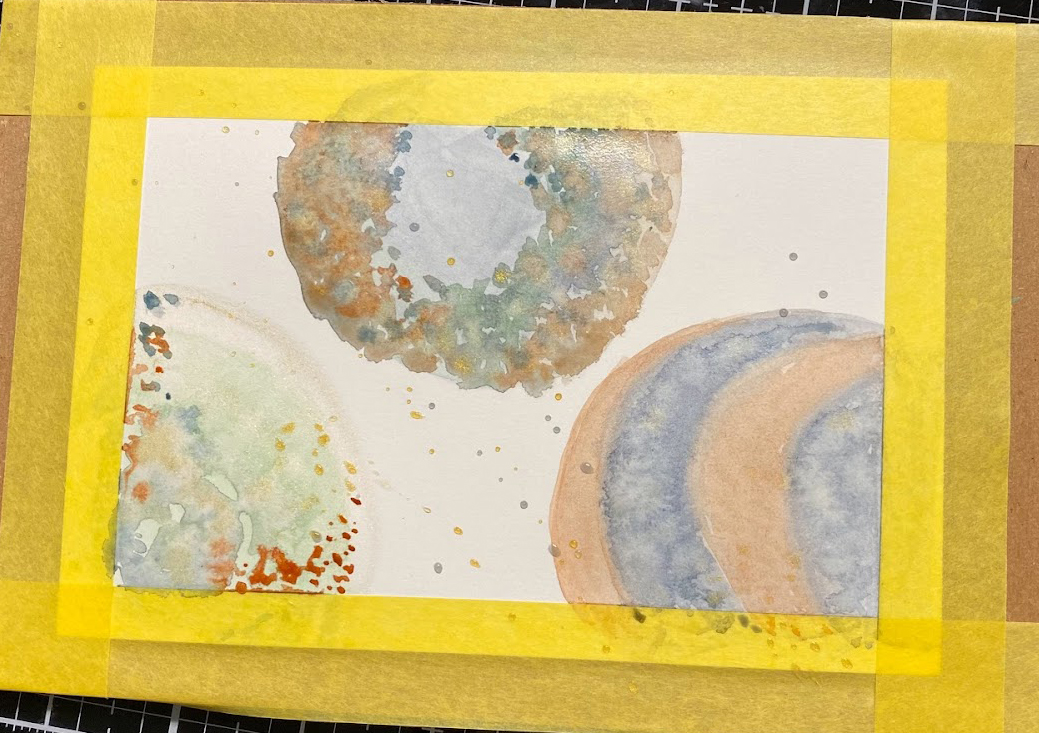
First layer of paints ( wet ) the white is Dr. Ph. Martins bleed proof white, mostly Daniel Smith watercolor paints with some Holbein shadow green.


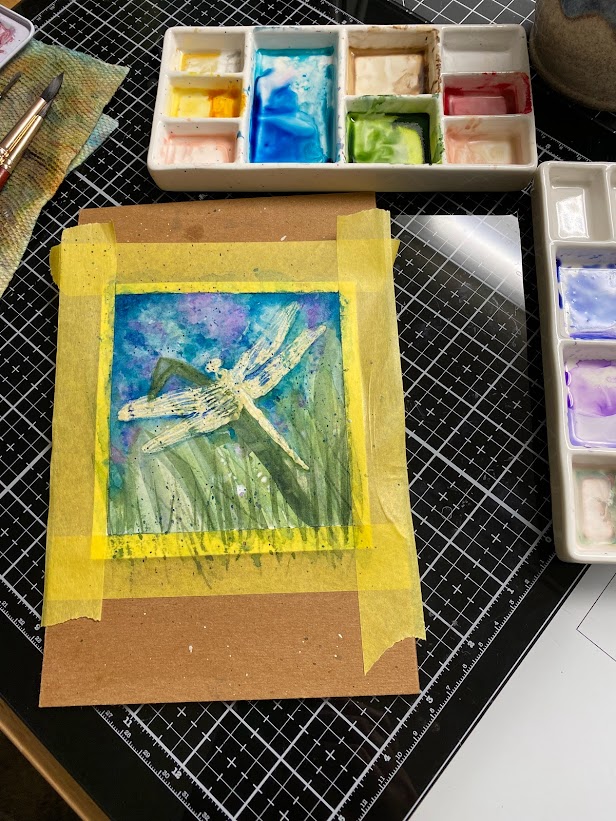
Third layer of paints 

When I removed the masking fluid. ( I had tried to leave a little space for the paints to flow through the wings since they should be see-through ish but, I probably could have left a lot more space than I did.I also seen that I could not see the stamping ink for the veins or details of the stamp anymore so, all the detailing on the finished painting is just guess work. 

trial veins and such. I think the eyes look a little goofy but, for a first try its not too shabby.

even though this was taped down it did warp so, I left it being pressed inside my big shot while I went to work on Tuesday AM. 


The pressing it was a marginal fix so, I ended up mounting this to some textured Bazzill with foam tape to help make it a little more "flat". You can find this challenge here at Splitcoaststampers to play along with us. Thanks for stopping by.


5.27.2022

Inspired by { Lady Yard }

 This week Amy has shared with us this Lady Yard site where I came across this vase in the storefront and decided it was just the push I needed to finish painting this poppy that I had started a long time ago. I had stamped the Poppy Background ( Sweet n Sassy stamps) with vintage photo distress on some shinzen textured watercolor paper and started out with the first layer of paint as some shimmery watercolors that June had gifted me with that I keep at work) and over time I started adding more Daniel smith over the top to deepen the colors and the shimmer still peeks through from behind it which is interesting. 


So, I cut this out with scissors and used a piece of textured burgundy/brown ish cover sheet that I no longer remember who makes it and then found a shimmery textured satin trim in the gold ribbons box. ( that is totally unknown to me too) The base here is some Neenah earthstone and this one finished out at A7 in real life. I left off the sentiment as I do not know how I want to use this just yet, but I suspect it will end up being a birthday card eventually. You can find this challenge here at Splitcoaststampers to play along with us. Thanks for stopping by.

5.25.2022

WOYWW # 677


Happy desk peeking day, if you'd like to see more spaces or play along 
the link up for this blog hop starts here at our hostess
There is also a new Instagram hashtag of #WOYWW
 
(I am behind and driving all day for work, so will be playing catch up over the long weekend) 
 

 This was my desk Yesterday after work. I had thought I may have time to turn the doodle planets piece into a card for that challenge but, it didn't get that far. I had also hauled home some flowers I started painting at work in the slow times months ago thinking to add more shadows and finish them off maybe. ( this really has not happened yet) but, the intention is there. those mice are staged as they were in just a stack ha ha. 
on the other side I have been you know stamping cling stamps on cards to laminate them for years now and since it took a long time and I was shopping through out the process sometimes to finish a card of sentiments I just stuck them all on one card, and that has been really frustrating to find the one you want to use knowing you have it kind of a situation. So, I have been going through some of the previously stamped cards and resorting them into tighter categories as A I own more stamps now and B this will just be better in the long run. So, I am allowing it to take "longer" to have better organized cards now than I did a few years ago. ( there is a pile of partially stamped cards on the coffee table across the room they have been there so long I probably need to dust them again ha ha) 
the update on the truck is it made it onto a rail car last Friday to start crossing the country to get here. I know it will ultimately end up in Portland at the top of the state and there is a shortage of Union works to unload things so it may be there for a while before it makes its way down here to me. but, at least its finished being built and on the way. :)

That's about it from me, hope you are all doing well. Thanks for stopping by.

5.24.2022

Watercoloring {Circle Doodles}

 This week Angie has shared with us an abstract painted circles doodle project seen here on YouTube

I kind of grinned as I was watching this because, I have similar colors on the palette so, I decided what the heck. Funnily enough I even had the brushes she used and nope, I was not that great at spinning that big flat brush. (this was the first time it got wet and played with) so, after a while I did switch to an 8 round.

This is arches hot press watercolor paper and Daniel smith paints. I had remembered she mentioned they looked like planets to her. and it was late when I was trying this I could not see the colors well so I kept adding more. I skipped the salt stage.


So this morning before work I added more paint to it making "circles" of doodle blobs of paint over the top mostly. 

And it dried so I tossed it in my bag and doodled on it at work with those pens ( as that was what was on my desk) 


What it looks like with the tape off. ( my desk at work has a glass top and an overhead light so, this was cropped a little to take the desk/glare out) but its probably about A6-ish in real life. You can find this challenge here at Splitcoaststampers to play along with us, thanks for stopping by.


5.21.2022

Inspired by { Crazy Dog T-Shirts }

 Hi, It's my week to host the Inspiration challenge at Splitcoaststampers and I had stumbled across a silly fishing tee shirt from Crazy Dog T-Shirts and thought this may be fun for jump starts for Fathers Day. They also have Pinterest Boards that hide here


I have really been enjoying being able to just pop cards into the mailbox without having to stand in line to mail them this last little while so, I knew I had this Hero Arts nested T-shirt die set and that it would be really easy to make some Clean and Simple tee shirts. I laughed at this shirt in particular And started digging out my Fishing sentiments and some tiny fishing images. I cut a stack of the largest t die and then I scored some thin 80# white accent opaque cardstock to be folding bases for the tops to layer on, the fold is slightly under the collar of the neckline ( which you can see on the tee shirt on the left here as that one is a one layer card. the others with "crisp" corners on the collar are layered cards.

I think that rounded look is "OK" too, I do think the fishing lines ( Impression Obsession) are a little too big scale wise for the die but, this was just for play so, I paired it with a Sentiment from stamping Bella as it went nearly side to side on the shirt front. The one in the center the small fishing scene was a block with no mfg info on it and hubs found it on eBay a while back, that sentiment is from Heather and the larger fishing scene on the right shirt is from the old SU set called Angler, that sentiment is from Inky Antics.

So I decided to try some with just sentiments. The shirt on the left the sentiment is from Rubbernecker and I believe the one on the far right is also a Rubbernecker stamp but, I don't see it online in their store anymore and its not in the evernote file. the one in the center is from Impression Obsession. These the corners of the outside edge of the shirt are too wide to fit into A2 envelopes like this so, I have put them crooked into A6 envelopes. That's about it from me, hope you are doing well. If you'd like to play along with us this challenge hides here at SCS. Thanks for stopping by.


5.18.2022

WOYWW # 676 { A catch-up post}


Happy desk peeking day, if you'd like to see more spaces or play along 
the link up for this blog hop starts here at our hostess
There is also a new Instagram hashtag of #WOYWW
 
I decided to take some shots leading up to Wednesday as most of the time the desk is clear on Wed am...
So, this is a Sunday afternoon Monday am view of the desk.
 
I had the bright idea to stamp off some things on watercolor paper and start painting them. With more than one panel taped down that allows me to shift between them when I have a chunk of time to paint and let the paints dry.


 what it looked like from the other side.

and some of the happy mail that came monday

these came from two different Etsy sellers.


and these came from two ebay sellers and one etsy seller. 


what the desk looked like Tuesday pm. and then I seen that Karen's husband Mark is the teaparty destination at SCS this week. ( his wife Karen lost her battle with cancer last month and the card shower is casing cards from her gallery there.) and one fairly close to the top was this pretty Iris one

So, this is what I did with the flowers I had started painting before I found that card of hers.

The elegant iris corner is from Penny Black and the sentiment is from Simon Says Stamp. there is a second sentiment on the inside here also. 


 That's about it from me, evidently I am now an every other week poster. ( which is a little better than once a month) So far, the truck has not arrived and there is a slight chance that the irrigation water may be turned on at the end of this month. ( crossing fingers here) Hope you all are doing well. Happy Anniversary Julia! Thanks for stopping by!


5.10.2022

Watercoloring a Wisteria covered doorway

 This week Linda has shared with us a Wisteria covered doorway tutorial for the water coloring challenge. (you can find the tutorial here on YouTube) And I loved that so much, I started out you know watching until the first round of paint went on to the first 3 blooms or so and just started sketching and painting mine without watching it all the way through. 


 I recently seen this watercolor paper for half of what they normally sell it for on Amazon so, I tossed a couple packs in the cart as I wanted a new "sketch" book. should have seen my face when I pulled it out of the envelope. (those squares its sitting on are 1 inch in real life) so, this is about a quarter of the size of the last sketch book I had filled. ( It's OK, I just figured I would shoot a shot so I could remember that metric numbers LOOK big but in fact are not) hahaha... 

So, I sketched it with this watercolor soluble pencil and yes, I used a ruler for the door way & no I still did not get it "straight"

But, I didn't really see that until later I was more worried about painting the flowers than sketching a straight door. 

At this point I had hauled this to work this morning to add more paint to it during the slow times as my secretary is on vacation this week and I am spending more time there than I normally do in the later afternoon. The woodgrain, window and door handle were done just with a regular pencil.

When I got home I added just a little bit of black to the handle and window and mail slot. and I decided to diecut it with a Waffle flower A7 rectangle die, and yes even with tons of washi tape on it, it slipped before it went all the way through so, I had a really crooked cut door. 

So out came a smaller die and I did it again with tape wrapped from the front corners all the way around the watercolor paper. 

( I did not tape this to anything, she did not in her video but, I am thinking I got a lot more water on my "cottage walls" than she did. So, this was very warped when dry even after just that first round of paint. 


I nearly left this as just a scrap on the table but, decided to add a Hero Arts sentiment from their House stamp and cut set and layered this to a premade Strathmore watercolor card base with foam tape. ( It's slightly smaller than A7 in real life) That's about it from me, you can find this challenge here at Splitcoaststampers to play along with us. Thanks for stopping by.


5.06.2022

Inspired by { Party Swizzle}

 This week Julie has chosen the Party Swizzle site that also has a collection of Pinterest boards seen here

And funny true story at the time I looked at the store for the first time, the second photo on the floral & Vases category turned out to be a Geranium Garland. ( seen here) And I Laughed and Laughed because, I had won a Geranium stamp on eBay recently that arrived in them mail earlier in the week and I had scrubbed it and stamped one off and started adding water color paint to the image. This was stamped on some Arches cold press cotton water color paper with Versafine.


So, after seeing that garland I went and added more paint to the image (the Graphic Word) and when it was dry cut it with a Simon Says Stamp wonky stitched rectangle die. The sentiment here is an old one from Inkadinkado stamped on some Earthstone from Neenah papers and it was cut with a waffle flower rect die. the lace here is vintage and the red corrugate is from Fancy Pants. This one finished out at A7 in real life. You can find this challenge here at Splitcoaststampers to play along with us. Thanks for stopping by.

5.04.2022

WOYWW # 674 {Still sorting}


Happy desk peeking day, if you'd like to see more spaces or play along 
the link up for this blog hop starts here at our hostess
There is also a new Instagram hashtag of #WOYWW
 

 Every week I have been taking photos and not posting them because, I have been really on a tear up here the last little while. When I got the new sound processors in March I came home with 1 of those 10 drawer units from the Container store and I LOVED that... and then I ordered another one. so this is the front side of under the table with a view of the second one. those plastic boxes were inside the file cabinet and all of those contain wood mounted rubber stamps. 

This is what it looks like yesterday. a few weeks ago I ended up ordering 6 more of these drawer sets so there is now 8 of them that completely fill the under side of these two husky tables. ( they are sitting on a piece of plywood) and they contain wood mounted rubber stamps. on the other side I do have three drawers with ink pads and on both sides there are a few empty drawers but, not that many. 

This is some new loot that came in the mail on Monday so it was sitting on top of that side of the table Tuesday when I got home the Nellie the nest lady and the Geraniums were eBay finds. 


 I got that geranium for like .99 cents and shipping because, the back side of that block was filthy with packed in ink and glitter. ( I cleaned and cleaned that rubber and fortunately it stamps just fine. that is not always the case so, I tend to shy away from ones where the rubber looks "iffy" now as I have bought a couple that the rubber came in crumbling kwim?) So, I did start painting it last night before dinner. and this is what is going on this morning. I am not quite done "organizing" I am about to start more purging I think, but it is much closer than it was a few months ago. I still have stamps on the wall, and all the other wood mounted stamps are now under this table together. on one side or the other. so, that is much more functional for me than trying to dig and shift boxes around. 

On the home front things are going well, supposedly my new truck should have been done being built last week and so the wait is two more weeks to have it reach us here. ( crossing fingers) it was pushed back a week because, the different plants are taking turns shutting down for weeks/month at a time because of the chip shortage. So, I had sold the dealer my truck a couple of months ago because, it had 97,700 miles on it and those trucks are worth more to trade in to trade them in at under 100K on the odometer. I have been driving hubs all this time and he has been driving one of the other work trucks. But, I am looking forward to not wearing black all the time. ( driving his truck means the seatbelt is grubby and in pale clothes I end up with a line across the front of me) wouldn't it be cool if you could toss seat belts in the wash? Anyways, there is no water in line one ( the part of the irrigation district water canal that is right next to my property) for year two now. Hubs has cut his grow plan way back as far as the veggie garden goes and it actually started snowing here in April so we picked up feet of snow in the mountains but, they are not releasing the water again. and we tell our selves 7 more years and he can retire and we can move to where people are not fighting over water rights and Forrest fires. 

I am hopeful that now that I can walk around again up here ( I had the hoarders episode look going on while I was sorting those stamps ) and I keep moving things around I will have more interesting desk views to share again. That's about it from me, hope you are all doing well. Thanks for stopping by. 


5.03.2022

Watercoloring a Red Squirrel

 This week Kia has shared with us a video tutorial about painting a red squirrel with watercolors seen here on YouTube.

So, the first thing I did was I did print out the sketch and if you just hit print without say tinkering with the file you will get a full sheet sized squirrel.


 So, I had come across a little packet of Fabriano? watercolor paper in the closet. and it looks like its something I chopped up to A2 size years ago and I assumed I was going to remember the details haha. but, It has an interesting textures so I pulled out a sheet and used a water coloring sketch pencil to try to duplicate what I seen on the print out. ( I didn't realize I did not sketch the flower until I got to the part where you would paint it ha ha) 

And I added a first layer of paint and then set this aside to dry to go watch more of the video. 

and so this is second layer of paint and it sat like this for a week or so, and then I did end up adding just a little more shadow type layers and paynes grey blue to the eye and fingers toes nose type places. more splatters just because.

I really could not decided on a sentiment for him so, I decided to run it through the big shot inside a blanket stitched rectangle die from PinkFresh just to give it some interest and then added a piece of printed wood grain paper from the Craft Consortium pad and funnily enough there are a lot of similar colors to the printed paper as the painted layer. The base is some textured Tim Holtz Coredinations and this one finished out at 6" Square in real life. You can find this challenge here at Splitcoaststampers to play along with us. Thanks for stopping by.


5.01.2022

Inspired by {Hats & Signs}

 Oops it looks like I skipped blogging about two weeks ago Inspiration site it is a collection of Hats on pinterest seen here shared by Amy. And I came across this one that I just loved the red bloom on this hat.


So I came up with this, the Emerson image is "Age Happens" from American Art Stamps and the full bloom sentiment is from Art Impressions. That printed paper is from Authentique and this one is 6" square in real life, the fibers are really old and the mat under the stamped/painted panel is red mulberry paper. That challenge can be found here inside the Inspiration forums board.


This week Kelly has share with us the 4season home site and I came across this silly giraffe fence post sign. (and I knew I had this IO giraffe in the not been played with section still so, out he came) 


 I wanted to give him some depth and have him peeking through a window and I knew I had this pack of SU new horizons watercolor looking printed paper ( which I had not opened prior to this) and I assumed I would find one sheet with green on the bottom and blue on the top. ( that is not the case) but, this piece was interesting but, the colors were a little jarring so, I did end up adding layers of watercolor paint over the printed paper and then the grass along the bottom to give it some illusion of depth. the window hole was cut with a spellbinders deckle edge rectangle die. The giraffe was stamped with some Acorn versafine on fabriano watercolor paper that is kind of thin and has an interesting texture to it. That sentiment is from Great Impressions. I found some old moody blue cardstock in the file cabinet and finished this one out at 5 1/2" square. This one's challenge can be found here at SCS. That's about it from me, thanks for stopping by.