10.31.2022

November Dirty Dozen Christmas Card

 Can you already believe we are sharing November prompts for the Dirty Dozen Christmas card challenge? I have no clue where this year has gone. I cannot tell you what the challenge is but, I can tell you what I did. So, I started with a scrap of Arches hot press and very lightly drew an arch for the tree to be bent and sagging and then attempted to draw the two by fours base. that is where the sketching went sideways for me.


First layer of paints, I decided to make the bulb Red. I cannot remember what color it was originally but, the tree skirt I remember as being the blanket Linus carried and I think it was blue. 

and then I added another layer of paint trying for some detailing, a few shadows. added red and blue to the shadows. and I may have added more paint after this shot. ( cannot remember now) but, it finished out looking like this below.


I decided I really did not like the base I sketched so, I mostly covered that up with a reverse print sentiment strip from Simon Says Stamp. The card base here is an A2 one from the brand of paper that is from Hobby Lobby. ( mind just went blank sorry) and that was all she wrote. I hope you all are doing well. If you'd like to play along with us you can find this challenge prompt here inside the special forums set aside for fan club members at Splitcoaststampers. Thanks for stopping by.

10.30.2022

Happy Birthday to me, The Happy Mail Edition!


This one was hand painted by Ann and it was filled with bitty birds and deer die cuts like confetti.

This one is from Pam :) and it opens like a book with that fold on the side. neat eh? 

This one is from Cara , Isn't that pretty :) I heart Lavender.

This one is from Jenni and I cannot make out her SCS name. 

From Pat, That sentiment is tucked into the ice cream panel so, it holds the card shut. very cool.

This one is from Erin M and those tiny sparkle are bitty sequins. ( who knew?) :) 

This one is from Jeanne with a lift up flap on the front panel so the message hides behind the Sentiment.

From Jo Ann I love the raised almost hidden message look to the letters here. This one fits inside one of those like the size envelope you used to send letters in size. (mind went blank sorry)

From Kathy, I love that faux tag look she gave to the main panel.

From my Gma Mary :) such a pretty color combo.

From Sabrina, isn't that cool that it looks like faux wood burn :) 

This one is from Diane, and those blooms that look solid in the centers here have bitty gemstones on them. so pretty :)
From Brenda :)
 

 A closer look at that painting of this leaf and the 3-D framing. SO gorgeous!
Christmas tags that have been painted *Swoon* :)


The box has a cute mouse print on it tied off with vintage lace.

Inside the box was all this fun waiting to happen.

A closer look at the card's textures :) So pretty.


10.28.2022

Inspired by { The Jolly Christmas Shop}

 This week Julie has chosen the Jolly Christmas shop as our Inspiration Destination where I came across these cute snowmen ornaments doing a search for plaid. And in my brain they were red and white mainly. So, then by the time I actually came home and started digging through my snowman collection, I had wanted to color some of the newer ones and settled on these from Whipper Snapper Designs. 

I stamped them with some morning mist versafine ink on Arches hot press watercolor paper and did a loose, rustic colors for them like they were made from Muslin rather than snow. ( with all the stitching going on kwim?) and then added a bit of Dr. PH Martins bleed proof white when the paint was dry to the ginger and the scarf. The one on the left is called Starry Snowman and the one on the right is called Rustic Joy. I love these I picked up almost the entire release Anna Wight did this time around as there is just so much rustic, snow, gingers and Santa's to love. 


To keep the rustic simple and cream & red colors going I found this really old scrap of October Afternoon stripe print and decided it would work well with them.  The snow men were cut with a Waffle flower mini slimline rect die and the Stampin' Up sentiment was cut with a Lawn Fawn lg X stitch square die. The base here is from some textured Sundance felt natural white cardstock and I did finish this one as a Slimline. That's about it from me, I hope you are all doing well. If you'd like to play along with us you can find this challenge here at Splitcoaststampers. Thanks for stopping by.


10.25.2022

Watercoloring Realistic Leaves

 This week it's my turn to pick what we are learning along to watercolor paint at Splitcoaststampers and I have chosen this video by Crystal Beshara Artist Channel. I love that snapshot of the leaves and thought, I want to know what ever it is she is going to share. 

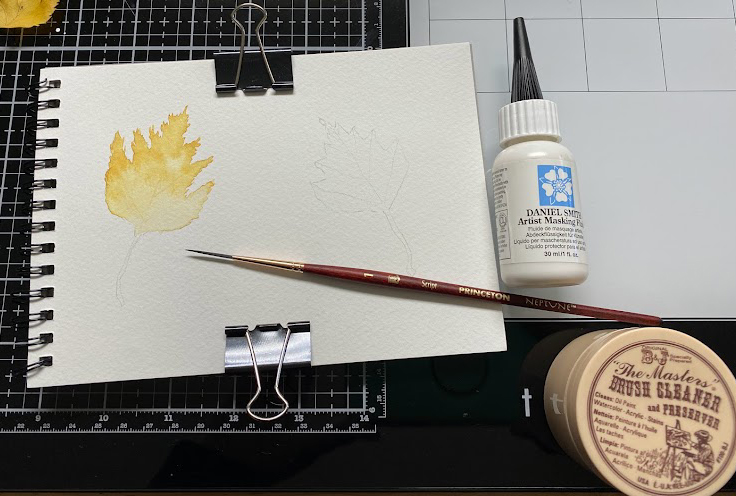
So this video starts with go outside and pick up some leaves to give it a whirl. The ones in my front yard when I started this are from a weeping birch. These are the one on the left is a little less dry than the one on the right here. (and you trace around the edges with a pencil) 


So what I found was my more dry leaf on the right, I knocked some of the crunchy edge off the outermost edge of my leaf trying to lightly trace around the shape. I just eyeballed where the main veins were.


And the tip I loved the absolute most was that just gently rub your brush bristles into the soap before you daub some masking fluid on them. ( brilliant) I have in the past been using different ( cheap brushes or a silcone wedge thing but, I had not been able to get thin lines with that so, using a striper brush and protecting it first worked really well for me.

Funny true story, we have seen so many video's over the last couple of years one of the people I have learned a ton from is MarenaART and I had decided I really really liked that I thought of it as a leaf palette that she makes ( she has some others but, the "leaf" was something I really wanted and after hemming and hawing about it for a while I ordered it and the butterfly from her towards the end of September thinking ( it comes from Croatia) that it just might arrive by my birthday. ( and it did took about hmm 3 1/2 weeks from when it shipped to arrive.) the part that makes this "funny" is when you look at it in the store she calls it a feather, not a leaf. :)

This one the adding brown to the edges of the leaf on the left was not going too well for me and I decided to stop what I was doing and go watch the video again before I dug a hole in the paper. 


So, at this point it's the next day and the leaves have dried more being up on the table so the shadows are changing shape a little because, of the curling as drying is happening.

at this point I decided to remove the masking fluid, so you can see the palest yellow space where the veins are. 


A few more layers of paint, and started the shadow on the leaf on the right.

I am not too impressed with the leaf on the left, but everything has a learning curve so I am glad I did this in my sketch book so I can see it again later. that is the most affirming thing to see how far I have come in the last while playing along with these challenges.

Closer look at leaf on the left.


Closer look at leaf on the right and ultimately what will go into the gallery.

We had a little road trip last weekend and I was laughing at my self looking at the ground, ( it was raining all weekend) so, there were quite a few leaves that had been knocked down and these caught my eye in a Cabela's parking lot in Tualatin, I have no clue what kind of a tree they came off of but, the first one on the black console of the truck they are wet leaves.

these are wet in this shot, so I put them in the pocket of the door of my truck and 

They had dried quite a bit on the drive home so I stuck a flat bottomed bowl over them and left it there about 18 hours before checking to see if they were flat and dry and then shooting a shot on the glass mat to see if I could see "colors" in the shadows ( which I do not) but, I thought these were such an interesting color combo. I hope you are all doing well. If you'd like to play along with us you can find this challenge here at Splitcoaststampers. Thanks for stopping by.


10.21.2022

Inspired by { Party City }

 This week Amy has chosen the Party CIty site where I came across this scarecrow yard stake and Loved how sweet his face looked. So that being said I started flipping through my scarecrow stamps looking for the sweet-ness factor and decided on this old Stampassions scarecrow bust from Karla Eisenach.

I stamped him with some Versafine Acorn ink on Watercolor paper and painted him with Daniel Smith paints. This was cut with a My Favorite things stitched dome die when it was dry and I had chose one large enough to add the sentiment directly to that panel ( and then tied on ribbon anyways ha ha) the Sentiment here is from Karen Lockhart, stamped and painted with same things. The ribbon here I have had for so many years I no longer remember who makes it. I do know it was one of those things you stood in line at the bolt counter and someone measured and cut it though. The double sided printed paper is from Glitz and the base here is some Sundance Natural felt. This one finished out at A7 in real life. I hope you all are doing well. If you'd like to play along with us you can find this challenge here at Splitcoaststampers. Thanks for stopping by.


10.18.2022

Watercoloring a Light Strand

 This week Linda has shared with us this tutorial on Glowing Christmas lights from Nianiani found here on YouTube. 


I watched the video and then just winged it sketching a strand across this cotton sketch book ( Windsor & Newton 5X7 ) I did not draw the long center lines as I had forgotten that part by the time I went to sketch my strand. I did clean up stray lead with an eraser. 

I didn't really remember much about the video by this point so, I did just pick 5 colors and this is first layer of paint.


So, after that dried I did add more paint trying for some depth in the bulbs.


And this was my finished look at the strand, the shadows are on, the line was painted the white bleed proof was added to the bulbs and strand. I think this may have been a little easier to do if I had sketched them larger. and I do own lots of say critters holding light strands as Christmas rubber stamps but, those the lights are tiny in the scene so, taking what I learned from this exercise it does make me want to try to shade those bulbs for some depth in the future. If you'd like to play along with us you can find this challenge here at Splitcoaststampers. Thanks for stopping by.


10.15.2022

Inspired by Urban Owl

 This week it was my turn to host the Inspiration challenge and a long time ago I came across a snarky / silly coffee mug from them and saved the site. the thing with stores that have Pinterest boards is, when they stop selling something, the photos tend to go Poof from pinterest so, I cannot link you up to the mug. and that's OK they have a ton to see on their pinterest boards and I stopped in my tracks at this collected piece of Aqua Marine Shades. ( I love that color) So, I happened to glance at the wall in my space and I have a few old wood mounted stamps on the wall that I have been wanting to color and the old Limited edition shoes caught my eye this one in particular since it looks like it is covered with gemstones to me.

I stamped it with some versafine morning mist on Arches cold press cotton watercolor paper and painted it with mostly Daniel Smith watercolors, and a couple of windsor newton ones. 


The shoe was cut out with scissors and is up on foam pop dots over the frame which is also on foam dots. That pink fresh stitched scallop frame cut's as two pieces and I have taped it together on the back side. the glitter paper is something I found a while back at Micheal's from their recollection line, its nice that it does not shed glitter but, the backing is almost a plastic feeling paper and I do not have such good luck die cutting it so, it became a straight cuts background. The sentiment here is from Stampendous and its tied on to the sheer ribbon with some sparkly May Arts cord. The base here is some SU soft sky and this one is 5 1/2" square in real life. You can find this challenge here to play along with us. Thanks for stopping by.


10.11.2022

Watercoloring a Fall Vase

 This week Brenda has shared with us this tutorial from MarenaArt That I just love the colors of that so, I watched it and then tried to recreate something similar from memory. 


first wash of paint on some cold press Arches cotton paper not taped down. 


added another layer of paint to the foliage parts and a few more splatters.


Started adding branches and more defined foliage, deeper tones to the vase and more splatters. 

added some lines to the vase, more branches. and I thought I was done so I went and looked at the video again and seen there was white highlights so, I did add more shadow to the ground and a few white highlights but, they looked pretty obvious to me so, I did not add very many before I stopped. 


 I ended up stamping this Impression Obsession Thanksgiving sentiment on a piece of Neenah earthstone with some Versafine Acorn ink for the inside. Since this card is A7 in real life, there is plenty of wiggle room for a handwritten note and such.

The base of this is Stardream copper so its shimmery in real life, I did distress the edges of the watercolor panel for something different. You can find this challenge here on Splitcoaststampers to play along with us. That's about it from me, I hope you all are doing well. Thanks for stopping by.


10.09.2022

Inspired by {Pumpkins}

 Tis the season right?  :) seems like a lot of the challenges lately have been very fall and Pumpkin centered and I enjoy coloring Pumpkins so, I have a collection of stamps and dies for them so, they have been dusted off this last little while and here is a few of the things I have been up to.


This is a Karen Lockhart stamp that was a gift from Debi "Bottomphish" at Splitcoaststampers many years ago now. I did stamp it on hotpress Arches watercolor paper and cut it out with a Pinkfresh studios blanket stitched die. that is up on foam tape over the base.

A closer look at the window scene, this was jump started by this pin seen here the red berries wrapped around the stem caught my eye.

the week after that Julie had an Art reproduction site and I came across these sunflowers and knew I had this sketchy Judith bucket of Sunflowers and I pretty much used the pumpkin colors from the week before.


 This week Kia has chosen an Pumpkin board and I found this pin with the white/green pumpkin and I instantly remembered that old Water coloring challenge Pat through down a while back and my brain said oooh you could do this with a die.

So, I used some cold press arches watercolor paper and the base is SU seafoam so where the green peeks through it blends with the paint drops. This is a really old Papertrey ink die set called shape up pumpkin and I do not know if they still make it, the sentiment is from the Unity Stamps set called Thankful Oak. This particular challenge is the one that went live this weekend and you can find it here to play along with us. Thanks for stopping by.