8.29.2023

watercoloring Pumpkins

 This week Brenda has shared this watercoloring tutorial by Dina Kowal on watercoloring pumpkins.

It is a short and sweet video so, I watched the whole thing and then this is where I went with it.

This is a piece of Arches cold press watercolor paper with Daniel Smith paints, first layer.


Second layer of paints, I had considered doing some grasses or something else besides the shadow but, this is what I did .


I die cut that painted layer with a Penny Black Framed die ( this is the largest one on the set) and all those pieces are taped together on the back side here to keep it on the clean and simple side. The base is some Stampin up most likely mellow moss and this is 4" square in real life. I left off the sentiment as I do not know what I am going to do with it as of yet. That's about it from me, I hope you all are doing well. If you'd like to play along with us you can find this challenge here at Splitcoaststampers. Thanks for stopping by.


8.22.2023

Watercoloring a Simple Landscape

 This week Angie has chosen this landscape video tutorial from MarenaArt seen here on YouTube for beginners. 

I had happened to have a scrap of Arches hot press cut in the drawer so I just started with that and some Daniel Smith watercolor paints. 


 It was about 9% humidity when I was trying this and I started thinking maybe I should have cut the paper down more as I could not quite keep it damp enough to move the paints.

The sponges I have in reach are sea sponges and so, I tried the foliage with that. They are not quite as tight of an cluster as the ones on the video.

and my stems, ugh. So, I set this sheet aside and found a smaller scrap from some Strathmore 400 series to play with.


This time I tried to keep the colors darker, and since it is that plastic-y paper it did stay wet and repel the paint a little better than the cotton did.

while I was standing there I had the bright idea to totally re-wet over the whole surface of the cotton paper and try it again right over the top, figured the first round of paint would just be shadow texture.


And so, the cotton paper did hold up to being wet twice and it does look a little better. So far these are just trial paintings and not finished cards. I do like the horizon colors on the smaller strathmore scene better than on the cotton scene. I am thinking I will press these in the big shot to flatten them out and see about mounting them later this afternoon. 


I ended up getting a message at work this morning that someone I know needed a sympathy card so, I decided to go that away with the taller panel. I did die cut it with a Waffle Flower A7 rectangle die and then the sentiment here is from Clearly Besotted message me set diecut with a Nellie Snellen tags 3 die. The base here is some barely grey textured bazzill that was cut to become an A7 base. That's about it from me, I hope you all are doing well. If you'd like to play along with us you can find this challenge here at Splitcoaststampers. Thanks for stopping by.


8.18.2023

Inspired by {Harriet De Winton}

 This week it's my turn to host the Inspiration challenge and I chose Harriet DeWinton. ( I have seen quite a few of her water coloring videos on YouTube but, when I came across this painted bridesmaid thank you card I knew I had clothes stamps and that was all it took. 

I stamped this ( I think it's name is something like Rose gardening? by Alesa Baker when she was with Stampa Rosa. I think a lot of these designs were re-done when she started illustrating for Impression Obsession but, not positive on that. Anyway, this is stamped with some Versafine Morning Mist on a slim scrap of Arches hot press (smooth) watercolor paper. I did use some Daniel Smith watercolors to paint it. 

I diecut the painted panel with a Pinkfresh Studio's Mini Slimline stitched scallop rectangle die and since it was a scrap the watercolored panel was fine but the scallops were chopped off the bottom and then when I had originally thought about this I was going to do a lot of white layers but, I ended up using some Papertrey ink blush cardstock to do a frame and then the sentiment on the drop piece from that. ( this is all taped together on the back side as that frame cuts into 3 pieces actually the center and an inside scallop frame and an outside scallop frame) the white crepe paper ( Hobby Lobby) was diecut with a Pinkfresh Studio's blanket stitched slimline die ( its probably hard to see) and the base of this card is some Stampin' Up pretty in pink. The floral vintage lace has those pink flowers printed on the lace and I poked some pink brads through the centers of them. The sentiment on the top is from Penny Black. ( the Kate & Campbell font line ( I love that font) this was diecut with a Spellbinders maybe label 11 die? (something its an older one) and the printed button on that is from Making Memories, its really a flowery paisley type shape but, it at first glance blends with all the flowers I think. and that stamp off to the side ( Uptown Rubber stamps is stamped on the inside) This card is headed to a gardener soon-ish. That's about it from me, if you'd like to play along with us you can find this challenge here at splitcoaststampers. Thanks for stopping by.


8.15.2023

Watercoloring {Wet on Damp}

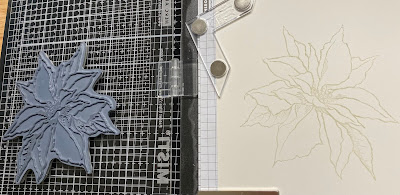
 This week it's my turn to host the Watercoloring challenge at Splitcoaststampers and not too long ago I came across this short video from Anna Bucciarelli called "Powerful Watercolor Technique" and it showcases some orchids that she drew. But, I was so excited about the veins looking real I knew in the back of my mind that I own lots of fairly large Flowers and leaves that I could try it on. For me this journey of teaching my self to paint is the main goal for me is to color stamped images I have collected along the way. I am thinking I am not alone on that thought so, here is what I did after watching that video. I stamped this Stampendous (cling) Poinsettia in the Misti on some Hot Press (smooth) Arches 100% cotton watercolor paper with Simon Says Stamp barely Beige ink.

I did ink this several times to make sure the center had some definition to it. 

And then I proceeded to do one petal at a time skipping around the flower not doing one touching the one next to it until most of the flower had at least one layer of paint on it. 


 Some petals I timed it better than others, and that is OK I am thinking as I have never seen anything that looked perfect in real life anyways. 

while the paint was drying I hunted through my phone for some old photos I took at work of the Poinsettia I picked up at Homedepot last year that is still on my desk. ( its not so lush looking at the moment this plant but, its still alive and who knows? maybe it will bloom again) 

A closer look at the petals and how the veins go. ( which at this point I realized mine really did not look real but, I was so excited that I could at least see veins on mine that I let that part go in my head) 

So I added a little more paint and a little bit of beginning shadows. and let that dry. and walked away.

Then when I picked it up again I decided to diecut it with a Spellbinders matting basics ( 6" square die) this is the second one down from the largest) and I grabbed some polychromos pencils and started to try do trace some circles into the center. ( and I could not see the pencil) so, there is some. technically it is now a mixed media piece but, "shrugs" it really I think I would have to be more obvious about it to make it so. The sentiment here is from the Ton blizzard hugs set stamped with some Versafine Clair Nocturn on Neenah solar white and diecut with a Spellbinders reverse wonky rectangle die. The painted panel I ended up putting on foam tape over the Bazzill textured base a it was slightly warped. (the inside also has some neenah for a liner but, its blank at the moment.) If you'd like to play along with us you can find this challenge here at Splitcoaststampers. Thanks for stopping by.