2.28.2018

WOYWW #456 {epic piles}

Happy Desk Peeking day, if you'd like to see more or play along with us 
this hop starts here at our hostess Miss Julia's blog.

 This is for me about as bad as it ever gets the funny part is it's pretty much sat this way since Sunday afternoon when I ran upstairs to do the last VSN/FS card. I did not have time to put things away, and monday was hubs bday and yesterday I made enchiladas afterwork. so maybe today things will get picked up again and put away because, this is too much mess for me to continue in.

 Let's see clues, I had come across a shot of a live sand dollar and they are pale purple in real life. ( I had no idea, I have only seen the white dried skeletons) Those pens were used on VSN projects. all the piles of stamps and dies to the left are things I showed you last week there really has not been much time at all to play with anything yet.

 Now this is new. it arrived at work yesterday and I tried cutting the free sample die with the instructions ( both ways as a regular die and an intricate die.) it did not cut the free sample die out all the way on either version of plate stacking. so, hopefully it will work better on the dies I actually paid money for that take me 8 or more passes through a big shot to get them to cut. ( my elbow will thank me if this works) The machine is much heavier than I thought it would be. That red chicken wire basket is holding my stencil collection because, I have not found a better way to do that yet there are so many different sizes of them. Today is billing day at work so, it may be tomorrow before I start making the rounds, thanks for stopping by.

2.27.2018

VSN Mini Trio

The Spring VSN Mini opened this last weekend and I seen that on Saturday afternoon. 


And the first challenge I read ( I did these out of order) was Kim's to use "compost" items, the theme this virtual stamp night is how does your garden grow? and so, on this card is a used recycled coffee filter and a new sentiment from Riley and Co that came in mail recently. ( so, it was on the table front and center) the sentiment actually has to tiny coffee beans under where those brads are ( eyelet outlet?) and I had water colored them but, when I tied on the Hero Arts string ( also laying on the table from one of their previous kits of the month) they really faded into the background so, I knew I had these brads and for the first time they were not "too big " scale wise for the card. that text print is from a Graphic 45 pad and this one is 6" square in real life.


 The next one I did was Lee's add a bug to it challenge and when I typed in bug in evernote this particular old Stampendous pail topper was the first one that said ooh play with me, and so I did. I heat embossed this twice on white and the curry and cut the white one apart to paper piece it. the bloom was colored with some white gel pen. the bug bodies are covered with clear wink of stella glitter pen.
The sending love is from Hero Arts and its on a Nelle Snellen tags 3 die. the tag dies (round) are from Memory Box.

 Now Misti's challenge was to have blooms in a container. and I knew without looking I would need to color something to play in that one so, I saved it for last. and just let it sit in the back of my mind. and then I woke up Sunday and seen the newest Featured Stampers gallery ( Carol card seen here) and I just laughed and laughed because, although it is not exactly what Misti asked for it "technically"
 works right? Isn't Carol's card gorgeous, I probably should have masked in some of the leaves from the Power Poppy Dahlia XL set but, I had started darkening the background of the vintage dictionary page to let the "container" definition pop and I got it too dark and then I had to keep adding more color to the bloom. so, by that point it was too late for leaves.
So, Changes from Carols card are I used a Die cut sentiment ( Lawn Fawn scripty Hello) and Stamped the bloom. and tore the edges of that paper.

A closer look at this, it was stamped with some Versafine Imperial Purple ink and I tried to keep it very no line coloring but, when I got the background so dark I finally grabbed some polychromos pencils and started putting the lines back in a lot darker so..
So, this has made it something to look forward to with the rest of the Challenges that get released later. Thanks for stopping by.

2.24.2018

Inspired by {Antique Farmhouse}

 This dog stamp (Gourmet Rubber Stamps)  Was something I picked up poking around at amazon a long time ago. I have a tiny collection of Emerson images from American Art Stamps so, I was surprised to find them on cling from these people. I was actually hunting for a different stamp that I used to have on a watch page on ebay and found this instead and loved the sentiment. It finally got inked up and colored in January during the last 30 day marker coloring challenge and set aside. So, it was sitting on the table when I came across this window inside the inspiration site.  The thing that caught my attention first was that weathered green textured window frame. I loved that. but, when I started to make my card I grabbed the first green scrap I seen that was (also laying on the table) because, when I ordered these embossing folders from SU I did not you know read the sizes on anything just thought oh, that will make cool seaweed order it and was a little surprised it was a wide border folder. ( the good part is its 6" long so, it works on square cards for me) I liked how all the words were stacked too so, just looking at the image and the way the sentiment is I thought you know what, close enough. the brown card base was part of a pack of premade ones ( and I am trying to use these up so) since it came out of the drawer I do not know who made it, ( its thin, I lined it with more Neenah)
A look at the window. ( they are actually selling that hand garden sign) but, the green in this frame is just so gorgeous to me. I did actually do some shopping in this store and that surprised me even more than the fact that I wanted one of everything. ( not really, I am totally over dusting things) but I picked up one of these and one of these and I think they will mostly be used as booth props. (they have not shipped yet, or the co. does not tell you it was shipped.... not sure yet, placed the order on 2/14 so we shall see. and that is a rare (very rare) thing for me to just order something like this from a co. I have never heard of before. Thanks for stopping by, I will do an loot shot when these piece show up.

2.21.2018

WOYWW #455 {Loot}

Good Morning, & Happy Desk Peeking day! if you'd like to play along or see more spaces you can find the link up here at Miss Julia's Blog.

 So, I had to get my teeth cleaned Tuesday am and they have a new girl working the counter in their office and she was burning stinky candles so, I had a headache all day. and I had received these packages from Ellen Hutson & Simon Says Stamp from their big sales they had last week and I really didn't have the oomph to open them so I shot this and walked away. ( popped pills, closed my eyes went for a walk) I had fully intended to just do a post with that shot and maybe stick a card at the end you know? but then,

 I Came back inside feeling better and decided to open them up this was in the envelope. no clue why the snarky sentiments tickle me so much and yes, I probably have "enough" but... they were on sale and... lol The die is a solid one from MFT that I seen Ardyth use not to long ago and it looks supper as an embedded one because, all the letters are already straight like that ha ha. :)

and this was in the box. I really need to hunt down the names of the which color on the new Versafine Clair pads is supposed to be black? ( I could not tell just looking at the images online so decided to try a red.) Have not opened the ink yet. the die on the bottom was on clearance and it makes a box that pops up and holds a gift card on the inside. ( I did stamp the girls with the pets and some of those cute sheep to color later) but, that was about it before I ran out of steam. Thanks for stopping by :)

2.19.2018

Thankful Stems

This week the featured stamper is Susy and I found this gorgeous card in her gallery ( I actually found a lot of cards I just loved and so, it was a hard decision to finally make one) :) I changed the layers of textures and colors. ( diecut, sentiment) the banner became a tied on tag, the gem became nuvo drops on the die cut. This one is A2 in real life. The background was done on some Yupo paper with alcohol inks last fall when there was that Alcohol Inks baubles tutorial during the fallidays fest.  I still have a small pile of these that I made laying on the table and most of the time I think they are just too pretty to cover up so, this open die really made me happy layering these like this. That sentiment is from the Papertrey Ink Autumn Hills set.

2.17.2018

Inspired by {Schreiner's Iris Gardens}

This weekend we are headed out to the Schreiner's Iris Gardens in Oregon.
This is a virtual tour of some of the Varieties of Iris tubers and Day lilies that are available to purchase as it is a few months shy of blooming season here yet. 

 This is one of those fourth time's a charm cards... I am hosting the Inspiration Challenge this week trekking everyone out to see an Iris Farm so they can wish it were closer to spring (mentally).  :)
This is the first Iris stamp I ever bought, its a huge one from Magenta. ( there is no name on the woodblock sorry) Iris were the first flower tubers that were ever gifted to me when I first expressed an interest in growing things. so, over the years between the horse trades and purchases. I have a very big selection of them.  I am sure my neighbors hide when they see me pushing a wheel barrow full of ones that are being weeded out of the beds. lol. The background was done on watercolor paper with the original greens and blues Oxide inks. cut with the largest waffle flower A7 lacy layers die.

 This one was stamped with some Versafine and colored with Polychromos and prisma pencils. the sentiment is from the Altenew Birthday greetings set.The color pattern inspiration for this bloom came from this Banish Misfortune tuber.

 Now this, this was the first one I tried. and yes, its pretty but, it wasnt a WOW card in my head. ( and I am not really partial to purple so.. I set it aside. the bloom is called Single Iris from Penny Blacks brushstroke line ( its also a really old stamp) I do not know if PB retires stamps or not.
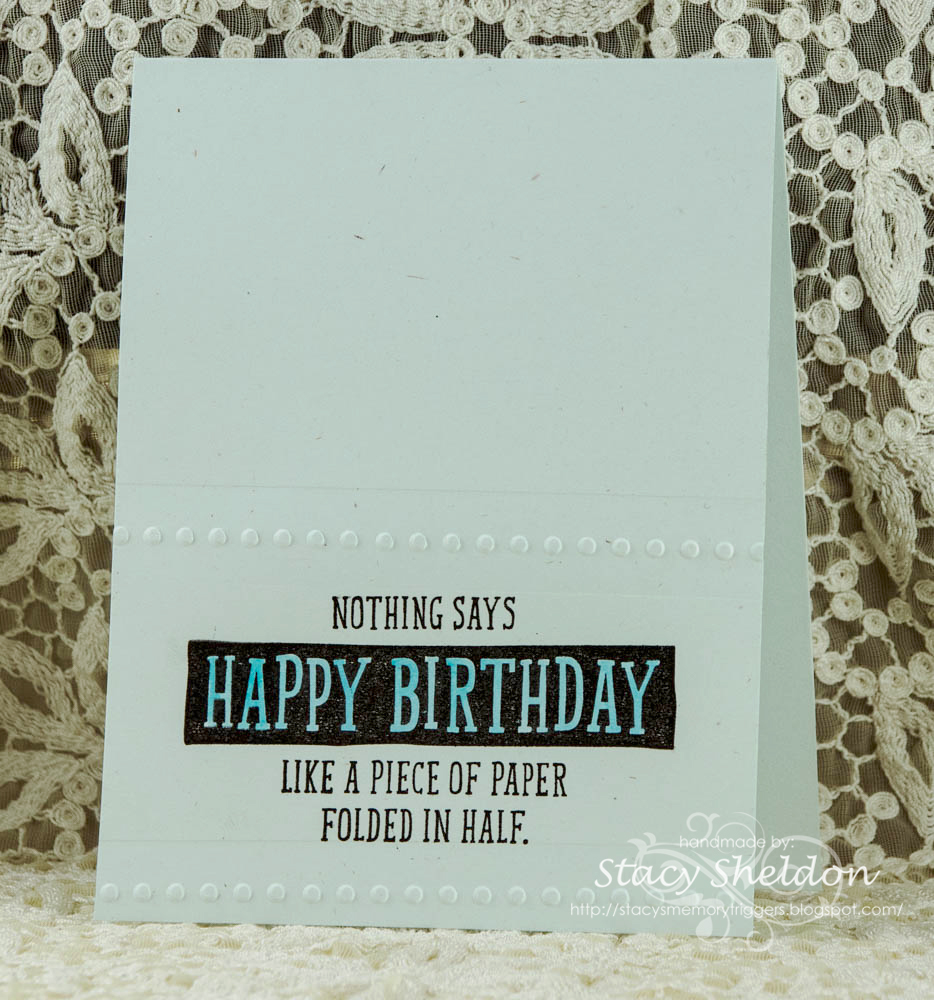
the sentiment is from the Simon Says Stamp Best ever set. the wired ribbon is from May Arts. the base is black berry bliss and the print ( I have forgotten its older though from the scrap bin)
 A closer look, I did add some pencil colors over the markers. this was stamped direct to rubber with markers and misted with water. the inspiration piece for these colors looks like this. and since the Iris stamp had more of an Siberian look to the petals instead of a double ruffle I skipped the peachy shades at the top and focused on the pink/purple shades.

 So, then I decided to focus on the mostly pale blue shaded one that looked like this (seen below) the ribbon on this one is a shimmer one from SU in pool party, the embossing folder is a cuttlebug one and the hand made mulberry paper has bits and pieces of dried flower petals in it. This one is A7 in real life.

The reality is the pale blue I have that looks pretty much like this, it fades to white about a day and a half after it opens. so, my thought is this one is probably a photo shopped shot. ( I know we all do it.)
Very pretty though.
 The colors on this one I did not add any pencil shading to it and this one only had 1 spritz of water on the inked rubber. the one below was misted twice so the colors blended a little better and were softer.

This one that sentiment is from the Simon Says Stamp set called You got this. this is the smallest card at A2. I actually liked the way the softness of the inks look best on this one. and because, I forget things it's a good idea for me to actually photograph and record those thoughts. because next time If I happen to see this ( I have been plugging my card shots into my evernote file with the stamps) when I am doing stuff in evernote it gives me that Oh, yeah spray it twice first thought. We are supposed to get snow tomorrow so, it will be fun to see all the flowers in the garden this weekend in the gallery. you can find the thread to play along with us here.  Thanks for stopping by.

2.14.2018

WOYWW #454 { Folded Papers}

Happy Desk Peeking Day, you can find out how to play along
 and or see more here at our hostess Miss Julia's Blog.

 So, these are tuesday after work shots. there was a color challenge this week that was a bright berry pinkish color, turquoise and peach. which looks really pretty together but, it way way out of my comfort zone. and when I came home I still had this pile of newish SU stuffs and I thought ok just play with some of these. There was exactly one stamp in both sets that I wanted so, since that seems to be the norm anymore I hardly order anymore.

 This is left out from Monday when there was a use cardboard as your paint brush challenge. all those shades of green cheap acrylic paint are very very similar to each other.

 the chucks are "drying" and the birthday cards were the first 3 attempts at that color challenge idea and the embossed gatefold kinda looked like seaweed to me. ( its not a full sized folder is a wide border one) which was a little bit of a surprise. and so, while I was thinking that I started messing around with that mermaid tail thinking just maybe I will combine these things.

this is that sentiment. It made me laugh. the bumps are a skinny cuttlebug border embossing folder. because, it is a little snarky I thought it would be funnier as a one layer card. so this is actually the first one I made before I kept trying the color challenge. We had two more baby boy lambs born yesterday. but, no mug shots. ( I am in my robe typing this) Hope you all do something fun for Valentines day & thanks for stopping by.

2.13.2018

Monday's Projects

 I am really enjoying having a little more daylight after work now a days.. so, Monday afternoon I seen the Clean and Simple challenge was to add in a bird... and so, I picked up the already colored images envelope on my table and flipped through it and found this sweet Penguin and thought why not. ( it was colored with Polychromos and Prisma pencils last fall some time) and has just been waiting. The stitched edge is a Simon Says Stamp wonky die and this one is A2 in real life. that sentiment is out of the Altenew Birthday greetings set.

 A closer look at the coloring this guy is from the Unity Stamps set called Little by Little. I wasn't sure really what color to make him so there are a lot of shades of grey. you can see the brownish "french" ones along with some cool and warm tones.

 Now this was an unexpected bonus. I had not looked at the try a new technique challenge ( the instructions are here) and I had come across some samples in the gallery of others who had combined the two and thought what the heck. ( I had changed out a toilet paper roll that morning before work and knew it.) it was still daylight here So, I tried this ( I have 3 pale shades of cheap acrylic paints and maybe an off white so, that made it a limited supply right off the bat, I did like the burst patterns I made and it had the best contrast with these shades on a darker sheet of cardstock and when it was done it really looked like a Christmas wreath to me. so, I started looking in the previously colored Christmas images envelope and found this mouse. and thought if you add a few more sprigs, it looks like he ran that wreath through the paint and all over the place haha. So, that made the sentiment ( SU) a no brainer.

A closer look at the coloring. done with pencils and a little bit of white gel pen over the top. You can't really see it but there is a piece of wide pale green sheer ribbon that runs under the bottom edge of the stamped panel and wraps around the painted panel. I probably should have wrapped around the red Corrugate too but, such is life. Thanks for stopping by.

2.12.2018

Kind Words

Just a simple one that I had originally started coloring this big butterfly from Impression Obsession for the last weeks color challenge ( which was a soft green, blue and lilac type colors) and I got the green a little too on the yellow-y olive side and the purple too pink, and I set it aside. The pencil has some clear wink of stella over the top of the wings and body. So, it was sitting on the table when I seen this weeks featured stamper was revealed to be Michele who happened to have this cool butterfly thank you card with 3 colors popping through the veins of the wings on the butterfly and I thought well, why not... so other changes were to move the sentiment up onto the butterfly panel and not do fancy corners in the matting. The kind words sentiment are from the sugar pea set called Kindness Matters and the thanks is from the Lil' Inker designs set called Just Sayin. This one finished out at 6" in real life.

2.09.2018

Inspired by {Spoonflower}


I had come across this Mermaid Tails Print inside the spoonflower site that Angie has directed the Inspiration Challenge to this week and my brain seen Easter Eggs...
So I started flipping through my hanging file folders of prints and looking for mostly solid colors with some texture or pattern to them and picked a handful of old textured mulberry papers, gelli prints, mixed media backgrounds and regular printed papers that worked together and made a row of eggs. ( Spellbinders nested egg die) and I thought I don't want to do a whole panel of these and the stark backgrounds I tried the row on were just too plain so, I grabbed this heat embossed resist background I had done with an old Stampin' Up! fine lace background embossed with some Ranger Verdigris powder and then inked with broken china & cracked pistachio oxide inks and thought OK this is a little better.  wrapped on a scallop edged vintage lace for another "row" and a ha ha almost straight line to follow while gluing the eggs. The mat is a piece of Minty handmade (bits of dried floral in it) Mulberry paper. The base is some SU pear.  This sentiment is a dollar bin Hampton Arts one. (its old) and was cut with a Lawn Fawn banner die. This finished out at A6 in real life.

My Inspiration piece which can be found at Spoonflower here.  I think I missed the yellow/copper colors but, it still has that bright textured vibe for me and I am happy with this one. Thanks for stopping by.

2.07.2018

WOYWW # 453 {timeline}

Happy Desk Peeking day to play along or see more check out 
 So the image on the far right was colored with just the two distress markers and I added a white gel pen over the top later this was done messing around for the Valentines challenge that started last thursday. this is a friday evening shot. the rest of the blooms were colored at work on friday ( there was a whole lot of hurry up and wait going on)

 On Monday I had happy mail from Simon Says Stamp, I did order two of the AI storage tins and one is completely full and one is mostly full ( no duplicates) I moved all the duplicate colors to the closet and I think there are "new" colors out now that I dont have so there is room for them. The adhesive in the back is supposed to be perfect for vellum ( I have not tried that yet) I did get a SSS stamp set and a card wrap die and 4 of the newest Oxides. ( pink, burgundy and two more greens)


On Tuesday at work there was more hurry up and wait and I have you know maybe 40 pencils there a mixed bag of things so, coloring is like having my own little limited supply challenge.
The rose was stamped with either Distress antique linen or SSS beige ( a long time ago) so I was working on a no line look with pencils.

 My desk this morning. after the nice clean shot of the new things they were all opened and I mostly cut the card wrap die a few times. I do have wax paper in it and I also am using a metal shim to get the cuts, It is going back and forth through my big shot at least 4 times, because I keep turning the die to get the center to cut. ( do you know what I mean so the die feeds into the rollers a different angle each time.) So, I have not take this to work and tried it in a cuttlebug. (but, I think it would be difficult to get a wrap card in that machine because you don't have the landscape of a big cut pad to turn it horizontal. The one video I seen of it being cut was done by Jennifer McGuire and she had run it through an electronic machine. (a small one and it cut for her with one pass like that)

 So a few cards were finished and a few pieces are waiting,

 first card (closed)
 First card open that sentiment is from the SSS stamp set that was in mondays happy mail its called.
Best ever. The background is alcohol inks on Yupo.
Closed this card is 4 1/4" square so the inside card is 4" square.

 The second trial this one is closed with a vellum belly band that hugs die is from Papertrey Ink.

The inside sentiment on this one is from Impression Obsession. so, that is what I have been up to. no new lambs yet but, the other ewe is looking closer. Thanks for stopping by.

2.05.2018

Purple Poinsettia

Just a simple one for the Dirty Dozen Christmas card challenge for Feb. 
You can find the details to play along here.


 A closer look at the poinsettia, this was colored at work last week with the ( duplicate) pencils I keep there so really its a limited supply challenge for me when I do that because, I do have full sets of both Polychromos and Prisma pencils. when I first started buying them I picked them up a handful at a time at a couple of art stores. (before I found buying sets online haha) so, when I did have all the colors I took my duplicates to work and left them there. This is the Penny Black Christmas Pride bloom heat embossed with SU pewter powder on Neenah solar white and cut out with scissors. Its flat in real life. (one layer bloom) I tried to add more shadows to the lower spots when coloring this to give it some depth.

The finished card. the silver glimmer paper is from Micheals and was cut with a Waffle flower lacy squares die. the sentiment is from the Clearly Besotted Message me set cut with a Spellbinders labels trio die. this finished out at 6" square.

2.04.2018

A few more Challenge Cards

 two weekends ago Featured Stamper was Karen who had this gorgeous fern card in her gallery that I just loved. I hardly ever use the same stamp someone picked so that I can have one change right off the bat but, for this one I realized that I have the same exact fern stamp and I cannot remember inking it before this. So, I followed her footsteps with distress inks but, in different colors. flipped the fern to horizontal and moved the sentiment down and popped it up. This fern is from Justrite and the sentiment is from the Altenew Thinking of you set.


 And while I had it out figured I may as well stamp it again. this one went vertical with a Happy Birthday tucked in.
The ink colors on the fern are evergreen bough, cracked pistachio & lucky clover.

 This week the ways to use it is to make a "love is in the air" "Valentines" card... I didnt really need a Valentine card but, I had embossed this Simon Says Stamp Emma Background in some SU pewter powder last week while the embossing backgrounds marathon was going on in my space and thought what the heck just color one. the red is Distress candied Apple and the other marker was black soot. there is some cream pencil on this and some white gel pen. the Sentiment is from the Hero Arts many messages set.


 This week's featured Stamper is Amy who has this gorgeous card seen here that I just loved the depth of color on this both the floral panel and its main matting. So, changes were to use a heat embossed Penny Black awaken flower that was colored with some polychromos & prisma pencils and added in that just so useful Altenew sentiment instead of a diecut one. there are also less matting layers on my version. The crackled over the moon press paper here has an actual texture to it in real life it's not flat.

A closer look at the coloring. which is kind of subtle so it did not want to photograph very well.

 A few weeks ago now the color combo challenge was two shades of pale pinks with some pear green. and I tried to color that kissing frogs image and ended up with too many "extra" colors in the end so, I tried it again with this Frantic Stamper marshmallow bunny die. the grass was cut with some martha stewart fringe scissors and inked with a few shades of distress green inks to give it some contrast from the pear base. that sentiment is from Lil inker make a bunny set.