 One of our niece's is a chick after my own heart with a shoe thing... bad... so, I'm certain a large portion of her birthday gift money will be used for shoes... that crochet flower my mil made, the brad is MM, the ribbon is Martha Stewart, the polkadot pp is basic grey. this ones 5 1/2" in real life.

3.31.2012
Happy Birthday J!
One of our niece's is a chick after my own heart with a shoe thing... bad... so, I'm certain a large portion of her birthday gift money will be used for shoes... that crochet flower my mil made, the brad is MM, the ribbon is Martha Stewart, the polkadot pp is basic grey. this ones 5 1/2" in real life.
3.30.2012
Just Because Sunflower
 That is an Daisy Stamp from Magenta colored with copic markers up on pop dots to look like a sunflower colorwise. on a scrap of that copper texture left over from the birdy card a while back. the sentiment's SU but, I don't remember its "set" name anymore. Think that ribbon is also from SU. the sentiments stamped on some Neenah cream with Memento cocoa. Card base is close to cocoa and this one is 5 1/2" square in real life.
3.29.2012
Welcome Gate
 Debi rak'd me a few Lockhart gate images a few weeks ago and I did color one so far (with copic markers), this one uses some of the scrap papers & bow left over from the wedding & pink chick cards earlier posted this week. Its A-6 in real life. there is a layer of pop dots between the lacey oval and the image panel.
3.28.2012
Pink Chick
 This Chickie is from the Ippity set called Your friendship, my cup of tea. It's paper pieced with a scrap of basic grey pink paper and the other colors you see on it are copic marker. the sentiments from A Muse, the brads from recollections. the paper is scraps from the wedding card earlier this week. There is a layer of pop dots between the lacey diecut squares. this ones 5" square in real life.
3.27.2012
New Beginnings
 This was done for the Unity Opportunity challenge to do a floral card... Most my Ippity stamps tend to be on the weedy side so... this is what I came up with, its 5 1/2" square in real life, tfl & Thanks for this challenge Jen! The green handmade mulberry paper is machine stitched to the green reminisce pp. June asked how the strings were attached and they are taped to the back side of the mulberry then sewn to the gingham. so the honeydew floss was tied on one side then tucked under the butterfly wing with a glue dot on the other end of it.
 This uses stamps from the Now and Always and The simple things Ippity sets.
3.26.2012
April Christmas #1
 This weeks featured stamper FS268 is to case yourself and This image star Santa wish an gift to me from Pansy last Christmas ( Thanks!) So I decided to use it because it was in the already colored pile and I need to get started on the April quota anyways... so Changed the colors and sentiment tag on this version. and its larger the orginal is here then scroll down its one of those mass card type posts ;) The Star is from the justrite charming christmas set ran a copic around the swirls of that, the believe is from the justrite deck the halls set and used the justrite spellbinders charms tag die on it. the lace and ric rac on this one are vintage. the stripe pp under the image is unknown, the pillow ticking under that is daisy d's the cardstocks are real red and river rock colors.
3.25.2012
Bow Challenged no more...
 So when I was hunting down the refuge set inside ourdailybread recently I came across this Becca's peg bow maker and thought ah ha... she has a post on her blog that shows how she made this but, for me what made it worth ordering was the fact that it comes with a video where you get to listen and watch her hands make various bows. ( way cool, I lose my bow easy every time I find it) this comes as un-finished wood in pieces.
 I stained mine green before I assembled it.
  So this seambinding bow is one of the first ones I've made. that is one of the recommendations on the video is to learn on the seam binding because of how it drapes. ( now I'd like more colors of it lol )
 The Ivory May Arts burlap string I tied around my left hand fingers like they were pegs because, by then I had the peg holder off the table again. the Northwoods sentiment has some jump rings through it and the brads unknown.
 Colored this lili of the valley image with copic's but forgot to jot down what colors these actually are. its die cut with an classic scallop rectangle spellbinders die and inked on the edges with creamy brown chalk.
  Peek inside. sentiments from SU well scripted set, the stripe pp is not marked with MFG info on back.
  This is 5X7 in real life, the pink shimmer paper is from provocraft, the grey (basic grey) was run through an sizzix argyle #2 folder, The check pinks is from Making memories, the floral pinks is from fancy pants and the base is bazzill.
 3.24.2012
Recent Finds
 Some of the things we've found in the last month or so treasure hunting. the twig basket I think will work for small things at a Ren Faire display. the blue insulators I will probably stick in a flower bed. ( that's where I found those yesterday at an estate sale in the backyard) the jello molds are slightly different then any others I've found so far and I think the cutters could become cute Christmas decorations.
 The Pink pyrex Mixing bowls I already own a set of these but, they were so cheap I couldn't leave them there ( I collect the pink ones usually) but, that blue one caught my eye the other day and I don't know how long I will keep it. blue doesn't usually last long for me. The measure cups will become "gift wrap" "cup of Love containers filled with goodies next holiday season. The old hanger I think I may drape wide lace on but, not sure about that yet.
  I have a few baskets like this... with the straw flowers embroidered on them, seen this and was totally in love with the colors and then thought wish it was a basket then thought ah heck it would look cute on display in the laundry room maybe.
 so grabbed it anways.
 one lone rubber stamp ( comotion ) was at a recent estate sale so, brought it home too so it wouldn't be lonely. the pattern I snagged to try doing some tissue paper flowers from the pattern paper. It didn't make it into any of the shots but, grabbed a stack of old map papers at one too. ( not the plastic kind real maps.) the card display thing I don't intend to use I have ones I like better that look nicer, but am thinking to cut it apart and poke them into something that looks better. ( not sure what yet, got a vague idea about wood spools maybe. ) the book was just for fun, have not read it yet. but had to laugh when I seen it. I had a hundred or more "felt" things pinned... I'm rolling my eyes here.
 vintage shoe stretchers. just for the heck of it, may look cool on display in the laundry too. probably should get some kind of display shelf in there.
 Big bag of doilies ( missing two stained ones I have in the Laundry right now) but all of them together were 1.50 WHOOOO... the bottom ones are huge.
  another one of those "idears" was so excited to see this case had a key...
 ( the key does not fit the locks haha) Others in this brand on the internet auction house's are claiming this is 1950 ish... its in pretty good shape for its age. had the bright idea I could "stain" the fabric since its fabric, tried some wood stain for the heck of it... it wipes right off. does not sink in at all... so. then scrubbed and scrubbed and decided maybe. just maybe it would not look too bad in a display of them too "blue" if i get others to layers near and in front of it.
 the satin is stained. and I need to think about this more if I want to try to refinish it ( which is not my goal in life to refinish these cases but, to use them for temporary display/storage of cards)
 So that being said had the bright idea to just tighten up the safety pins in the lids pocket and drape an old table cloth ( I dont use this one, it has a hole in one corner now) and see what that looks like... may make some kind of a skinny bunting/garland for across the top of the lid to dangle and hide more of the staining. that card on the bottom of the lid is an 6" square one, so that being said this will hold a LOT more cards then a basket does.
  The bread box I am going to tinker with as I love the outside and want to use it but, its rusted pretty badly inside. and since I don't care about resale value am going to sandblast the inside only and spray seal it.
 closer looks at some of the loot above. loaded the photos a little out of order.
  oh found these blocks ( brand new it looks like) at a school rummage sale this morning, didn't buy the suitcase thingy they were in had no use for that. ( same place that had the pattern, suitcase and also not photographed are two more old scrabble games)
 ( im taking the wood letters out)
 twig basket with old cookie cutters and jello molds.
 Some wood crates hubs snagged for the barn. we use these a lot during harvest times actually.
 Scrap Notes
 I recently seen this Amazing card from Beverly in the splitcoastgallery and I told her I loved it and of course I thought she was very brave for using that paper ( can't buy the paper anymore Ive searched high and low for it ) and so, I *think* I have maybe one sheet left that I've been hoarding and she said... I can send you some scraps, and I thought oh cool maybe there will be enough to make a card... that was an understatement a big huge envelope of these gorgeous papers arrived in the mail while I was down for the count so this is just something I put together yesterday afternoon. clean and simple ones. they are all A-2 in real life. She also sent me some already cut into triangle piece's too that I am going to try to make the quilted look background like on her card with those soon I think.
  just randomly cut on some edges with various sizes of pinking shears most the PTI kraft edges have some creamy brown chalk ink on them. the sentiment's savvy stamps ( I think )
 3.23.2012
Joy Bird Sketch
 This bird is from the Our Daily Bread designs set called You will find Refuge, and patsmethers does such beautiful things with this I finally caved and bought one for me. along with its die, but this one was cut out with scissors and I did just the bird and its foot on the branch. not the whole side branch and berries. so, this is a first attempt at coloring it ( copic's ) just winging it, I had some really beautiful pins on pinterest saved of bird images to use as coloring guides but, this is just off the top of my head. I did stamp it twice and cut the bird out with scissors to layer to the other for just some slight dimension. there is a layer of pop dots between the bottom bird layer and the cream pp layer.
the joy to you is an justrite sentiment from the charming christmas set, done on a scrap tag die cut, trimmed off the bottom with mini pinking shears and inked all the edges with creamy brown chalk ink.
 So, its using the splitcoaststampers sketch sc377 the cream and blue pp are from an MME 6" pad, the crackle pp is from sweetwater, the copper shimmer texture cs under that is from Provocraft. the wide sheer copper ribbon's unknown { bought it in the cut it by the yard thing at Joann's years ago) the layers are machine stitched.
ETA 4/11/12 this card has been chosen to be the Our daily Bread Designs Customer card of the day
Pinterest Changes...
Pinterest has made some changes to it's site you can read about it here: pinterest blog
Daisy Hello
 This Penny black stamp was done in Memento on Kraft then colored with a white gel pen ( petals) and copic markers ( everything else) the mat under it is soft sky. the lace is from American Crafts and the sentiment ( A Muse) was done on a scrap of oatmeal speckletone and diecut with an spellbinders label die. this panel is up on pop dots. the blue pattern/stripe is reverse sides of the same sheet of MME pp. the yellow gingham is unknown. tied off with a little bit of metal green seambinding. this ones 6" square in real life.
3.22.2012
Pinecone Bloom Wishes tag MAR12VSNK

| This is my second tag for Michele's challenge this one I wanted to try it with the pinecone die because I knew it kinda looked like the "flower" dies. the base on the bottom I cut with an punch bunch flower punch to give it something to hold onto. this is 2 cuts of the pinecone wrapped around each other. Done with some old DCWV pink vellum from one of those mat stacks, interesting thing that vellum is thicker then the stuff sold loose on the shelf today in A-4 size sheets. The center was kinda blah when it was done so poked this big brad through there. most these things were just laying on the table from previous almost used them projects but, not bad enough to toss in the bin things... |
3.21.2012
Melted Pearls
 It's later (remember these?) haha, found a baggie of these butterflies all cut out and ready to use when I was cleaning out the closet in February. so... they are still on the table and maybe the next round of them will show up used much faster.
 Melted Pearls butterfly was done years and years ago so no clue on cardstock, ink or colors of powder anymore if I ever knew. that sentiments from the our daily bread set called Pray, the doily is from SU ( hello doily ) stamped with creamy brown fluid chalk on vellum and heat embossed with clear. ( cut out and in half) the lace is from recollections, as are the blue pearls.
 This one is A-6 in real life, the printed paper I think could be october afternoon ( from the scrap bin no telling anymore) the kraft is probably PTI its just a tad thinner then the gkd and so I think I use it a little more freely as layers because of it. the textured blue is from Bazzill.
 This one is A-6 in real life, the printed paper I think could be october afternoon ( from the scrap bin no telling anymore) the kraft is probably PTI its just a tad thinner then the gkd and so I think I use it a little more freely as layers because of it. the textured blue is from Bazzill.
 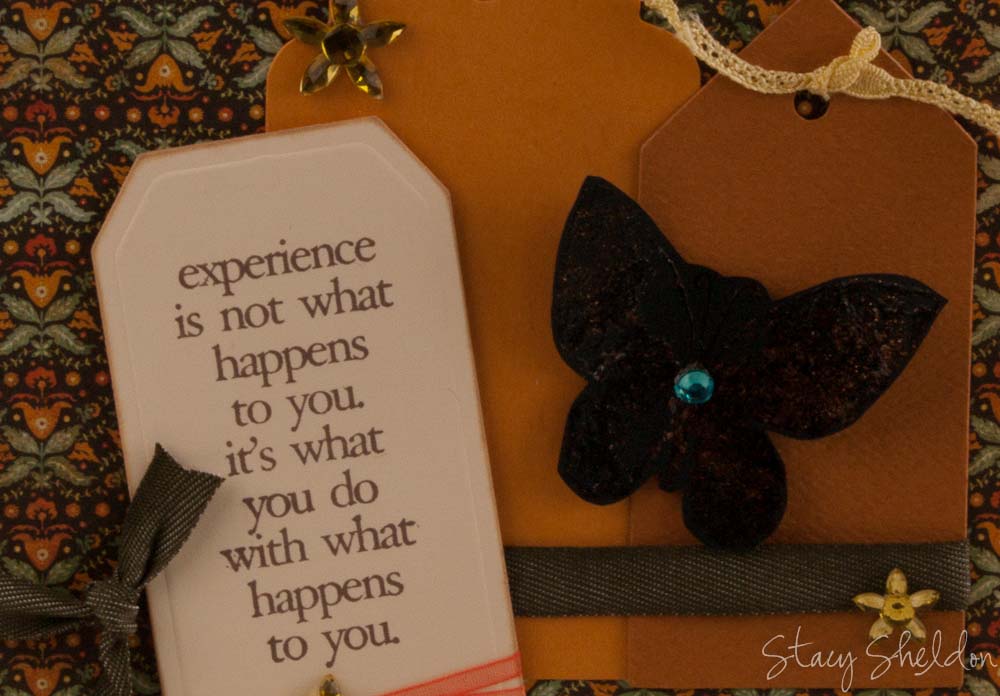 another from messing around with some of the scraps on the table and found this printed paper in the bin to tie it all together. ( ha it almost looks like butterfly paper if you squint at it ) Sentiments from stampers anonymous ( Tim Holtz line) that green denim ribbon is from su.
 Those yellow bling flowers came to me via one of the sunrooms page kit swaps. I think that pp is MME but, would have to find more of it to be certain. the skinny sheer on the sentiment tag is from the SU free gift set at the moment. the tags were cut with scraps who knows how long ago. this ones 6" square in real life, the blue lace is vintage and the yellow was some really pretty basic grey ribbon from their baby line a while back but, it unravels if you pull it.
 3.20.2012
Cheap Wine
 I've been practicing coloring with copic's mainly for the last little while and somewhere along the line between scheduling blog posts and not putting things onto the blog intended for certain people on specific dates the folder I keep things to upload in has gotten a little messy. somethings went to the scs gallery a long time ago, somethings went to the blog a long time ago and not the gallery... so until I get this folder cleaned up the next few blog posts will be things that already hit the gallery and vice a versa... Plus Ive been sick and not upstairs for over an week now.
 This silly guy's from Art Impressions, the printed paper is creative imaginations I've had it forever The ribbon and brad are unknown, the purples from bazzill. this is A-6 in real life, the sentiments from make an impression cut with a spellbinders tag die and pinking shears.
3.19.2012
Some New Phyllis Harris designs from Unity Stamps
 I fell deep and hard for this line at Unity and I refused to buy this for a long time
( I have so many stamps you know...) but, they had a super sale a while back and of course I caved... this top image/sentiment's from the Your wings exist set. She's stamped on Neenah solar white and colored with copic's the sentiments stamped with versafine on a scrap of basic grey printed paper. used that ever handy su paper punch on the side and tore the bottom and inked the edges with antique linen distress. I've had to start ordering refill bottles for my copics now and some of the ones I use all the time for water and sky have been on out of stock at oozak so... this sky is distress tumbled glass and distress stormy sky with colordusting brushes. the fibers are from brownbag fibers and the blue dot pp is from the scrap bin, this ones 5X7 in real life.
 This one just grabs me by the throat too, (she's from the present in my heart set) started out thinking I would do some "miss you" cards with her and had some my favorite things twisted threesome sentiments stamped and though haha but, you cant actually post that can you... so LA suggested putting the zinger line on the inside of the card... its for in my hubs someday pile. its not a matter of if it would be needed but more of a when would it be needed type card. This ones smaller at A-6 in real life, also colored with copic's.

3.16.2012
Flower Pot cards FS264
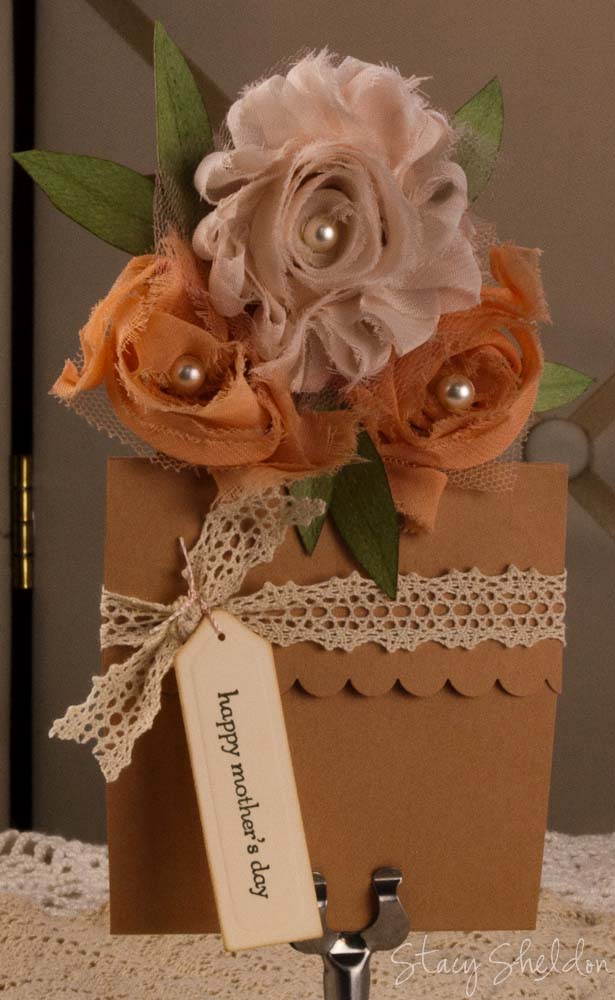 Okay this is something Janice will know (and now so do you...) fancy folded shaped things intimidate me so I just dont do them hardly ever. but, seeing as this is Janice's week I chose this card of her's that I dearly love. The changes I made was to use netting ribbon flowers and switched the ribbon tie out to lace. thanks for looking, and Congratulations Janice!! The link to the tutorial for this card can be found on Janice's original card. this one uses a sentiment from SU teeny tiny wishes, some creamy carmel cardstock. those websters pages bloomers and the largest pink flower was an etsy find. I did add the pearls to the centers of these.
  The inside or the flowers out of the pot.... see those crochet blooms in the front? Janice made those for me and I was this close ( see my fingers?) to using them on this pot card... :)
 Tried it again with the scraps of the first one, this white embossed cardstock was from the old days when that was the only way to get embossed paper was to buy it lol... used vintage lace and
 silk flowers on this one.
3.15.2012
FS265 ~ Ferns for Kecia
 When I was going through Kecia's gallery (pretty cards in there) earlier I noticed quite a few stamps we own in common and that doesn't help when you are thinking to change a couple of things to CASE it haha so, then I came across this one and I totally Loved the colors with pops of white and I don't own this stamp. so, I started digging for a detailed background stamp that could work in shades of green. the changes I made are these ferns were stamped in color ink, clear heat embossed onto distressed basic grey printed papers ( the one on the right is the first and I also changed the layout of it to portrait. I added the pops of white on mine with a gellyroll pen. these are A-6 in real life. thanks for looking. and thanks for this challenge Julie!
FS266 for Harriet
 Cracked glass... done with diamond glaze glue. It took forever to dry on sunday and I kept messing with it off and on and really wrinkled up the cardstock. at one point I hit it with an heat gun trying to speed up the drying time and boiled the glue in stead... so I dumped more glue on top of that to smooth it over a bit... the interesting thing to me is this Hero Arts flower was stamped with a tombo and SU markers... the colors of the cardstock around the flower seems to be bleeding out to yellow under the glue. ( Ive never seen it do that before, but this is a very old bottle of glue too) who knows.
 Harriets card which I will not link to this time ( she did it for a dare to get dirty challenge at scs and if your not a fan club member you would not see the card anyways) is very similar to this ( different colors and stamps, but she did her cracked glass with embossing powder)
 This one is A-6 in real life. one of the other changes I made was to try to outline the sentiment panel with an very old almost dry gold krylon leafing pen... all was well till I got to the fourth corner then out blopped a huge puddle of paint, so, had to drag it around the edge a few more times widening the gold so it could be more balanced. on Harriet's original card she had gold threads tied around the fold of the card into a bow on the front. for the most part its a keeper. but, it felt like a comedy of errors all day long haha.
 This one is A-6 in real life. one of the other changes I made was to try to outline the sentiment panel with an very old almost dry gold krylon leafing pen... all was well till I got to the fourth corner then out blopped a huge puddle of paint, so, had to drag it around the edge a few more times widening the gold so it could be more balanced. on Harriet's original card she had gold threads tied around the fold of the card into a bow on the front. for the most part its a keeper. but, it felt like a comedy of errors all day long haha.
 3.14.2012
Vintage type {from scraps}
 I know if you recognize these stamps you are laughing... yes, they are clear ones from my favorite things..."just my type"
I did that bought some stamp sets from them recently. and this is what I found so far.
This type writer paper sheet die is a decent size in real life. this particular one was stamped with memento which made bloppy splotchy spots on the image ( got better results later with versafine) but, kept this one because, it was one of the finally got smart images that worked.
 My usual plan of attack is stamp something on a scrap or what ever then die cut... the mft dies are just like memory box, poppy stamps, papertrey ink... you cant see through them... so every thing I stamped then tried to cut no matter how i lined it up, it did not cut right, it cut into the image... finally it occurred to me that these stamps are clear... I just might be able to see to stamp on the die cut... so this was done that way.
 mostly scrap papers used an goochie script folder on the embossed part, the gem thingy is from prima flowers ribbons unknown. this ones 5 1/2" square in real life.
Subscribe to:
Posts (Atom)