10.30.2017

More Fallidays & Daily Challenges

 
 So, continuing with the daily challenges the Thursday challenge was to "cut it out" have something you had cut with scissors on the project so, I finished off those tags that have been under construction for that one. the List and the packages and the love santa words are all from the Hero Arts cut and stamp Christmas list set and some of the other words are from the Unity Stamps naughty or nice set. 


 On Wednesday the challenge was a sketch one that looked like this
So, the hedgehog is an older one from Penny Black called Daisy swing it was colored with zig clean brush markers with some prisma & polychromos pencils over the top.
The lace is vintage and that whole wood grain panel is up on pop dots over the base.

 On Friday Dina had a mixed media challenge that was to be inspired by this photo below, I mainly worked off the colors and continued with that use some stamps that have not seen ink project I have been twisting the challenges to work with for me these last few weeks. the Gorjuss girl is colored with copic markers, polychromos pencils, some white gel pen. ( technically for SCS that makes her mixed media) the panel under her was done with Alcohol inks on Yupo.


 The saturday challenge is an Inspiration one and this week Steph chose a store filled with the sweetest stuffed animals type gifts in it and I chose this baby Giraffe from the Jellycat store.


The top sentiment comes with those Giraffing me crazy giraffes from My Favorite things and the sentiment below that is from the Lots of Hugs set also from them.

 On Friday Jeanne had a challenge for the free for all to use fiber... any kind you wanted.
and what I need more of is Christmas cards. so, This was done as a simple one where I poked a hole through the Yupo (heavy weight) alcohol ink background with a paper piercer and ran the cord through the hole and up the back side of the panel to tie the bows at the top.

 It's very glimmery in real life the white is a glitter cardstock and the navy is a shimmery one from Stardream and there are clear rhinestones on the die cut panel. I used that Birch Press Bailey trio ornaments die on that.

 Now, this is for the tutorial # 8 which is a Mason Jar topper (you can find the instructions here)
I think this is hands down one of my favorite gift ideas from this month, the gist of it is to cover duck canvas with two coats of Gesso and then stamp on that (heat set it) color it, and die cut it to be glued to the seals inside rings for canning jars. ( there is cheap white foam under the canvas on mine below but, from the angle I shot them at to show off the stamping that probably does not show up very well.

 I geared mine to work around things we have canned for real, the heart shaped chili peppers wreath is an old one from PSX thinking jars of Salsa here, the strawberries are from an old sketch book type set from SU that had some script off to the left that I had masked off and the bottom one is some unmarked Tomatoes stamp. They were all colored with derwent watercolor pencils. ( very easy )

 On Sunday the Featured Stamper Challenge headed to Jennie's gallery and I stopped in my tracks at this one because, I thought it was such an awesome design ( and not anything like what I would normally make if left to my own devices..) so, changes were to switch the washi tape strips to diecut scrap printed papers, I switched out the circle framing for a wreath that I made into a frame by cutting out inside and out loosely ( to keep the berries) with scissors. That noel is a Echo Park die, its cut twice the top layer is gold mirror and the bottom one is just smooth white neenah. that is up on foam pop dots over the background. (the colored background is one of the Yupo (ranger) alcohol ink ones from the rainbow on the table.


Which brings me to Monday and the first of two the second I will do after work because, it also looks like a very fun thing to play with. but, this one was done for Kia's clean and simple inspiration photos of unusual for you to make Christmas trees and I chose photo #3

We had gone out to dinner last night and when we came home the Monday challenges were up, so my card was shot in the deep dark under the artificial lights and it is really not that halloween-ish colored in real life. The frame is up on black foam pop dot tape and the fibers were pierced through the Judith tree. and then I noticed the star at the top and decided that, if I tried to heat emboss a star up there I'd probably catch the fibers on fire. so, decided to be cautious I looked for a white star button, did not find one and finally decided on this flower because, the shape. so, technically I have done all 30 challenges 8 of the last 7 days of daily challenges, and 8 of the 10 tutorials. I still have not made a decision on the foal point for this shaving cream sparkle tutorial ( #9) and I want to give the try a new technique from today a go also.

So, that is about it for the moment. Thanks for stopping by. 

10.25.2017

WOYWW #438 {24 cards plus}

Happy Desk Peeking day, if you'd like to play along and or see other spaces
 the link up starts here at our hostess Miss Julia's blog.
 

 So, the make things for the booth next month is in full stream ahead mode now.
Yesterday it was revealed that the surprise component to being listed as a Yeti for the fallidays challenges was to complete 1 of the daily challenges for a total of 7 from 7 different days of the last 8 days you can upload to that gallery. ( the deadline is Halloween) so, since I had all these 3" card bases going on for the booth production. my "color combo" card ended up becoming one of those.
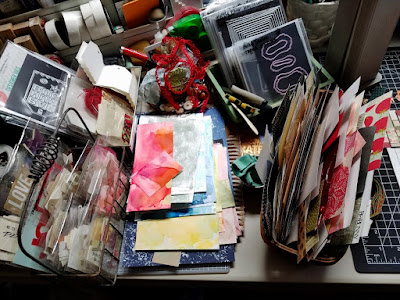
 this is how I did 24 cards in about 3 hours off and on yesterday evening. all year long you guys see me stamp those sentiments on scraps, well when I make a card that is 5 1/2" square all those drop pieces get trimmed to 6" long, scored and folded and tucked into that plastic bin. (instant rainbow of bases) the basket to the left of that is printed paper scraps. ( slivers ) but, big enough to work on a 3" card.


 behind that basket is another basket of all the previously stamped and die cut sentiments tucked into clear envelopes. (ready to use)
along with all the extra backgrounds I had made during Fallidays too. (and those tags, I have not done "naughty list" ones yet. ( soon ) maybe after next week.
 a look at the center, I just pick up scraps from the basket and look for bases colors that are "close enough" the little houses came about because, my first thought for the Halloween color combo was do do something with a whole bunch of houses on black berry bliss color and then all the purple and black houses just faded right into that. but, before I put the die away I happened to cut some more in other colors because, I think I may do some of these booth little cards with little house scenes on them.

 the rest of the finished cards. they are really simple. and people just love these.

the color challenge this week is blackberry bliss, ( a orange-ish color and a yellowish color with black and Halloween themed) (I forgot the names of the other colors already I just squinted at the screen and thought "close enough" no one has wet noodled me for not having the proper Stampin' up colors in case you were wondering. So, today will probably be a pick up this mess situation because the daily challenge is a sketch and I will need more room to work I think. ( so, it may just get pushed into another small basket so I can drag it out again after. oh, and my new glasses are at the store today so, I need to run by and see if better bifocals changes my life hee hee. Thank for stopping by.

10.24.2017

Tutorials & Elves

 Michele ( whose talent I admire so much) has written a tutorial for Fallidays for foam glitter ornaments... and so, I gave it a try. (you can find her instructions here) I did use a Spellbinders ornament die for my shape, and  papertrey ink smallest scallop border die for the scales. ( I was thinking to turn this into a mermaid tail when I started but, that tail I have been pushing around was not the right scale for this. I also covered the whole thing with diamond glaze after to try and seal in some of that glitter. ( that part is working so far)

 There was also one from last Saturday that was to use a triangle treat box die and turn it into a witch hat and I kind of read it and mostly just looked at the finished picture and so, this was the only one I did not print the instructions for and it's missing the belly band hat decoration step. oops. I guess the tag makes up for that though. and I also added a second layer of printed paper under the vintage doily as it felt fragile to me.  Here is where You can find the instructions for this tutorial and a printable template if you do not own a triangle treat box die.

 this was supposed to be a "clean and simple card" and the green stitch die I forgot to use my tan mat... so, it cut a hole in front of my card base, so I promptly cut the larger one from the other half of the card base, and layered it to another card base... and tucked in some glitter washi tape and then it was no longer clean haha.
such is life.
 Now this one of all the elf cards is my favorite so far. that background is alcohol inks on Yupo ( thin ranger brand kind) and the branch is the last left over piece of "glittered suede cardstock" This one is 6" square in real life.


 nearly a total copy of the first one except I added some snow marker to the white of his hat and then I die cut it, so running it through the machine after meant it flattened the snow. oops.


These the one on the left I had added the snow marker after the card was done so his hat is floofy and the tag was done after so it has been smashed flat.
but, I think they will go over well at the booth next month. Thanks for stopping by.

10.23.2017

Fallidays {the last 10 challenges and the 5th Tutorial}

 A few more fallidays projects done. ( I still have 5 tutorials left) but, this completes the 30 challenges and one more tutorial in this batch since the last time I posted on last Wednesday. 
You can find the list of all the challenges here in this one post. and all the tutorials here in this one.

Jeanette has a challenge to recycle something and this cardboard was pulled off a shipping box that came in the mail last summer and was covered with acrylic paint on its ribs during dare to get dirty. ( it as the smallest scrap so, it counts as hoarded right?) the sentiment is a new one from Two Lips stamps. the leaf is the drop piece from the card below.

 This one was done as a combo for last Sunday's featured stamper challenge where I seen this card of Tracie's that stuck with me and then Joanne had a challenge to decorate a window for the holidays. the big stitched leaf is from Simon Says Stamp and the smaller one is from Neat and Tangled. The sentiment is from the Altenew beautiful inside set. the scene was done with pencils and markers the only stamp is the sentiment.

 This one was for Holly's challenge to make a fall card with only fallish colors no whites no creams...
the girl is from Penny Black and the printed paper is from Basic Grey and the framing was done with an Studio Katia darling ribbon and dotted frame die.

 Barbara has a second challenge to use waterbased ink on your backround, stamp with waterbased ink and spray it with water so, it looks like it is raining... this gal is from Unity Stamps and the sentiment is from the Ellen Hutson mermaid tails set. The grey and black print is all shiny and slick in real life.


 Kelli has a challenge for being inspired by the Dolly Parton song called a coat of many colors...
So, I had water colored this triangle background ( SSS ) a long time ago and set it aside because, it really has too many colors for me it makes me feel frayed around the edges to look at it, and then
I seen it in the tray on the table I thought well just add some fray and suck it up..

 The lamb is from Whipper Snapper and the sentiment is from Dylusions.

 Patty B has a challenge to be inspired by the movie poster for the old movie called a Nightmare before Christmas (below) so, I grabbed this old Stampendous pail topper stamp and inked it with some versamark on a crumpled textured peach print scrap and then color dusted the purple distress inks in from the edges. The back of this tag is a shimmery one from die cuts with a view that is purple but, you don't see that from the front. the dies are from Memory Box.


 Kathy has a challenge to do a holiday treats project and this weeks featured stamper is Jeanette and I had come across this funny one from her first and then decided on this one to use as a loose sketch. and it all just kind of jumbled along in my head.


Edna has a challenge to create a card with only capital letters in the sentiment for a thank you card for a shelter. so, this is a single stamp from Concord& 9th they were giving out as a purchase with a purchase thing a month or so ago and I heat embossed it with some peach altenew power.

 Dina's last challenge was to create a wall flower card with the flower peeking in from hanging off the edge of the corner. the bloom is from Penny Black.
there is a bit of stickles glitter glue on the petals and some prills in the center.

 Lori C's last challenge was to be inspired by the movie a Christmas story. (which I have not seen) so, since her first prompt was the color red I decided to just use that and keep going. no stress.
the image is an old one from Hampton arts. the lace is vintage.

 And Lydia's last challenge was to do a snarky Christmas card... so this elf is from the My Favorite things set and the sentiment is from the Hero Arts offbeat holiday messages set.
the stitched framing was done with a simon says stamp wonky die.

The 5th tutorial I have done ( I've done them out of order) is the mini hoop ornament. that bird is from Inkadinkado, the sentiment is from Stampendous. done as a chalkboard on stretched burlap in a 3" hoop found at Joann's fabric's the edge has some glittery vintage crochet lace on it. and that poinsettia is a multi layer button. (so, if you cut the shank off it falls apart) so, this particular one has the shank on it. The instructions for this are found here.
All the challenges and tutorials need done by Halloween so, there is still a week left to finish the last 5 for me. Thanks for stopping by.

10.18.2017

Panel Pull out card

 The 7th tutorial for the Fallidays challenges is for a panel pull out card. (you can find the instructions here)
 as I was messing with this no matter how much I scored the foldlines I could not make the folds stay flat. and so, since my first wonky stitched rectangle for under the die cut tree was printed paper ( to break up the red below it) I decided to cut a second piece to make it stronger... and tucked some burlap string between the layers to tie it closed. the OCD part of my brain said this has to be tied shut, this flapping in the wind thing was not going to work for me at all... and so, this meant that I did not follow the directions all the way through, you are supposed to mount this to two more pieces of flat cardtock that do not open. and that just did not look good to me either because, I did not use paper that all came from the same package, most of the plain cardstocks I looked at against this did not look good either. and so,its just a bitty fold of cardstock and I am ok with that.


 especially with it tied shut hahaha. the tree is from Taylored Expressions its called trim a tree. done on scraps. and up on foam pop dots over the wonky rectangles.

 while I was attempting to decide how long to cut the string I knew it had to be long for the folds to be able to unfold all the way, but if I had glued all this to one more layer of cardstock there would have been not a way for the string to have the movement it would have needed to open and close. and I would rather have the tie then the back panel so.

there is a stamped "word" border on the 4th panel. This sentiment is from the Hero Arts winter silhouette set. I am not sure what I am going to do with this next, I think it may end up on a tag maybe. maybe. I really like the movement it has when it opens, I think this could be a cool thing to tinker with and see if there is a way to make one of those fold hold a gift card some how. as always thanks for stopping by :)

WOYWW # 437 {piles with more Fallidays projects}

Happy Desk Peeking day, if you'd like to play along the link up
 starts here at our hostess Miss Julia's blog
 So, this is a Wed. am shot, before the sun was up. the piles are back in force but, things are still on the table.
 off to the left these are some tag ideas I had sunday evening after dinner while I was mostly caught up with the fallidays challenges. I think I will be doing more naughty tags next. ( that always sells well at the school booth coming up next month)
 Underneath those piles of tags are piles of yupo backgrounds done with alcohol inks last weekend.
found this photo in my phone this morning and thought what the heck...

 on monday I had an eye exam and new glasses have been ordered ( stronger bi-focals with a taller lens part because, the glasses I have now are pretty slim and they think the problem I have with the bifocal part is there is not enough room for the progressive in them)
anyways Rebecca's card challenge is to do a dog/cat thank you card for a shelter that can give them out to the humans who have been rescued by the furbabies and it has to have felt on it. so, these are headed to that card drive.
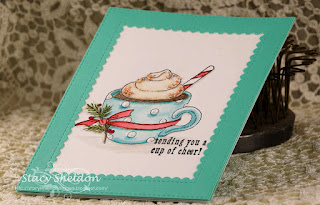
 and Kathy has a challenge about a fall/winter drink so, this is a closer look at the cup. ( Impression Obsession cocoa comfort) and its shot on its side (wet) last night, the whipped cream has prills on it like cinnamon puffs on Mexican coffee yes?) and it was water colored with some pencil over the top of that. the circles have white nuvo pearl drops on them. the berries were colored with a spectrum glitter pen.
The sentiment is from that Hero Arts coffee tag set that came out last year and the frame is a Mama Elephant park avenue diecut. (this one is A2 in real life)
So, at this point I think I am behind by 4 challenges and 5 tutorials.
and its mostly a lack of time rather than a lack of supplies ( except the double sided foam sheets shipped today, (from Iowa) so, hopefully they will arrive by next weekend. That's about it from me, thanks for stopping by!