Showing posts with label Personalized. Show all posts

4.17.2025

Odds and Ends

 A while back one of the Clean and simple challenge was to do spring and I happened to start adding more watercolor paints over the top of the (marker?) color to this previously started and set aside Penny Black snail and then when it was finished I decided it was not really all that Clean looking with that printed paper. So, I never linked it up.

I fished that sentiment out of one of the envelopes in the drawer so, I am not sure who makes it off hand.but it was die cut with a spellbinders labels trio die. The snail panel was probably cut with a Simon Says Stamp wonky stitched rectangle but, I do have similar stitches from one of the UK companies that has a set in A6 size so, one of those your guess is as good as mine now as to which one it was. That textured printed paper I think is Die cuts with a view. 


This is a little bitty gift sack that has an Tag for J for Easter this year. The butterfly is a sticker that she gave me, the tiny tag I sprayed with some shimmery paint spray a long time ago, That gold ribbon is probably Offray and the black hemp string is maybe lawn fawn? ( once you take the wrapper off its hard to say anymore) The tiny J tag was done a long time ago I have a little plastic envelope of letters I use frequently die cut in it and this was fished out of there the color of the tag was a nearly perfect match to the purple flowers on the tissue paper. That's about it from me, Hope you are doing well & thanks for stopping by.

12.10.2024

Watercoloring Simple Ornaments

 It's still crunch time for last minute Christmas crafting in my world so, I knew that I was going to do the video Brenda is sharing this week as a quick tag. This can be seen here on YouTube by Sandy Allnock called How to paint EASY ornaments in watercolor. I started out by cutting my Arches cold press with the top layer of the smallest Crealies tag die in the set to use the mat die for a color block.

I knew I wanted something small for the ornaments and I seen this Milk Glass ( I use it as a tiny vase it's currently holding a bottle brush tree which you will see in the shot below) and decided it would work. I used some Windsor & Newton Red and some Kurake opal (shimmery paint) for the baubles and then used some Daniel smith (what ever was on this palette for the boughs & strings) 


I shot these with my cell phone and the red is not quite right in these photos but, it will have to do. It's hard to shoot red and white under any conditions with digital but, its even harder when there is little daylight. :) the B is an Woodgrain one from Memory Box, that red is actually this really cool textured paper that looks almost like leather. The with love here was stamped with Versafine Aged mahogany ink and cut out with scissors. ( it has more of a barn red color to me in real life) I want to say these are not so pink in real life but, I think using red and white did make pink Baubles. and that's OK. its something different. If you'd like to play along with us you can find this challenge here at SCS. Thanks for stopping by.


VSN The Holiday Edition {Part 2}

 A few more of the VSN challenges have been done by me and I had the bright idea to use my cell phone for all these shots, the tags from the previous post also. The thought was it would save me some time and since I am mostly shooting this in the non daylight hours under studio lights the thought was maybe some of the white balance would be better and the colors would not be so off. ( shooting a lot of red and white the two colors I tend to struggle with shooting)At any rate here's a few more things. 


Misti has a do Christmas Plaid as a challenge and I found this piece of really old Basic Grey that I have had squirreled away and decided it would be cute with a Penguin. I stamped this Xmas Wait! from Penny Black on some Arches cold press watercolor paper. I did use black since this bird has a lot of solid sections and I knew it would be "quick" as there is a 1 hour time limit to VSN projects. I did end up going over the top of those black spaces with lunar paint to fill in the texture there as the ink you know was only on the top surface. (that is something I really enjoy with coloring with watercolor paints is how easy it is to fill in something like that) I cut the paper with an Impression Obsession deckled rectangle die and then found these previously hot foiled sentiments in the drawer. ( I have an entire drawer filled with sentiments ready to use like this) so. I don't remember which foil this is or what the color of the paper is but, it does look better in person.I also added some clear sparkle glitter glue to the fur trim on his hat. This one is A2 in real life on some Neenah solar white. 

Jeanette has a put a gift on it challenge and I had this Stampabilities Mice Elves stamp out on the shelf behind the table with an IO sentiment wanting to use them. So, to save some time I decided all the gifts should be variations of a Red & White combo then I only needed to paint red spaces and add shadows.

I did add more paint to it, along with some grey fineliner pen on the eyes and a few places in the stack of packages. There is also some stardust gelly roll pen on the white spaces for sparkle.

The tag base here (some SU red) was cut with an Sizzix super crescent tag die and the text paper was just trimmed off the edges on the sides with scissors. The stitched B monogram here is an My Favorite Things stitched Alphabet die. The IO sentiment was cut with a Poppy stamps mainstreet pinpoint tag die and the Ribbons are unknown. This tag is about A2 in real life.

Holly has an Glistening snow challenge and I didn't want to over think it. So everything you see here except the sentiment was found in the drawer. I can't remember what color that snow embossed panel is or even which folder I used to do it, but when I fished it out I did die cut it down smaller with a spellbinders labels die and then when everything was glued together I added Crystal stickles glue to the centers of those snowflakes. The base here is some mirror like silver. and all those Snowman pieces are diecuts from IO dies. The sentiment. I cannot read the mfg. info on the end of the block but this was stamped on some Neenah and diecut with a Jumbo IO stitched banner die. This is A2 in real life also.


One of the challenges is an CASE challenge featuring Lee Murphy's gallery as she has been one of the organizers of VSN for many years and she is retiring from that. So, after a long deliberation I settled on this particular card because, I still love what she did here as much as the first time I ever seen it. And Lee is the reason I own these swirly Spellbinders tag dies. 

So what I did was I started with gathering some printed papers in similar kinds of colors. The stripe here is probably SU. The floral is Basic Grey. The plaid is from , and the pink cardstock is some Flamingo from SU. This snowman is from Stamps by Judith. it was stamped on some arches cold press a long time ago when It was also started to be painted. I tend to add more paint and shadows now then I used to so, when I find a "started" coloring image I tend to add more to them now when I use them. I did use less layers than Lee's card and one thing I did for interest was used different stitched square dies on those layers and then I put a tiny bit of watercolor paint into the stitched holes to emphasize them a little bit. This one is 5 1/2" square in real life. So, since Lee is also very much into Sparkly besides Pink, I added some crystal glitter glue to the hearts on the mittens and in the cluster of sprigs on the hat. That's about it from me, I know there are something like 4 more challenges left? I am not sure if I will get to them all but, I am thinking about a couple more of them. Thanks for stopping by.


12.07.2024

VSN The holiday Edition {Part 1}

 There is a VSN going on at SCS and ( if I knew ahead of time you guessed it I forgot a long time ago) so, I spent a little time off and on today peeking in between other projects and playing along with making some mostly reds and white gift tags as I had gotten out some previously started red & white bits and pieces for the IC tag I did yesterday after work. 

The first challenge is Kim's and she wanted a Star ( or multiple stars) on the project. So, this one went together really quick for me as all these pieces were on the table. 

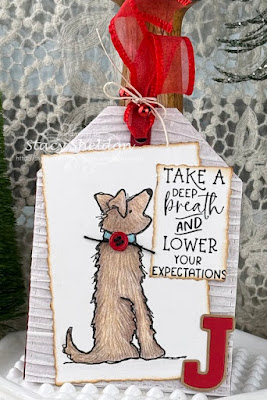
The next challenge I did was Vicki's Christmas critter one, and I did go fishing in the previously colored images bin and found this dog from Impression Obsession and I'm guessing I colored this a couple of years or more ago as it looks like it was done with pencils to me. That silly sentiment is from Taylored Expressions and it made me laugh. I did cover up the heart that is part of the dog's image but, I needed room for the sentiment. 

Lisa Has a "sparkly Santa" challenge and both this tag with this paper and this All Night Media Santa gift tag image ( water colored and stickled a while back) were both already on the table in different bins so this was my 5 minute tag.

Susan has a Splattered Snow challenge with the explanation of what you did. So, (this is a wet shot by the way) I had found this previously stamped and had one layer of watercolors paint on it Snowman and thought OK you can fix this. ( I have a few more skills than I used to so, I am getting braver with making the paints deeper and or more layered ) So, this received another layer of paint and while it was damp I splattered it with some pretty wet White gouache with a round watercolor brush. 

So as it started to dry I hit it with the gouache a couple more times with less water in the paint to get smaller splatters. This tag was diecut a long time ago ( not sure off hand which die it was but, want to say probably Sizzix.) the tiny snow is falling tag is an lili of the valley stamp that I had stamped on a scrap of water color paper and cut out with scissors, my friend at work does "happy snow dances" all year long so, this will most likely go to her and the oh joy, I know she will chuckle over. That's about it so far from me, I forgot to count how many challenges there are but, I am thinking about a few of them off hand but, we are hoping to get some more of the Christmas decorating done this weekend so, we shall see how it goes. Thanks for stopping by.


12.06.2024

Inspired by {Imagella}

 This week Julie is sharing the Imagella site for the destination for Inspiration. At this point in the year, I am finding I need to find time to address all the envelopes of my Christmas cards I've already made this year and Make tags for gift wrapping. In the past I have made a lot of Personalized tags that were based on things or colors the person receiving the gift likes and these tags, they are interesting but, they do not tend to look all that great on the wrapping paper I own. So, with that thought in the back of my mind I squinted at my Christmas paper and I see alot of red and white. with some green. but, mostly reds and whites. So, I typed in Red & White to see what would happen in the search box at Imagella and one of the images that it spit out at me was this one. And I thought that was interesting in an abstract kind of a way.

So, I spent some time puttering around with reds and whites of found things on the table from what ever was in reach and things I had not played with a lot as of yet and so on. I left my self a tiny sliver of space to glue and came up with 1 tag so far.


And yes, its for me. I get bluntly told there are more tags for everyone else in the basket for people wrapping then there are for me. So.That's it from me so far. I intend to do a few more over the weekend as time allows. If you'd like to play along with us you can find this challenge here at SCS. thanks for stopping by.


11.30.2023

Dirty Dozen Christmas Sample for December 2023

 I recently (Okay it was in October but, this is the first time they have been cut) picked up these stitched tag dies   CREAlies - Dies - Big Labelzz & Tagzz dies #20, with stitch lines at Frantic Stamper that layer and I loved that. also these tags are Huge. :) this one I did here uses the two smallest tags in the set. What the photo does not show you is it also comes with two hole dies so, when I did layer these two tags I did glue them together before I cut the hole at the top so that it would line up. 

The base tag is some Simon Says stamp school house red and the top is some Neenah cream that was stamped with the Unity Stamps A Little Christmas Carol background stamp with pinecone ink. the edges of that have some Distress Oxide vintage photo as does the edges of the Simon Says Stamp Holly & Berries tag die. now that one the top layer of the tag was cut from some handmade rice paper because, I liked the texture but, its kind of flimsy so, its backed with a second layer of just Neenah earthstone cardstock. The berries were cut from some Recollections glimmer paper and the holly berry printed paper is from the Simple stories vintage rustic Christmas pad. I did add some Nubo Crystal glaze to the berry dots on that print as the big diecut berries are so shimmery in real life.

The tiny made with love heart charm is a generic one I found here on Amazon. These are the copper colored ones as brown is a color I use all year long. I did think about cutting that tag hole off the holly tag but, left it as another opportunity to tie stuff on ha ha. The red fiber here is from "On The Fringe" it was called hot pepper and I really don't think any of those old fibers online places are open anymore I think what I see being sold mostly anymore is dyed seam binding type things. The letter B charm and the findings tag in the top of the red stripe ribbon is from Tim Holtz. ( I toss packaging so, I am not sure what their real names are anymore but, I don't use up whole packs of things right when I get them so, they are old and from the stash)


While I had that holly tag die out I decided to use it on the Work Christmas turkey gift card holders and so, I found these plaid bases in the closet. And the holly was cut from Scraps. The Merry Christmas is from Lili of the Valley Christmas sentiment tags set and a lot of the edges were inked with Vintage Photo DOX inks.


A closer look at that, the pack of plaid cards only had like 5 of each pattern so, I ended up mixing two of the mostly reds for these. I want to say they are hobby lobby but, they could also be Joann's or Micheal's. ( I have a drawer filled with little A2 cards and I am trying to use them up) There are red jingle bells on the cord with the sentiment tags also so they do jingle for a little bit of fun. :) That's about it from me, If you'd like to play along with us you can find this challenge here as Splitcoaststampers in the special forums set aside for Fan Club members. I hope you are doing well & Thanks for stopping by.


12.18.2022

Red & White Tags

 
Today is the day they share a Featured Stamper to case at Splitcoaststampers, and right at the top of her gallery I seen this red and white Poinsettia card and I loved that. I don't need more Christmas cards at the moment but, I found this year as I was wrapping that I have a ton of really 3-d Huge tags. I have shared that before that everyone hands them back to be after they open things so, some of them are really old and also heavy, mixed media style tags. and some of them, the colors just did not really work with any of the Christmas wrapping paper or bags I have bought over the years. One thing I noticed this year is, I tend to buy Red, White , Green & Gold for Christmas papers with some grey mixing in the last couple of years. And it  just felt like it was time for some new ones.  And this year there was a lot of small things like gift card sized things to wrap. So, so far these are smaller tags.

So, I spent hours this afternoon pushing around and die cutting things from red and white scraps to make some new tags. 

A few of them went off in left field with some greens and blues and blacks mixed in. Which is OK as all of these will work well enough with wrapping papers I have.


This most recent batch finished is more red and white than the first 6 so, It's going to be the one that loads to the gallery. If you're really curious about what die is made by whom shoot me an email, I am going to go see if hubs needs a hand with dinner and such so, will edit with die names later if needed. Hope you are all doing well, Thanks for stopping by.


12.10.2022

A do - Over

 Jean has a recycle an old Christmas card into something new challenge for the Fallidays where you are to start off with a photo of your original card. And my original card, is actually one I made that came to me in the mail in 2016. (the original blog post is here) It was one of those simple things that, was one where as soon as you shoot the shot, you see the goof. ( I had the printed paper on the cardbase upside down from the hanging "Joy" diecut tag. And I had made this to be a filler card for the booth. And I must have said something to June about it, because I didn't know this at the time but, she always helped me do the booth and sold cards and such too. but, that year for Christmas this card came back to me in the mail from them. 

So, Jeans challenge was to recycle one. And I started playing with this tag thinking, ok you could doctor that up or something. and as I played with it, I realized the ribbon would slide right off that half the printed paper as it was just looped around the gatefold on the left side. 


 as you can see I have barely a square foot left to work in since the piles have grown around the edges of the desk as Fallidays continues.


I had recently bought this stamp on ETSY from Laddstamps ( seen here ) and when it came in the mail I had stamped off a few on scraps on the table then painted the leaves and berries. This particular one was die cut with a wonky stitched circle die from picket fence studios. So, I picked it up and decided to drag some paint around the edges in a wonky way since its not a perfect circle to begin with grabbed a box of previously die cut from cheap watercolor paper scraps box and started digging for flowers. Didn't find that but, did find some sprigs. Added some paints to those. I did have a diecut doily on the other side of the table I had been pushing around the other day making gift tags and used that for a backer to tie the hemp string to. 

I did end up pulling up the ends of the printed paper on the left hand side to tuck that vintage lace behind the glitter paper. Lucky me, I did it without ripping it. ( happy side not the bazzill and dcwv papers tend to have plastic in them, so they are easier to move things after the fact) ( which is handy when you glue things on upside down eh?) slipped the original green ribbon back on and just tied it into a knot this time, trimmed the ends and used some foam pop dots under the doily on the left half of the card so the panel does not wiggle much. And I think I will pop this back in the mail on Monday to them again. I am debating if I want to just draw a line on the liner and write a note across the other half of the inside or totally make it a new piece. I am leaning towards writing in the blank space so she can laugh about it too. If you'd like to see what all the fun is about with the Fallidays Challenges you can find them here at Splitcoaststampers to play along. Thanks for stopping by.


1.02.2022

More Tags

 Since I have zero J tags and or B or D or any of the other letters I use besides old tags for me and hubs I am still making tags to have a little cushion of a head start for next years Christmas. And all the Christmas is still out here old and new. 

So I found these mini wreaths at Micheals and they went on deep discount sale after Thanksgiving so, I picked up a few packs thinking they would work on tags. This tag shape is a die from Moda Scrap called Diamond Tag. its hard to see through the printed paper but, there is some stitch detailing on the edge. The sentiment here is from Simon Says Stamp Fa La La set.


The snowman on the left is from Judith and he was colored with Daniel Smith Paints. The B die is from Altenew, the tree is an old yellow sizzix Pine die. Which when I look at it I thought oh this will be a fun one for little Country projects so, I had cut a few from scraps in Christmas patterns. The heart here is from Ellen Hutson folk heart set. The big die is from the Mama Elephants Tags a Lot set, and it was run through a embossing folder from Simon Says Stamp called Holiday Greenery. the flower is a layered mulberry sticker.


This one the primitive star is an Sizzix die that was used to cut the faux leather fabric that had been ironed to (mind just went blank but, its the iron on fuseable web type sheets that make fabric into press on patches type of a thing) The tag here is a Mama Elephant tags a lot diecut with some acrylic paint over the cardstock. the J is from Altenew. The snowflake is a diecut with a Hero Arts gem on it and the sentiment here is from the Mama Elephant holiday messages set.

The sentiment on this one is from the Unity Stamps Old Traditions Set. The B here is from the My Favorite Things stitched alphabet set, the tag it self is from the Ellen Hutson tag trio set. the Poinsettia is an Sizzix Tim Holtz tattered Poinsettia that was run through its matching embossing folder. that great big brad was a gift from Paula a long time ago for one of the wish rak exchanges I think.

This is the same large die from that EH set. The deer here is one from Gourmet rubber stamps - Emerson line and it has a sentiment under the deer that reads deck the deer. and I placed the Club Scrap watercolor Christmas set believe over the top of that. The deer was painted with some Daniel Smith paints, the J is from MFT and I am also hunting for that tag die info as it is also not in the evernote file ( or the "tag" of it is not ha ha. 

This one was done for my friend at work who is all over anything glitter. the holly is a Tim Holtz Sizzix Holly Branch pieces (without the branch) the No Peeking tag is from Avery Elle and the tag it self is from Altenew Holiday tag die set. SO between these and the gnome tags it feels like a good head start for next season. Thanks for stopping by.


12.17.2021

Inspired by { Emerlyn's Closet}

 Not too long ago I was doing a search for something and I stumbled across a thing called free cell phone wall paper, I guess its a thing. The art on the one I seen caught my eye as it was a tall skinny design and I thought oh, that would work as a tag. So, this week we are taking a look at a blog / Pinterest board of someone who has gathered some of the wall paper images together. This is not something I have ever actually done, saved these things. The one I kept coming back to was this one, I love the colors. That being said I tend to create tags using up things laying around and scraps so the first trial tag didn't look much like the Inspired piece and I ended up giving it a second go.

This version uses lots of scraps the tag it self is an Spellbinders Shorties tag die, the Deer is from Penny Black, the tree is from Taylored Expressions. the eye on the deer is an tiny black pearl from Recollections. I just cut some sparkle mulberry paper for the snow bank. The round tag was cut with a Sizzix tags and words die and the stitched J on it is from My Favorite Things. (it is missing the tiny pops of red) and probably has too much white. 

A closer look at the deer stamp from Inkadinkado. ( this was a gift from my son for my birthday this year) and I've had it out on the wall like art so I could remember to use it. I stamped this with some Pinecone ink on some old Basic Grey printed paper that had a little bit of Distress Oxide speckled egg o the edges. I did end up going over the tree's with some Daniel Smith watercolors and then the eye I had inked with a white gel pen but, later in the process I had splattered some White Gouache on the whole tag ( the trees on the edges were done with paint) it really faded so, I did more paint and more white gel pen on the eye but, it really lost its detailed definition along the way. )


Both the printed paper layer and the Gina K Kraft layer under it were cut with a Sizzix Tim Holtz tag & book plate die ( which is an Size 8 shipping tag in real life) the tiny tag on the top ( I forgot) the Joy on it is from the Hero Arts Hero Greetings Christmas messages set, the sheer ribbon is unknown and the iridescent cord is from May Arts. It is nearly impossible to see but, there is an Stitched T diecut from some very pale shimmery Diecuts with a view cardstock in the lower right corner on this tag front. That's about it from me. You can find this challenge here at Splitcoaststampers to play along with us. Thanks for stopping by.


1.30.2021

Happy 80th to my fil

 Recently my father-in-law turned 80 years young. and I had picked up this Riley & Co. sentiment knowing the big day would arrive sooner or later and we have a few guys on our list that would smirk at it.


The Norm stamp is from Art Impressions, he is colored with a combination of Copic markers and Polychromos pencils with some white gel pen on the flowers of the shirt.  The 80th numbers were diecut with Taylored Expressions just a number set from some textured pale green Bazzill cardstock. There was a case your self Clean and Simple challenge at SCS a few weeks ago and I had started this card knowing I wanted to use Norm for the image and ended up picking this old card of mine as the jump start.

The stamped panel is countersunk behind the Basic Grey printed paper and this one is 6" square in real life. There are no embellishments on this version, and my fil is more of a plaid shirt guy than a Hawaiian one but, the he can fake a good grumpy look when he wants to.


Hubs dad's family had been secretly planning a surprise party for him for months but, due to the ongoing Covid situation the only people who dropped by that day were us (because, we are already in their bubble) So, we were able to drop off our things and Crystyl's families balloons. He was very surprised & tickled. He was on his way down to the lower garage with dog treats for his furbabies when we got there so, this was a taken by surprise shot.

12.31.2020

A Few Tags {how I spent Christmas Break}

 
So, having a 4 day weekend last week and having been feeling a little bored with the tags I found in the closet that have been being re-used I decided that since there were no looming deadlines of make this or make that right now going on, it was a good time to start a new pile of tags for next year. ( and I do not have a stash of C tags because, every time I do make one for Cortnie, I give it to her ha ha.) 


The large alphabets here are Altenew Mega Alphabet letters, they were cut twice on printed papers glued to blank cardstocks for some depth and stability. the just for you on the left is from a Sizzix tag set called tag with snowflakes. The No peeking tag is from Avery Elle. both of these tags the texture was done as Faux Patina. The Noel die is from Echo Park.

The tiny James tag was found in the bottom of the little basket that is holding these letter tags to be used and I decided to add it to this larger tag diecut that had been run through the bigshot with a embossing folder. The shipping tag has some Distress Oxide inks stamped direct on it with a Simon Says Stamp plaid making set and the letters in the name are from the Tim Holtz Alphanumetric set. The for you with love is from the Simon Says Stamp Joy for you set cut with a MFT jumbo fishtail banner die.


The C on the left is from the Pinkfresh Studio's Adore alphabet set, and the tag is from the Altenew Holiday tag set. The tag on the right is a re-habbed one. the largest snowflake was on a different tag, the shipping tag was sprayed with ink and the other layers of snowflakes came out of the bin of precut things and the letter is from the same Adore set. The sentiment is I think Tim Holtz on a Mama Elephant slim tag that I cut the end off with some pink shear deco scissors.


The tag on the left with the D that bird on the branch is Penny Black diecut called Perched. the tiny poinsettia came out of a spellbinders decorative frame set. The poinsettia ornament on the right is a Hero Arts die, they are both on Spellbinders "Shortie" tags, although I did trim the one on the left to make it more square. 


The embossing folder the two upright tags ( T&C ) is from Simon Says Stamp called Holiday Greenery. the skinny tags laying down are cut with a tag from the Sizzix Brenda Walton XL Library pocket die set. the round one in the center is something I cut with a Cricut when my mom first gave it to me, I cut pages of these round tags in this size and still have a stash of them. The sentiments here are all from that SSS joy for you set. 

The Ho Ho Ho here is an Impression Obsession die, the tiny poinsettias are from spellbinders and the larger one came pre made like that. The tiny snowflakes are also dies but, I lost track of which set they came out of.

The birdhouse one on the left was a tag that got re-habbed from the basket, the original version of that tag can be seen here. (scroll down a little bit) it really surprised me to see that post was from 7 years ago. Now the tag on the right is something I think really different for me, I did this one jump started by Ina's tag seen here. ( she is featured stamper this week at SCS)

I had this little snowman previously colored from when I received it as a gift from Unity stamps a long time ago its been waiting for an idea. The tree is from the reverse confetti set Holiday gnomes and was also previously colored and cut out just waiting. So, I cut the snowman out with some scissors and added some clear wink of stella to the banner he his holding and put foam pop dots behind him. the You'll never guess sentiment is from the Hero Arts Snarky Christmas messages set cut with a MFT stitched dome die, and the letter J is from the pinkfresh Adore alphabet set. And it is on a justrite tag that is really old. the main tag it self is from the Poppy stamps mainstreet pinpoint set and it was run through a tasteful textile folder from SU. 

Doing that, I had completely covered my table in bits and pieces and then hit the wall with the mess when things kept sliding off the piles to the floor and I spent hours cleaning up these left over things. but, the temptation is still there to make a few more maybe with different alphabet letter sizes. ( and preferably less mess ha ha) That's about it from me, thanks for stopping by.

12.17.2020

It's beginning to look like


I seen something somewhere, danged if I can find it again. but, there is someone out there who made kraft tags with this die and sheet music as the base of the tag, they had a lot of red and white and layers of diecuts and maybe fluffy snow and the colors grabbed my attention so, this was the beginning. The sheet music stamp is the background one from Stampin up using some versafine tulip red ink. I started cutting piles of foliage with strathmore watercolor paper, neenah solar white, some red scrap & PTI vellum cardstock from the Sizzix winter leaves set ( the vellum one with red stickles berries on the right), Concord & 9th stocking stuffers set ( pine sprig), Spellbinders Shapeabilies Joy ( tiny pine red sprigs), Impression Obsessions twig wreath has a pine sprig &  The tiny poinsettias are from the spellbinders holly frame set.

and it grew to this. the tag die is from Papertrey ink tag sale #4, the flowers are cut from watercolor paper as I had intended to color them red but, ended up changing my mind. I find it really hard to make nearly duplicate things so, these gift tags or gift card holders that go to work are on one hand interesting to do and a thing I find hard so, when there are so many after a while I start doing a little less to the pile so that I can actually finish them lol these photos were shot over a series of days actually. 

which morphed into this. The sentiment is from the Simon Says Stamp Joy for you set stamped with some tulip red versafine and cut with a memory box stitched circle die. The ribbon is simple red grossgrain tied off with some natural hemp string as I have never been able to tie grosgrain and have it look good after I was excited to use up what I had of it. ( its the little things you know) :)

and finished like so for the work Christmas gift card holders going out with the payroll tomorrow, these were glued to white pocket things from paper accents. ( the pockets were big enough to hold gift cards they way they sell them now in all that excess cardboard) The name tag dies are from an old retired Justrite set that Spellbinders made for them called nested frame dies set. I just wrote on the kraft card with a white gel pen. There are some bisque liquid pearls inside the poinsettia diecuts. I cannot believe next week is Christmas, most of my Cards are sitting here waiting for me to address them and such. I do not know why I find that to be the hardest part, it would probably be easier if I made a big batch of very similar cards and there was not such hemming and hawing about who should receive which. That's my usual anyways since I make mostly one of a kind cards, its hard to decide and I put it off as long as possible. hope you are continuing to stay healthy & thanks for stopping by.