5.31.2020

VSN Mini Summer Playlist

 Misti has a challenge themed Tutti Fruity and I knew when I started water coloring this big and bold friendship cupcake from Colorado Craft co. that Sharon had a challenge about using two shades of blues. but, I decided somewhere along the way that this was going to be for the fruit suggestion because, I really cannot think of a fruity card I need right now. That was done on some strathmore watercolor paper and cut out with scissors. The sentiment on this is from Riley & co. This one finished out at 6" square.

 Now Kim has a sketch where there has to be 4 ( of the same) shapes in the corners between the layers of rectangles. and I knew I had this embossing folder that does not see much action and I dug it out ( which I did flip this sketch onto its side for the sentiment (Riley & Co.) to work better and. I started digging in a black embellishments box thinking I had something little that would work and came across these really old Pioneer photo corners. ( And I liked that just fine with those) but, I also found these Darice gems and thought why not.  I am thinking this sentiment calls for a little bling. This one is A7 in real life.

 This was done for Sharon's two shades of blues challenge, And I had received that speckled egg oxide ink in the mail last week so, I ended up adding in a green between the blues. ( the green is evergreen bough) and the bottom blue is peacock feathers. this was done on some textured sundance felt coversheet ( 80#) that I probably got too much water on it, ( its still being pressed flat) and continuing with the use things that have not been played with yet or much in my room I ended up adding this Tim Holtz pressed foliage image and the Foliage sentiment from Evelin T designs. This one is A2 in real life and one layer.

Lee has a challenge to do a rainbow or a card with all the colors of the rainbow on it, and doing a quick search in Evernote it spit out this set from Ellen Hutson called over it that I have never inked. So, I grabbed some zig clean brush markers and started applying them with an aqua brush hoping for a little bit of a pastel look. ( it kinda sorta watered down the colors but, this is still very bright in real life) I didn't have enough spaces to do all the colors so, I started doing the colors over the lines then later added some gelly roll stardust glitter gel pen on the lines. ( I might add some wink of stella to this later to make the whole rainbow glitter) this was cut with one of the squares inside the Waffle flower lacy layers set and that is up on foam pop dots over the base. the little note finished out at 4" square in real life. This is all 4 challenges from the Mini event and the full range of the rest of the challenges is supposed to happen in the end of June. That's about it from me, Thanks for stopping by.

Smoking Hot

This week's featured Stamper is Chrysi and I came across this card fun card that made me smile from ear to ear. and I instantly thought of what you see here ( stamp combo) 

 So, this is Madge from Art impressions stamped with some versafine ink on Neenah solar white, she is colored with a combination of copic markers ( skin ) and polychromos & prisma pencils. That panel was cut with a Waffle flower A7 rect die and matted with some gilded ink recollections paper that the dark spots really look like gold ( see below) the whole pad looks like variations of alcohol ink backgrounds with some gold bling spots. So, to work in some changes I did diecut the Riley & Co. sentiment with an Avery Elle Party tag die and tied that onto the sheer ribbon with some fibers by the yard baby blanked yarn. and it is up on foam pop dots.

I did wrap the ribbon around the top of the stamped panel because, the sheerness I think just blends a little with the wispy look to the printed paper. but, from this tilted angle you can see how the gold glimmers. That's about it from me, thanks for stopping by.

5.30.2020

Inspired by {Nail Art}

This week Kia has pointed our attention to a very pretty nail art board. and I thought to my self A2 sized cards are tiny haha, I cannot picture how small the brushes are that were being used to paint these fingernails. ( Amazing!)

The butterfly is from the recent Simon Says Stamp kit that arrived and is called Beautiful Butterflies.
I had seen the nail's below and remembered these stamps had come and decided to just go with that. It was stamped with some versafine clair nocturn ink on strathmore watercolor paper and colored with some kuretake gansai watercolors. This panel was diecut with a My Favorite Things stitched dome die. The background was done picking up some of the left over paints off the glass mat where I colored it. The same thing was done to the sentiment which I cut out with scissors and bumped up on some foam pop dots. The card base is a pre-made A2 one from Hobby Lobby.


 A closer look, the wings really are covered with clear wink of stella but, it did not want to photograph for me this time around.
I did smile a little when I made this post as I realized I went with a little more greens than blues as seen in the Inspiration shot I chose but, I really like how this turned out and just shrugged.

You can find these nails here on the pinterest board and this challenge here at SCS to play along with us, thanks for stopping by.

5.27.2020

WOYWW # 573 {playing}

Happy desk peeking day, if you'd like to see more spaces or play along 
the link up for this blog hop starts here at our hostess
There is also a new Instagram hashtag of #WOYWW
 
 So, sometime after last weeks photos when I got almost done with what I had going on with the unmounting/consolidating stamps adventure, I ended up ripping off enough stamps to fill 28 sheets of those 30 sheets of foam. so at this point there are two sheets left in the closet. there are also 7 or 8 pages of stamp filled ones that need cut out and such. but, I am taking a break my hands hurt. I will probably finish them off in a few days I ended up placing an order for more of the plastic envelopes I file them into. 

which meant there was time to play, somewhere in all that the stamp set with those butterflies arrived in the form of a kit from Simon Says stamp so last night after dinner I did stamp off a few of them on scraps of watercolor paper and play with them. the one in the front is not done. the one on the bottom of the pile will be a sample for this coming weekends inspiration challenge at SCS.

And that's about it from me, I hope you are all doing well. thanks for stopping by.

5.22.2020

Inspired by {A Cottage in the City}

This week Amy has directed our attention to A Cottage in the city store online and I came across this apron seen below. I really love that, I have an apron that I never wear ( it reads don't make me poison your food) something I hauled home from New Orleans a long time ago because, it made me laugh. but, as much as I love seeing them I have managed to resist buying more real fabric ones even if I love how they look so, I do have a few of the old Karen Lockhart stamps of Apron images and this one ( seen below)

 I stamped it three times, the top layer is on some Authentique printed paper that I cut out with scissors and while I was looking at it, I cut the ruffled shoulders off on purpose trying to make it look more like the sample but, then when I got around to stamping it for the mat piece and the belt, pocket and neck tie I decided to leave them on, thinking it would fool your eye into not seeing the shoulders right off the bat. ( yeah, it was one of those things that sounded good on paper that didn't happen for me in real life either) :) The mat and card base is some Neenah earthstone cardstock and the mat was cut with a Tim Holtz stitched rectangle die, the seam binding lace is vintage. the sentiment was cut with some Hero Arts circle dies and is up on foam pop dots. ( I have spend the last few years unmounted sentiment stamps and I missed adding this one to the evernote file so, I do not know who makes it sorry)
This apron can be found here in their store. and you can find this challenge here to play along with us. Thanks for stopping by.

5.20.2020

WOYWW #572 {Progress}

Happy desk peeking day, if you'd like to see more spaces or play along 
the link up for this blog hop starts here at our hostess
There is also a new Instagram hashtag of #WOYWW
 
So last week I showed you a stack of 17 sheets of foam covered with stamps ripped off the blocks. ( I decided that would be my UFO for this weeks 11 YEARS anniversary of What's on your Wednesday Workdesk challenge post ) and Saturday I spent pretty much all day cutting them out. and I had stamped off two sheets ( which are half the size and said to my self you should take a photo of what that translates to cut up) so this is missing a few stamps but not many.

by Sunday Evening this was how many sheets were considered "done" and my usual is to put them away where they go by theme and then I said I wonder how many sheets this is going to be when its done so I left them in this container.

this is also Sunday evening these were all stamped and the sheets were laminated but, I did not get the stamps moved to the sheets and "done"

So basically this many stamps remained at the end of the day to come home to on Monday after work.
(and I had to stop stamping and chop up and round the corners on more half sheets for them) ( its just plain cheap 110# white card stock from a US chain store Joann's fabrics) so, its really toothy and not as smooth as Neenah and good enough for this project.

and this is Tuesday night after dinner. and the total ended up being all these sheets here ( the one on the top outside that stamp the foam did not want to come off of the rubber and hubs decided to help me and took it to the garage and used shoot not acetone something ( something horribly smelly) to remove that foam and its still fragrant and that sheet is headed back out of the space for a while. 

So, I am leaving you with that same drawer I showed you last week. this is mainly flower stamps, a few garden scene stamps but, the majority is flowers. the iris project cases in the front are PSX botanical stamps and the ones towards the back are garden things. Foods and Veggies and such.
The intention is to get the boxes writing cleaned off of them because I re-arranged things so many times and then get their forever labels on them. ( It really gets old to open these boxes box after box for an hour looking for something.) the fingers walking through a bin of sheets is making me much happier. That's about it from me, I hope you are all doing well. Thanks for stopping by.

5.15.2020

Inspired by { the wooden shoe tulip farm}

This week we are taking a look at the wooden shoe tulip farm online as visiting there in person is on my "bucket list" They have so many cool shots people have uploaded to their feed on facebook ( seen here this is my favorite) and a pinterest boards collection too. this card below was jump started from a pin on their creative ways to use tulips board and I cannot read the language of where this photo came from.


 I just loved all the whites and the softness of the colors the tulips have in the scene below, so I started out cutting lots of tulips and leaves from the Hero Arts water can and flowers die set from Strathmore watercolor paper. ( the Sizzix Tim Holtz potted set) was cut from the same paper. and I used mostly Zig clean brush markers with a couple of SU markers and an aqua brush to color the pieces. The tiny brads in the bands on the bucket are from recollections. for the floor of the scene I cut a skinny rectangle of the printed paper and then just stuck it in the paper trimmer trying for a corner. The sentiment is from the Hero Arts tulips set and was just done with some Versafine clair nocturn on the printed paper. I did spend a bunch of time thinking about adding some pussy willow stems and maybe a vertical sentiment where the candle stick is in the photo below but, I ended up really liking this one like this. and so the base is some gmund woodgrain cardstock and finished out at 5 1/2" square.

The source for this pin came from a blog that I cannot read the language it is posted in but, this link here goes to the source for this photograph as far as I know. ( you have to scroll down the page) You can find this challenge here at SCS to play along with us, Thanks for stopping by.

5.13.2020

WOYWW # 571 {piles}

Happy desk peeking day, if you'd like to see more spaces or play along 
the link up for this blog hop starts here at our hostess
There is also a new Instagram hashtag of #WOYWW

 So, Julia tossed out the idea of doing a finish some project with a deadline of next week. and really about the only thing I want to be over with is un-mounting and re-organizing my stamps. So, with that thought in mind on Saturday afternoon I started ripping more off the blocks. and I ended up getting 24 sheets stamped and laminated so these photos are from Monday Am before I went to work.

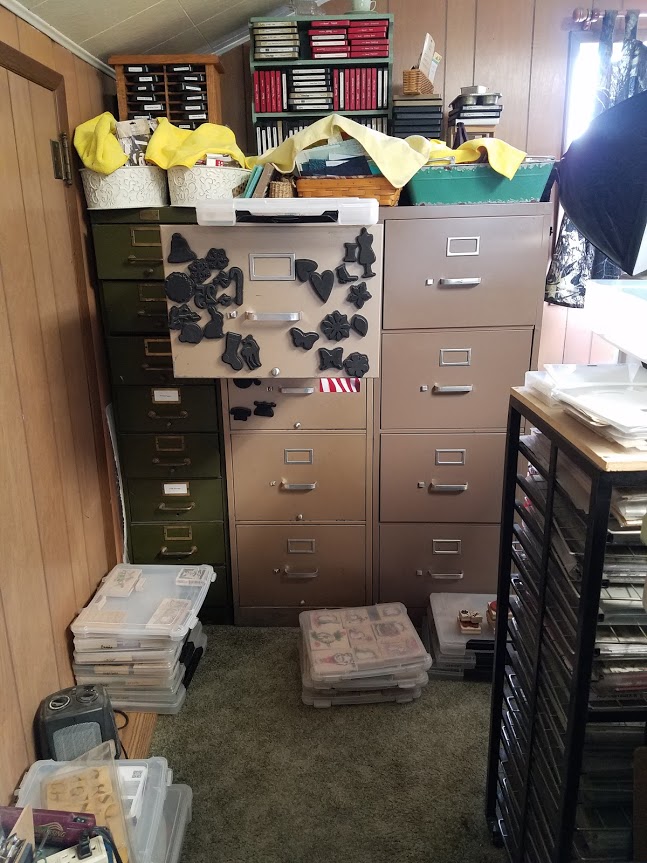
 Stamps that had been mounted to cling foam and laminated sheets of images needing put away.
(the large boxes were how I stored them as wood mounted stamps Iris brand project cases)

 This is one drawer of a legal size ( width) of old metal file cabinet that has 4 drawers. and the idea I had was that the stamped sheets could fit into this standing up right. Good news, it works. ( those boxes are holding PSX botanical stamps still on wood blocks.

Stamps that need their sheets from the other shot put into the pockets and put away. and so, Monday when I came home I did do that and ended up ripping off enough stamps to fill another 17 sheets of cling foam. ( I have 3 more packs of 10 on order) (two will get delivered this week) and so, I am starting to feel "this" close on this adventure. The main thing is there are no stamps on wood in the closet anymore, or on the metal bakers rack all the stamps are either in project cases, waiting to be trimmed from the sheets and then there are 3 drawers with things waiting. will I finish this by next week? bwahahahaha no, but, I intend to make a much bigger dent.
when I ordered the third pack of foam sheets on Tuesday am from Amazon they informed me that I have hit my limit of buying this stuff. ( who knew there was a limit?) ha.

 So, the stamp blocks in the front here need photographed as they are not in the evernote file in the computer. ( that was done after this was shot) and all those sheets were picked up and moved to the now empty shelf in the closet. (which means things on the floor on in the closet will be moving up in life soon) ha ha.

the stamps up against the closet door are all needing ripped off the blocks. the pile of boxes to the right of that have some penny black animals that I just may keep on the blocks and need moved into the old style project cases as those are the newer versions that are too tall and do not look uniform in the drawers. ( not an issue there are piles of empty boxes on the other corner of this space)

and it felt like everywhere I looked was a mess so, I hit my limit for that and the table was cleared off so that I can continue with this project after I get some samples made ( hopefully today after work) its supposed to be raining off and on the next few days so the light is not so great. so we will see. at any rate a lot of progress has been made here. Thanks for stopping by.

5.08.2020

Inspired by {Lia Griffith}

Last week I was poking about in this weeks IC thread ( one of the perks of being a team member is knowing in advance the destination) I received a phone call from my oldest niece that her mama was in the hospital and I was really struck by how much I loved the simplicity of this butterfly wreath adoring the book shelves.
and thinking of Peggy and how much she likes to read I decided to adapt what I had seen to make this card below for her.

 Instead of a book shelf I ended up keeping the colors similar and using text printed paper ( bo bunny press boulevard print) to cut the sizzix floral wreath die #3 from. I added in some prima mulberry flowers and yellow stickles to their centers and the sentiment was stamped on a pale pink-ish/peach-ish scrap with a new Riley & Co. sentiment because, she has a sense of humor.
The butterflies were cut from acrylic paint covered card stock and has some recollections pearls on them. This did end up safe to post as I did hear from her earlier in the week while she recovers at home.
This butterfly wreath can be seen here in the Lia Griffith site and you can find this challenge here at SCS to play along with us, thanks for stopping by.

5.06.2020

WOYWW #570 {loot}

Happy desk peeking day, if you'd like to see more spaces or play along 
the link up for this blog hop starts here at our hostess
There is also a new Instagram hashtag of #WOYWW


This is a Tuesday afternoon shot as the last order I had placed online from Simon says stamp has arrived. most of the middle of the country has been opening up the last few days and ( not where I live) and this week I will drive for dry Ice twice. so, the amount of cases here has not changed but, now they are offering immunity testing? something I have not had any coffee yet, so mind went blank on the word. 
and they are shipping out even more test at the moment. 
the Tim Holtz die has been on my wish list for ever and a half thanks to Angela. and the other things came a long for the ride. the mess underneath is from ha, I actually got this weeks IC sample done last weekend and had not been over there to put things away as of yet so, I would remember what I used. plus, the watercolor pencils are still out because, I ended up doing a few more cards that way ( vintage water coloring) besides the ones that made it onto the blog last weekend. We are all good and healthy here just tired.  on one hand I can not hardly wait for things to open, on the other hand when I am honest with my self, the chances of me actually going into said places is probably on the low side. ( my life has really not changed that much during this pandemic, I mostly just go from home to work, the bank and the grocery store on a regular basis. the difference is making pit stops in the city where I go to fetch the ice, that has a lot more places to go shopping or out to eat ( and open bathrooms ha ha) So, that is what I miss I think the feeling of just stop here real quick and see what's new and use the restroom before you drive back. That's about it from me, thanks for stopping by.

5.01.2020

Inspired by {Canva}

 This weeks Inspiration hunting is taking place inside the Canva site and I came across this wedding invitation and loved every detail and it made me remember I picked up this Honey bee mother's day set last year and I really bought it for the large sentiment thinking these flowers were a little modern looking to me... and when I seen that wedding invitation I said ha, you could totally do them as Vintage Watercolors (tutorial found here) and rustic it up a little. and so I did.

 I did place the flowers in a Misti and then I had cut the watercolor paper into 3 5 1/2" square pieces and stamped one side then flipped the papers and flipped the top side into that same space to have this shape on each panel I colored. The center ended up being a tad too small to fit the large sentiment that comes in this set, so I started poking around in my room and came across this SSS set that had a skinny one and decided it would work. It's hard to see but this entire watercolor panel is up on foam tape over the Bazzill card base. This card is 6" square in real life.


 and with the second panel, I decided I liked one piece of the flower row better than the other, so the one that was the least favorite is the base here. ( they were both cut out with scissors) and I had made this cardbase a while back and discarded it and thought the colors were close enough to the watercolor paper to work here and after I cut out all the blooming flowers and popped them up on foam pop dots I decided this piece was too short for a 9" long card and grabbed the left over stems, leaves and berries and tucked them in with glue dots and thought this will work.

The sentiment here is a printed one from one of the simon says stamp reverse print sets. I am planning on tucking a few more micro glue dots into this one before it goes out in the mail and the congratulations will go on the inside of the card.

This wedding invitation sample can be seen here on their pinterest board. You can find this challenge here at Splitcoaststampers to play along with us.  That's about it from me, thanks for stopping by.