1.31.2024

Watercoloring a Bunny in Winter

 This week Brenda has shared this video of doing a bunny in snow with watercolors seen here on YouTube. And the sketching the bunny was not going well for me so, after making some blue cardstock I decided to go smaller and taped off a piece of A6 watercolor card.

Stamped off a bunny on a scrap of Neenah regular cardstock with some versafine and cut it out with scissors. 


Added some shadows to the bunny and the snow forgot to add some blue to the very bottom to make the scene more framed. such is life. 

Decided to run the panel through a Penny Black stitched frame die ( the largest in the set) and then taped the pieces back together again after and that was as far as I got before the challenge went live. 


Decided to cut it down a little more and added a redlead sentiment to the bottom. The base is some sundance felt white textured cardstock cut to A6 in real life. If you'd like to play along with us you can find this challenge here at SCS. thanks for stopping by.


1.23.2024

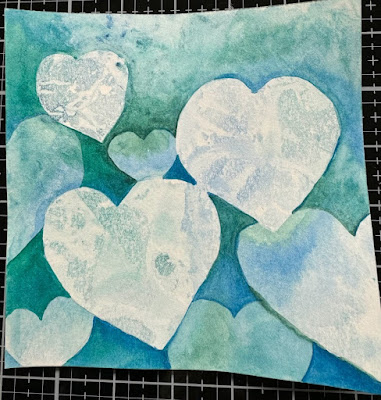
Watercoloring Negative Hearts

 This week Angie is sharing this video that shows painting the negative space around hearts for depth. I thought the video looked interesting and I gave it a whirl ( on strathmore student paper) 

I thought it may be interesting to have two the same layer touching. if I had to do it again I would have left space between them. 

first round of paint drying under wax paper.


First layer dried, I guess I could have also used some other pencil as I can barely make out the pencil lines here. 

First layer of hearts


next layer. 


So far I am liking the colors here but, I think I would like this better if it was something line forest trees or leaves or something botanical like that rather than the hearts. 


So I cut it down to 5" square wrapped some teal-ish Offray ribbon around the bottom. Poked around in my already stamped sentiments and did not see anything that said pick me. I did mount this to a 5 1/2" square of sparkle bazzill cardstock and this is as far as I got with it. I have to decide what I want to do with it to pick words I think. I am guessing they will be in the lower right corner over that ribbon though when I do figure it out. If you'd like to play along with us you can find this challenge here at SCS. Thanks for stopping by.


1.21.2024

Inspired by {My Red Door Designs}

 This week Denise has shared with us the My Red Door Designs which is a little quilt shop. The have a site, sell on Etsy and a collection of pin boards. So, I seen this heart quilt right off the bat when I peeked. 

And I pulled out some hearts I had diecut in the past. 


And then I promptly decided they were too not right. but, I had fun poking around in them and just might do something with them soon-ish so, they are still on the table. And I knew I had this old Authentique printed paper that has quilted hearts on it that I have like 1 sheet left. 


And I had cut a piece of it into a square and pushed it around on that red bazzill base for a couple of days also. And I kept wanting more texture. What I love about the quilts I own is touching the stitches. So, then I had an ah ha moment and dug out this old Hero Arts stitched heart, stamped it with some pinecone ink on some Neenah white ( which was glaring white with the vintage vibe the printed paper had) grabbed the trusty SU Canvas background and randomly stamped some of it with Antique Linen Distress Oxide ink. It kind of grew layered and collaged from there. The Washi Tape postage stamp is from the 49 & Market Vintage Artistry Serenity Postage Washi Roll. ( these are very cool if you have not seen them there are perforated holes in between each "stamp" on the roll of tape, I know I have a few more of the patterns and one is vintage Santas ( swoon) The heat embossed heart is from the Paper Sweeties Homespun Holidays set and I colored the center with a fine liner pen. (cut it with scissors) The red string heart is a diecut from the Papertrey Ink Bows galore set. I did add some crystal stickles to the knot of it but, then I flipped the card at some point before it was completely dry so, it smeared and then I just added some stardust gelly roll pen to that and as faux stitches around the heat embossed heart and the edges of the tiny craft tag. The sentiment on that tag is from the Simon Says Stamp deer delivery set ( it was a free gift years ago, I am not sure they actually sold that one) and the tiny red brad is from Recollections. I did trim that panel down with a Tim Holtz Deckle trimmer as I wanted as much of that paper to peek out as possible so, I did end up cutting into that sheet to have a piece that would go edge to edge. The red lace is vintage and I don't have a lot of it, so I did cut it off at the edge of the cardfront instead of wrapping it all the way around like I normally would.  That heart strings sentiment is an old one from Susan Branch made by All Night Media. 


A cell phone shot trying to catch the sparkle. ( there is not a lot of it) And I kept thinking this could work as a Thank-You card so, 

I stamped this Tammy Tutterow Thank you heart from Spellbinders ( I've had it a while, I do not know if its still made) on some Neenah earthstone with Acorn ink and started coloring it with some reds and white and sparkle pens for the inside of the card. This is 6" square in real life. That's about it from me, I hope you are all doing well & thanks for stopping by. If you'd like to play along with us you can find this challenge here at SCS.


1.16.2024

Watercoloring Simple Hearts

 It's my turn to host the water coloring challenge at Splitcoaststampers and when I was trolling video tutorials at YouTube after Christmas this one by Marena Art seen here on YouTube caught my eye. I think it was the 3-D heart that most interested me as I seen it and her color combo's. I know she makes her own paints and the colors I have from Daniel Smith I do not even come close in the pink ranges when I am messing around with mine so, I knew it would be different right off the bat. One of the tips in that video is she is using up not so great watercolor card to do the simple cards from rather than using the good stuff. and I do have a small stack of Strathmore student grade papers to use up still so, I started by chopping up a 12" square sheet into two A6 cards and one drop piece.


The drop piece received water and splatters and random mixes of pinks. I knew going into this that I wanted a 3-D card and I did not want the hearts to be perfect and as I was doing this I intended to grab a primitive heart die but, I decided to just wing it instead.

So, it turned out not so primitive or perfect and I was OK with the colors. 


I knew for the second one that I did not want to doodle that ribbon fold for the heart texture and decided to do 2 overlapping hearts instead. these are just free hand ones and you know it's hard to see the clear water when you make the shape but, all in all I think these are just fine for simple balloon shapes.

When all the paints were dry I did cut a second heart out of the drop piece for the Valentines day card on the right and did use a piece of score tape to attach it. I had originally started out with the top heart being nearly the same size as the flat painted one but, I wanted the flat one to peek out around it so I did trim that top heart a couple of times to get it smaller and then doodled some stitching along the edges of both. The doodles and balloon strings were done with an Micron pen (both cards) and the reverse printed sentiments are from Simon Says Stamp. that is so handy I think to just pop those sheets in the trimmer and have something ready to go. That's about it from me, I hope you are doing well & thanks for stopping by. If you'd like to play along with us you can find this challenge here at SCS.


1.13.2024

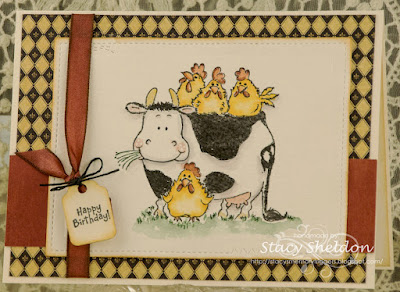
Birthday from the farm

 A very long time ago I used to trade stamped images on SCS with people in Pay it Forward stamped images threads and via Wish Rak. it was a good way to see the size of a stamp in person before you ordered in online because, at that time my coloring skills were very small and some images I did not know then what I know now to make it work. So, I did buy a lot of stamps to have things to "offer up" in trades. and that is when the collecting of "cute" stamps started. Over the years I have spent some time hunting down those stamps I really liked and wanted to play with again so, this week I received the Penny Black "from the folks" which is the cow with chickens on it. I don't know why but, it seems like the chickens and cow stamps do not come up for sale on the second hand sites as often say as Cats, Dogs or Hedgehogs do. So, this was a pretty exciting happy mail day in my world and I had to stamp one off and color it up that night.

I stamped it on some textured arches 100% cotton cold press paper so, the ink was not as perfect as if I had done it on smooth card and so, all the black you see here is actually watercolor paints as I went over the tops of the lines after the other colors were dry. There is a tiny bit of white gel pen on the heifers cheeks. I did use the crazy stitched die from Impression Obsession to cut that out, I just love the random stitching patterns on its edges and so, it hardly gets put away since I got that set. The tiny tag tied to the Martha Stewart ribbon was something I got a huge baggie of them once at a yard sale so, I think it was something people could get from an office supply store once upon a time. The sentiment on it is from My Sentiments exactly and there is some Distress Oxide vintage photo ink along the edges of all those papers. The print is a double sided piece from Graphic 45. The base is some textured sundance felt, cut to finish this card out at A6 in real life. I hope your having a good day & thanks for stopping by.


1.12.2024

Inspired by {Notebook Therapy}

 Hi, this week Kia has chosen Notebook Therapy for the inspiration destination and I came across this pin of Gingerbread cookies. I liked the colors and the theme. So, I grabbed some scrap strips of Arches cold press and gave them a wash of "gingerbread" color. intending to die cut them with cookie dies. 

But, while I was waiting for them to dry I started shifting through the pile of new stamps that have come in and just under the top was the Adorn it Gingerbread collection 2 stack by Dianna Marcum. ( I have been making a pile on the table of new things rather than just putting them away.) So,  knowing I wanted to watercolor but, not really wanting to use good painting paper for it. I stamped them on some Strathmore Mixed Media paper. ( its smooth-ish and can take some water)And painted with both Daniel Smith and Windsor & Newton watercolors there is both WN white gouache and Dr. PH Martins bleed proof white on the bowl and snow on the cover panel.

The plaid piece on the left is actually glued on the inside of the card, the tiny ginger at the bottom was stamped on one of those ginger strips above and cut out with scissors. I have been seeing things like that on YouTube lately with people decorating the insides and backs of the cards & I like that a lot. So, the plaid sheet is from the Simple stories Country Christmas line. The cover image was die cut with an Memory Box Curved cap pinpoint layers die and is on a pre-made sparkly red Paper Accents cardbase.

The sparkle is impossible to shoot on a red card. ( I keep trying ha ha) at any rate there is also a blank white piece also cut with the same size die as the cover to have a place to jot a note and then the plaid recipe piece looks like the image above, I did not die cut it. So, I have been toying with the idea of taking it out and cutting it with a curve also but, so far have resisted that urge. That's about it from me, if you'd like to play along with us you can find this challenge here at SCS. Thanks for stopping by.


1.09.2024

Watercoloring a Heart Wreath

 This week Linda has chosen this collection of Valentine/Hearts in this video seen here on YouTube from Tina Williams Art. This video starts with a glimpse of the 5 styles of hearts she is showing as cards and what caught my eye was the 5th card on the right. Its an open heart with foliage along the outside of the heart white space. So, I thought OK that looks cool and I did fast forward through the first 4 cards I watched just a bit of each one being painted before I just caved and skipped to the end of the video. 

I had some printed paper ( Basic Grey) on the table and I decided to use an CREAlies Heart die to cut one out of a piece of it. It probably does not show up well but, that die does a stitched edge along the Heart and I thought it was a "different" shape, not so traditional or primitive. I used a water soluble pencil to trace around the edges of it on some Arches cold press wc paper.


So I started doing some simple leaves and petals trying to stay on the outside of the heart white space. ( the white dots are Windsor & Newton Gouache)

Added a little more and then instead of adding in purples. ( my brain balked at that right off the bat) I decided to do some wiggly grapevine wreath twigs in the other edges of the heart. ( I did paint over the top of the pencil lines and never did erase them.)


 Added some tan-ish babies breath type sprigs and more paint on those petals again. I was not really liking these blooms much but, I did add more gouache over the tops of all the paint when it dried again also and decided to let it ride instead of making it too busy for my tastes to use.

So, then I grabbed a X stitched square die to cut it out and trim it down a bit, it was tapped on two edges with washi tape but, it moved in the bigshot and came out like so. The good news is I didn't lose the painting but, it I knew just looking at it I would have to cut it down to the edges of the paint to get it to try to look straight again.


So, I did that, inked the edges with some Distress Oxide Vintage photo ink. grabbed that piece of basic grey I had cut the heart out of the middle earlier and distressed and inked its edges. The base is some Simon Says Stamp School House red cardstock and the sentiment is an raised faux cork looking krafty printed colored words from Momenta. I probably mangled that spelling. At any rate I think this will work as an Anniversary or Wedding card. If You'd like to play along with us, you can find this challenge here at SCS. Thanks for stopping by.


1.05.2024

Inspired by {Tilly's}

 This week Amy has chosen this Tilly's site for the inspiration destination and I poked around in their pinterest boards and seen this grey sweater that had an interesting texture. But, I wasn't feeling like grey at that time so I kept looking and then smiled at this silly Snoopy Tee shirt. 

And then I started thinking, most of what I had seen was clothing and I knew I had sweater stamps that had not seen ink. Seems like there is usually an "ugly"sweater challenge sooner or later throughout the winter and so, I decided to break out this Colorado Craft Co. set called Sweater Weather.

I stamped it with some Versfine on a scrap of Neenah solar white and colored it with Daniel Smith watercolors. This was cut out with scissors and I did use the matching die to cut a piece of textured blue/grey mulberry type textured paper to use as a mat/shadow under it. The white panel was cut with an Crazy Stitched set die from Impression Obsession and then I used this Riley & Co. sentiment for giggles. The base is some Simon Says Stamp school house red and it's A2 in real life. If you'd like to play along with us you can find this challenge here at SCS. Thanks for stopping by.


1.02.2024

Watercoloring a River Scene

 This week Kia has chosen this on watercoloring silver birch trees video from Karen Rice seen here on YouTube. 

So I cut a piece of Arches cold press to A7 and sketched a cluster of tree trunks with a bird house.

I did use a water soluble pencil for the sketch.


I ended up using the three colors she mentions in her video except they are all Daniel Smith paints. 

more paints added. when this dried I did decide to add more snow flurries and another branch off the tree in the front to "hang" the bird house from.


The sentiment here is a reverse print one from Simon Says Stamp. The base is a pre made A7 card from Strathmore watercolor paper and the inside is lined with some Neenah solar white. It's very over cast here so getting a "white" card as what it really looks like seems to be beyond me today. its not so warm in person. If you'd like to play along with us, you can find this challenge here at Splitcoaststampers. I hope you are doing well & Thanks for stopping by.


1.01.2024

Dirty Dozen January 2024 Christmas

 Every Year the dirty dozen at Splitcoaststampers has a theme for the prompt of making a Christmas card each month all year long to have a little stash by the time you need to mail them in December. That being said I was invited to play along with the team again this year and so for January's prompt I chose this tiny little Rubber Stampede Piglet stamp that I had not inked before today.


The white base is some Neenah solar white cut to 3" square and I had inked the entire stamp with some versafine Morning Mist then dabed the corner of the black pad over what I hoped was the lettering. And again on a scrap of old green-ish Basic grey printed paper. I did give the eye ball and a few of the letters in Christmas some black micron pen after. And used the fineliner pens on the printed paper and the Zig brush markers on the cardfront. One thing about being a person who has been trying to paint with real brushes the last how ever long its been? a couple of years now? when I pick up these markers with brush tips I really do not like them much. It's like the bristles are stiff and they split at the tip so, you never know where its going to go coloring. 


I did piece this into the design slightly offset to the lower right to allow that grey ink to peek behind like a shadow, but it did not really look how I thought so, I ended up using the Zig grey brush to make additional shadows under the pot and scarf. There is also a tiny bit of stardust pen on the scarf, tree and star here also. That's about it from me, I hope you all are doing well & Have a Happy New Years!  thanks for stopping by.