1.30.2019

WOYWW #504 {stamps, Of course}

Happy desk peeking day, if you'd like to see more spaces or play along 
the link up for this blog hop starts here at our hostess
There is also a new Instagram hashtag of #WOYWW
 
 
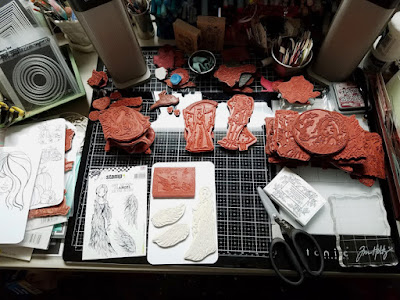
 yes, this is still on going. but, the good news is there are no more trays of wood mounted sentiments left to unmount. I do have 4 boxes of wood mounted PSX sentiments that are still on the blocks ( sorting them is another story) So, because all the rest of them were removed from the blocks over the last couple of days. the pile on the floor has not really changed that much since I added to it. the knuckle on the index finger that kept having a blister now has a callus. ha ha. the knuckle on the other hands index finger now has a band-aid from those th scissors being sharp. I am rolling my eyes.
it sounds more dramatic than it is but, I feel like I am "this" close to being done with this project so, it is what I continue to do when I have free moments. 
Thanks for stopping by.
 

1.26.2019

Inspired by {Sherwin Williams}

This week Brenda has sent us to the Sherwin Williams site for Inspiration.
I loved the paint chip critters. I lost the link to what I found and I kept coming back to this coastal room ( seen below) I just love the colors and in my head I was going to have this really white clean and simple card with the sentiment being the focal with slivers of the colors... hahaha.


So, I went poking around in my hanging file of printed papers and found this stripe ( unknown) and thought the colors were pretty close so, I went with it. The hello die is a mega one from Altenew and the stamped sentiment is from Paper Smooches fun and flirty set. This finished out at A6 in real life.

There are a few shots of this room using this color combo at this link seen here inside Sherwin Williams. You can find this challenge here to play along with us. thanks for stopping by.

1.23.2019

WOYWW #503 {progress}

Happy desk peeking day, if you'd like to see more spaces or play along 
the link up for this blog hop starts here at our hostess
There is also a new Instagram hashtag of #WOYWW
 
 It's probably hard to visualize because, I never did take any "before" shots... so, for reference. when I started unmounting sentiment stamps last year or the year before I purchased a laminating machine and a box of 200 sheets. and have now as of last night used up every single sheet. ( this was cutting cardstock in half so I have at least 400 sheets of cling mounted stamps sorted) last week when I told you there were stamps on the floor this was two rows deep an all the way to the bottom of those ink pads. seeing this stack here gives you the idea of what it is like in a drawer, all you can see are the spines so, every single box had to come up and out so I could see what was inside every time I was hunting for something.
there are no longer any stamps in dvd cases in the baby dresser. ( this used to have the bottom three drawers filled) and when they filled up, then they started filling book shelves around the corner.
I know its dark in the closet but, if you look at that top shelf. its filled with iris project cases filled with wood mounted stamps. the file cabinet in the middle on the wall at the other end of this group of tables I stamp at is filled with iris project cases of wood mounted stamps. around the corner where the book shelves are on two walls there is also this altered bakers rack that used to be filled with upside down frames filled with stamps. that is where the most obvious progress is seen. there are no longer stacks of trays of stamps on the floor because, they don't fit anywhere else.
I have been collecting stamps for at least 20 years.
yes, in the inventory I have done so far ( with everything counting as one even stamp sets that have 20 or what ever number of stamps in the set count as 1) I am running around 3K so far. This is an under construction process.

 I have started getting smarter about trying to wiggle the stamps on a half sheet before I ink them.
I received a new box of laminating sheets from Amazon yesterday and these new tim holtz scissors. ( if you ever start this project and you are tired of blisters on your knuckles from the KIA SU scissors go buy these, they have tiny serrated edges and cut very well and have a tip on them and I am not rolling them to the side when I try to clip V's into the spaces that were not trimmed previously where you can get stray halo's of ink spots) That's it from me, I will be driving all day for work today and will be peeking in later (probably over the next couple of days) thanks for stopping by.

1.18.2019

Inspired by {ETSY Birdhouses}

This week we are headed to ETSY to be inspired by all the different things you can find under the birdhouses search feature there. I found so many cool birdhouses. I was drawn to all the rustic versions of them and some fun shapes and colors.

 For my sample I started out stamping the birdhouse on the right with some Old Paper distress Oxide ink and used the first birdhouse below as it's color inspiration. and then When I started on the second one on the left I had thought I seen that church as blue and white. and I had stamped this in Weathered Wood oxide ink. they were both colored with polychromos & prisma pencils.
and after I realized I did change the colors of the second house but, I think it still gives you the idea. both of these are from Impression Obsession and the sentiment is from the Concord & 9th City Stacks set. The printed map paper is from Basic Grey and it finished out at 6" square on the textured Bazzill.

 This cute little door knob perch birdhouse can be found here.

And this Church birdhouse can be found here.  I just love these even though all the birdhouses in our yard are just plain unpainted cedar wood. I do have some painted ones in my Laundry room as "art" You can find this challenge here to play along with us, Thanks for stopping by.

A few Challenge cards

 On Sunday's the featured stamper challenge happens, and I came across this cool card from 
Lori seen here. I just loved everything about it, the tall shape, the pops of the red lady bugs, the fringy grass. So, to make changes, I switched all the stamps and moved the red from the bugs to the blooms and I intended to make a one layer card but, after I cut my cardbase I realized the printed paper I had stamped and colored was 1/4" an inch too short. ( I didn't want a mat) so, since I wanted a card that would fit into a regular business envelope, I decided to pull out my Martha Stewart fringe scissors and a scrap to add to the bottom. the ribbon is one from Micheal's a while back. This card finished at 4 1/4 x 9" when it was done, the coloring was done with polychromos & prisma pencils.

 On monday the try a new technique was to double stack your stencils so your biggest background window is the lightest color of ink and the stencil over that gets a darker color.
which looked really cool in the samples shared ( there is a tutorial here) and so, when I got home and looked at my stencils, most of them do not have big hole patterns. I tend to collect the skinny detailed texture ones so, these roses had some of the biggest window holes I could find. which for a few moments made me think I "need" more stencils but, the truth is I don't really use them enough to "need" more stencils. (yet haha) and I do like how this turned out. the sentiment is from an Impression Obesssion set with a pair of stick people and one of them is holding the others back stick)
its name is "my friend".

now this was just a funny thing, I am still sorting stamps and this fish stained glass window ( IO) was on the table to be sorted and the Clean and Simple challenge this week is to do something round. and so, I colored this on a sheet of Neenah (smooth) white cardstock with some zig clean brush and spectrum aqua marker and added a little bit of crystal stickles to the fins and then. ( I had been sorting stamps) evidently I got some ink on my hand and didn't notice until the fish was colored and the card base ( this started out as a one layer card) had this smear. so, I set it aside and Tuesday I came home and cut the circle out with a Memory box stitched circle die and tucked in the Hero Arts sentiment. this one is A2 in real life.
Every year I think this is the year I am going to be one of those bloggers who does each card it's own blog post, and every year it never happens... and somewhere I read maybe yesterday that one of the days this week was the day people throw in the towel on their new years resolutions and I laughed and laughed. Thank for stopping by.

1.16.2019

WOYWW # 502 {sorting continues}

Happy desk peeking day, if you'd like to see more spaces or play along 
the link up for this blog hop starts here at our hostess
There is also a new Instagram hashtag of #WOYWW
 
 So, the sorting continues. ( some days it feels like I am making a dent and others more of a mess)

 The system I have is unsorted stamps being stamped on blank cheap white cardstock that was cut to 7 1/2" x 5" with rounded corners to slip inside plastic envelopes ( from Amazon, generic ones not the Avery elle ones that cost a bit more) ( I have too many stamps to use the expensive ones so, what I find is the cheap ones rip in the corners if you are not precisely careful putting the laminated sheets into them. and there are hundreds of them in the package so, I just keep going unless it splits say all the way down the side then I toss it in the trash and do another one. ( its just been this newest package I just opened that I have been seeing them split) so, I do not know if the mfg changed something or not. the ones you see here are under construction, when the stamps fill the sheet then they move to another box on the big shot to get laminated ( down stairs where there are plug ins and counters to work on haha)

 So, I spent a little of my Christmas gift card money online a week or so ago and did not look at the sizes of anything. this house mouse image floored me when I took it out of the envelope. ( the grid on that glass mat under it is 1" squares) 
if you are familiar with these stamps they tend to be on the large enough to see to color them size. the chickadee dies from PB are also small ( but, not too small to use I think they scaled them to tuck into branch die cuts rather than to be card front sized.) 
so, that's about it for me. I think I am enjoying the mind numbing ness of this sorting because, every day at work is you know tax forms of one type or another to deal with so, the not looking at the numbers when I play is OK for me. Thanks for stopping by.

1.14.2019

A couple of Christmas cards

 I tend to lose track of the time but, a week or two ago there was a clean and simple challenge to redo say a memory or a card of your own (making it clean and simple) and my first card did not turn out clean or simple but, at the same time I had seem the fancy fold I also seen this Holly card that I had made hubs parents years ago. ( it still makes me smile to see that one) so, knowing that I had this Memory Box double holly frame die that had not been cut yet, I decided to play with it, I colored parts of the frames with a gold gel pen and let it dry. and then later I came back with a makeup brush and some bundled sage Distress oxide ink and started buffing the leaves but, some of the ink hit the gold and it was like an instant aging tarnished look that I really liked so, I rubbed the green pretty on both the frilly frames. ( the center gold piece I think is a spacer drop piece so that you can glue your frames equal distances from each other but, I liked how it looked with a little gold still shiny and glued that into place too.

 This frilly sentiment is from the Verve Stamps bright spirits set and I did cut one plain square to hide behind the frames for it to set on. the frames and sentiment panel were cut from PTI vintage cream cardstock and the base is Neenah Columns ( thinking pepper red?) ( there is only one red if you go poking around in their site) and this one finished out at 6" square.

Now this one was done a week ago for the featured stamper challenge because, I had come across this cool  card of Kathy's using that Santa collage stamp from delta rubber stampede. so changes were the colors and less layers, I switched out the belly band for some vintage seam binding lace and the gold sentiment is a Simon Says Stamp diecut. this one is A7 in real life and I like how it turned out a lot. That's about it for me, the sorting stamps thing continues. Thanks for stopping by.

1.11.2019

Inspired by {Papersource}

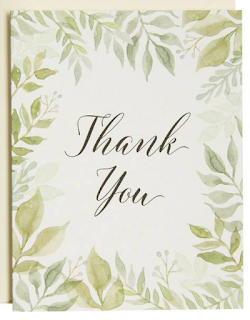
This week Angie has sent us hunting inside the Papersource store for inspiration. and I have to say most week's I do not look at the paper craft isles in these sites because, that is too easy right? but, I got this leaf frame die from Simon Says Stamp last month and could not resist the watercolor leaf thank you cards I found seen below.

 The leaf frame was cut from some Stampin'Up! seafoam cardstock and then I color dusted some Tumbled glass, bundled sage & forest moss distress oxide inks onto that (before I removed the drop pieces so that it gave it some stability and I did not tear any leaves rubbing the brushes across them)  Then the inked and clean diecut was layered to the Papertrey Ink vintage cream base. that sentiment off to the side ( its glued inside the card) these sentiments are from the Club Scrap Lavender fields set. This card finished out at A6 in real life.
Doesn't this just look like something Debby Hughes would paint? ( my fan girl is showing I guess) :) you can find these note cards here in their store and you can find this challenge here at Splitcoaststampers to play along with us. Thanks for stopping by.

1.09.2019

WOYWW # 501 {more cling stamps}

Happy desk peeking day, if you'd like to see more spaces or play along 
the link up for this blog hop starts here at our hostess
There is also a new Instagram hashtag of #WOYWW
 
The sorting is continuing. and yes, this is allowing more stamps to fit into the same space of the drawer. So, not many sentiments were sorted this last week but, some of the images have started to be. (because, I am tired of having stamps on the floor and an empty ish drawer) at some point the picking the mess up on Thursday to create again and dragging it all out on Sunday afternoon will get old and I will stop doing this I am sure before I get it "done" but, so far I am impressed that I have hung in there this long. thanks for stopping by. 

1.06.2019

A few more letterboard projects

 So, this was the second one I tried. and what I learned is, its hard to line these letters up. I tend to spread them on the board but, picking them up to glue them I move them. and so.
It's not horrible, but its not perfect either.

 This one kind of migrated to the right, so the additional frames are from a Memory box die set and the home is also a Memory box die. this one is a little larger at A6.

Now this one is the 4th and probably the closest to my original inspiration piece ( seen in the post before this one) the coffee is a retired Verve Stamps die and the bitty cup is the smallest one in the original Hero Arts nested cup set. ( the new sets have holes for the handles as separate dies) I have a couple more that I made up sayings for last night but, was waiting for daylight to glue them together hoping to get them more straight ha ha. but, that has not happened as of yet. thanks for stopping by.

1.05.2019

Inspired by {The Spruce}

This week Julie has pointed us in the direction of "The Spruce". Where I came across this page of letter boards. And I grinned from ear to ear because, I had picked up this recent release from Ellen hutson of a combination of letterboard dies ( the whole set) with some of my Christmas gift money.
I esp. loved the coffee board ( seen below) and then when it came time to make my card. I started thinking about what I wanted to say. the last few weeks I have been sorting my cling mounted stamps. ( mostly the sentiments) because, I am finding it helpful to see the sizes and fonts together on a sheet to make a choice. and although I have also been working on an evernote inventory and the numbers keep going up and up on how many things are in there its very much an eye opener to actually put your hands on all those stamps. so, I am also creating a purge pile at the same time as I work through this and this has been a thought on my mind lately. So,it does not look like the inspiration that I used as a jump start but, you get the idea right?

 This finished out at A2 size in real life, the white is all Neenah solar white and the black is some textured bazzill.

The sign that I think I may re create at a later time. You can find this here in their site and you can find this challenge here at Splitcoaststampers to play along with us. Thanks for stopping by & Happy Saturday.

1.02.2019

WOYWW#500 {stamp sorting}

Happy desk peeking day, if you'd like to see more spaces or play along 
the link up for this blog hop starts here at our hostess
There is also a new Instagram hashtag of #WOYWW
 So, New Years day found my desk looking like this again, I have been sorting through cling mounted stamps and stamping them to blank sheets, laminating those and generally making a mess off and on through the holidays. before Christmas I told my self I wanted a clean desk, so before all the stamp things came out again, I really did clean and had a blank desk last week. in this shot you can still see all the heaps and piles that were on the file cabinet on the wall and the basket on the floor in front of those file cabinets was all cleaned up and put away.
 photoshop added more light to this so, you can actually see a bit of the corner of the room I stand in to stamp.  (with the wood panel walls it is actually more like a dark little cave in here on cloudy days) the box on the big shot is holding stamps on clear pockets with stamped sheets that are ready to be laminated and after this was shot, and those were put away. I did fill that box to over flowing one more time with just single large background stamps. I have been testing this, and the pockets will lay on their side in the dresser drawers the way the dvd cases did and you really can get a lot more pockets in the drawer than boxes. So, even though there are still heaps and piles of boxes on the floor where I am standing to shoot this shot, I am starting to feel like maybe the end is at least half way in sight now. I am finding things I forgot I had and that is distracting because, I want to play with them. so, I am making my self sort stamps every free chance I get to have this behind me and just have time to play again. Thanks for stopping by.