11.30.2022

December Dirty Dozen Christmas Card

 Can you believe it is already crunch time for Christmas card making? I cannot, don't ask me where this last year has gone but, tonight I am loading my 12th sample for the Dirty Dozen Christmas card challenge where you can find this months prompt here in the special forums set aside for Splitcoaststampers fan club members. 


To Start with, I stamped this Annette Allen Watkins snowman K1240 with Versafine Clair Nocturn on some Neenah solar white. I figured it would not need much paint so, I could get away with using a heavy non watercolor paper for her.  I did laugh at my self after she was done because, I knew I had this tiny Endless Creations B88 sentiment and I realized after that I think she is a "Snow Lady" with that hat... Such is life eh? the painted panel was cut out with an PinkFresh studios blanket stitched rectangle die and is up on foam pop dots as the May Arts crochet lace is kind of thick. The printed paper is both sides from the same sheet out of the Maja Designs Christmas Wonderland set and This is A6 in real life on some Stampin' Up! Kraft cardstock. Just a simple one but, I do love how this turned out. I did consider adding some stickles glitter glues for bling but, felt like since the paper is a little rustic that maybe bling does not go over so well with that kraft look. That's all she wrote for this time, Thanks for stopping by.

11.29.2022

Re-Creating an Older Watercolored Christmas card

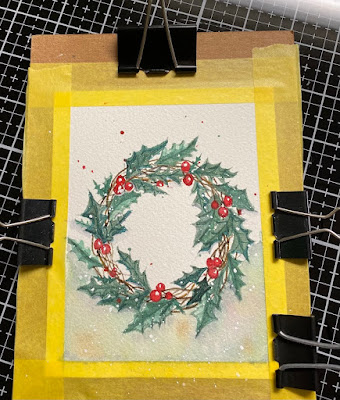
 It's my turn to host the Water coloring challenge this week. I recently came across this video from Emma Jane Lefebvre Re-creating my old Holiday Cards. And the gist of it is that she is re-doing some Christmas foliage she painted 3 years ago. And as I watched it I had assumed that I had painted those same things and I got all excited about seeing what they would look like now. ( the funny part here is, she has a really distinctive loose painting style that I mostly recognize as hers and I did Not paint that bunch of foliage, but I did play along with Linda's wreath challenge WCW072 last year in November and so, I decided to just roll with it and re-do the holly wreath from that challenge. My Original blog post with those mug shots are seen here. 

So first round of paints on Arches cotton watercolor paper with some Daniel Smith and Windsor Newton paints.


One of the things I have picked up along the way is using these binder clips on the edges of drying papers. I do take them off to paint when they are in the way and leave them on until its totally dry otherwise.

next round of paint, I did vary the sizes of the leaves and I realized painting this that I have not practiced holly leaves since last year so, that was NOT something I improved on learning ha ha.


Very recently we did some Christmas cards where the paint was blurred at the bottom of the berry branches and I just so totally loved that when it was done, so I decided to do it to this one too.


Using the clips to keep it flat while drying.


Tossed on some splatters the last round of paints and this is what it looked like when the tape came off, there was so much water doing the "blurry" bottom it leaked.

So, I trimmed it down in the paper trimmer and then ran it through a Spellbinders hem stitched rectangle die ( my absolute hands down favorite) and that I thought distracts the eye from the blurry paint line on the bottom. 


When you see it as a finished card. the cardbase here is something red from a recent Simon Says Stamp kit that came in the mail. ( not sure on the color name I only had this one piece so, it was sitting on the table to get used up.) The sentiment here is from the Stampin' Up Set called Many Merry Messages its stamped with Versafine on Neenah earthstone & cut out with a Simon Says Stamp sentiment strip die. 

That's about if from me, I hope you are all doing well. If you'd like to play along with us you can find this challenge here at SCS. Thanks for stopping by.


11.25.2022

Inspired by Colorful Images

 This week Amy has shared with us the Colorful Images site & Pinterest boards and as soon as I seen this address label my brain said. "Lee has a Pink Trio challenge for VSN.." so, I changed the colors. and I also made it a little more clean and simple with only one dramatic bloom.


I had received this Memory Box Poinsettia watercolor floral die in the mail not too long ago and decided to cut it out from Arches hot press watercolor paper. I did have to use a metal shim to get the whole pieces to cut out since it is just one die with intricate detailing. And then I decided since they are calling it a "watercolor" die, I decided to do just that. this is first layer of Daniel smith paints drying


Second layer of paints which when really dry needed more to get some contrast between the layers so, the finished one below has more paint on it.

This only has glue dots in the center of all those layers so the edge pieces are free floating and it gives it fun depth and shadows. 

The cardbase on this is some Stampin' Up blushing bride cut to standard slimline size 4" X 9" and the plaid here is an scrap from a really old piece of Basic Grey paper. The sentiment Creative Expressions snowman kisses was stamped on a scrap of Neenah earthstone with Versafine nocturn and die cut with a Trinity Stamps mini slimline die. The ribbon here is maybe offray or maybe generic Joanns ( not sure anymore there is not much left of it) So, its probably hard to see since I think the colors are so similar but, I do think I managed to squeak in at least 3 shades of pink here. If you'd like to play along with us, you can find these challenges here & here. hope you are doing well & thanks for stopping by.


11.23.2022

Watercoloring Christmas Baubles

 This week Linda has shared a video from Sandy Allnock on painting a clear bauble around a stamped critter tutorial seen here on YouTube. 


So, it starts out with stamp a critter and then use something to draw your ornament shape. I started out using this roll of ribbon as it was nearby but, it was too large so, I dug out this SSS die and that worked fine so I did erase the larger circle. 


So, I painted a layer around the snowmen buddies ( Penny Black) and then added the masking fluid and it wanted to run and spread SO, the next one, I added the masking fluid first and walked away from them.

Like so, I was not real sure how big to make them as these snowmen are pretty small in real life and I did not want the greenery to overwhelm them. 


first rounds of paint drying, this was one of those things that makes it obvious when you reach for a brush you do not practice with ha ha. 


more paint & water, and the next few images same deal. It took me a few layers before I liked what I was seeing. colors were OK but, the streaky look was not what I wanted.

and so

I added some greenery here and since I had removed the masking fluid before that, I pretty much painted over the highlights I had on the hanger piece. 


After the tape was removed, I did trim down the white edges and then ran an open pair of scissors around the edges. Cut a sheet of Pistachio Cardstock and added a sentiment.

To the bottom edge and decided I wanted them to be on an angle like so. And then tuesday happened. and this is the shot that made it into the gallery as I did not have a single moment to finish them tuesday before it went live.

Today I decided to just glue them as is and call it good enough. I had contemplated adding foam tape under them or maybe fibers or sparkle and it was just nope, they will have to do. This did point out to me that I could not remember how to do holly which is fairly funny as I have so many holly stamps. ( its not the same to color something as it is to create it and then color it) as much as I would like it to be. If you'd like to play along with us, you can find this challenge here at SCS. I hope you are all doing well & have a beautiful Thanksgiving with your families. Thanks for stopping by.


11.21.2022

Pair of Simple Trees

 So, I am cleaning my room. ( kinda, sorta, halfheartedly) and one of the piles I am shifting through is a stack of images I stamped off intending to color. and these two trees were "saved" and not tossed immediately for being not complete images because, they were stamped on cheap watercolor paper over a year ago. they were "almost" and I told my self, its WC paper, just get it wet and fix them...

I had seen these in the pile before I started looking at this week's Featured Stampers gallery and then I came across this blinged out tree in Sarah's gallery and I thought you could work with that. ( you always need to make change to their design anyways)

A closer look at the tree on the right. there is a bit of clear stickles glitter glue in between the red & gold watercolor bulbs here in the garland and at the top. the gold paint is iridescent in real life. ( so, these have some shimmer)

The tree's here are from Penny Black called Tannenbaum and it was stamped with some I thought this old post was going to give me the ink color name but, I had done other tree's that stamped completely at that time and its either Versafine or Distress Oxides. I didn't really get the tree all that wet adding the garlands to them so, it could be an Distress color. The edges of these panels were chopped in a Tim Holtz deckle edge trimmer and then I did add some Distress Oxide Salvaged Patina & Speckled egg to those cuts for a visual layer. The sentiment here is from the Waffle Flower cozy holiday sentiments set because, I just cannot put it away yet. The card bases here are pre-made ones found at Hobby Lobby and these are A6 in real life. That's about it from me, I hope you are all continuing to do well. Thanks for stopping by.


11.18.2022

Inspired by { Back Yard Boss }

 Sometimes we look for things to use when we host these challenges way in advance. That makes sense right? last time I was gathering sites together for my next bunch of challenges I had happened across something offered up by Back Yard Boss. and I thought oh, something not seasonal  yay. lol and then I had found this shot of the people roasting marshmallows at night and thought, you have a smores stamp. and off in left field this stamp happened. 


 A while back I had been stamping this Darcie's Snowman Smores with cup of Marshmallows stamp for Janice on some Neenah solar white and this is a pretty big wood block stamp, it didn't stamp all the way. so I had set this one aside as salvagable but, I tend to not mail out ones that are not perfect right? So, I decided to paint him with some Daniel Smith paints that were on the palette and used a tiny brush with black on the parts where there were no black lines later. 

  There is also some crystal stickles on the holly on the hat, the marshmallows on the cup and the decorated tree on the cup. 


My Rae Dunn Christmas mugs are out now and so, I had played with this sentiment set recently for something else and it was also laying on the table and I picked this one knowing it would fit on the tag ( Mama Elephant tags a lot die) if I made him tilted. So, after a while I considered running that tag through an embossing folder or adding some printed paper to it partially at the bottom and one of the pads I flipped through was this Kasier Kraft one called wonderland and the pre printed borders and tags in the back caught my eye. I have as far as I know never played with these things. I had assumed they were stickers ha ha. so, that tag at the top is from that pad. (it's not very heavy paper but, stiff enough to stand straight) I tied it on with some black hemp string and pulled a few cream, off white fibers through the hole. that hole re-enforcer is from the same Mama Elephant set. 

And it's one of those truly an "inspired by" rather than a CASE ( copy and share everything) type projects.  If you'd like to see what jumps out at you from this challenge you can find it here at Splitcoaststampers to play along with us. I hope you all are doing well, Thanks for stopping by.

11.16.2022

Cup O' Christmas Fall/Winter Coffee Lovers bloghop {Day 6}

 Hi, there is an ongoing Fall/Winter Coffee Lover's blog hop going on currently and you can find the link up here to see all the gorgeous projects being shared. 


It's funny how this works right? I tell my self I own well, lets say numerous coffee, tea, plain cup & mug stamps and dies and I am not currently on any manufactures design teams so, I don't have the  "have to" issue of promoting new things and I find that I am just enjoying poking around in my old things. That being said these stamps are really old and I have seen them for sale on secondary markets so, I will tell you their real names and such. 


This mug is called Cup O' Christmas, the designer is Debbie Mumm and this stamp was done by Stampington & Company way back in 1998. It's number is D6146. I stamped it with some Versafine Clair Morning Mist ink on some Arches 100% cotton watercolor paper hot press ( its the smooth one for detailed stamps) painted it with some Daniel Smith, Windsor & Newton watercolors and Dr. PH Martins bleed proof white. When that was dry I die cut it with a My Favorite Things Stitched square die & layered it to a Green Polka Dots print from My Minds Eye using a Pink Fresh Studios blanket stitched edged square die. The sentiment here is also old from Penny Black called good friends # 3276F from 2009. It was stamped on the same watercolor paper and die cut with an Simon Says Stamp stitched rectangle die. That lace is vintage, the red textured handmade paper came in some grab bag of unknown paper. the stripe in the background is also MME ( when my pads get mostly used up, I rip them out of the pads and tuck them into hanging file folders loosely sorted by main color so, I do not know its pad name anymore sorry.) 


A closer look at the cup, it's such a cute design to me but, I collect both snowmen and birdhouses. The card base on this is some red linen texture. ( probably Neenah but, possibly Bazzill) and it's 6" square in real life. I hope you all are doing well, Thanks for stopping by.

11.15.2022

Watercoloring a Berry Branch

 This week Brenda has shared with us this video from MarenaArt  Renata Tot Ivezic on doing both a Christmas Baubles card sized painting and a berry branch. I chose to do the berry branch painting. and I have to tell you I love how this turned out. 


So, I started out sketching my branches and berries to be peeking into the scene from the top left corner. which is not all that easy to see. 


First layer of paints drying. this is Daniel Smith & Windsor Newton (red) with some Dr. PH. Martins bleed proof white. 


I did add a little more paint and a lot more water to the bottom right corner as it had dried the first time with hard lines. I did add a little more definition to the shadows on the berries and lots more splatters. I forgot to erase the pencil marks. which I will do after seeing this photograph ha ha. This one is 6" square in real life on some Textured bazzill. The sentiment here is from the Papertrey Ink inside sentiments peace. I did stamp that with some versafine clair nocturn in the misti as the white tends to dry with texture to it, and I figured there were some splatters in that bottom corner that would need multiple inkings. I hope you all are doing well, Thanks for stopping by. If you'd like to play along with us you can find this challenge here at SCS .

11.13.2022

Fall / Winter Coffee Lovers blog hop {Day 3}


The Fall/Winter Coffee Lovers hop started on Veteran's day this year, you can find all the beautiful up loads linking up here. and I pulled out this old Emerson Stamp from American Art stamps intending to have her become a "quick" card on Friday and I really did not have time to steal to play again until just now. I finished gluing all this together.

  Her real name is "too old" if you go looking on the secondary markets for her and I stamped her with some Versafine Clair Nocturn on Neenah earthstone cardstock. She has some Dainel Smith watercolors and a little Dr. PH. Martin's bleed proof white coloring her with a little Stardust gelly roll pen on her hair and glasses. 

A closer look at that. I did cut her out with a Trinity Stamps mini slimline stitched rectangle die and I did drag a pair of open scissors around the edges of the Tim Holtz plaid paper for a little interest on it. The blue snowflake print scraps were the drop pieces from a card I did a few days ago ( Moda Scrap) that I just happened to have laying there and I thought that's funny it's nearly the same shade of blue as the print. So, that had me digging through circle sentiment sets and I used some Distress Oxide in barn door to stamp the Simon Says Stamp circle sayings sentiment here. That was cut out with an Hero Arts nested circle die. The base is that same shade of card stock and this one finished out at 4" x9" as a standard slimline card in real life. Thanks for stopping by.


11.12.2022

Watercoloring older Christmas Stamps

 This week Jessica is the featured stamper at SCS and I came across this sweet house mouse card she did, I loved every detail from the ribbon wraps to the vibrant fabric looking background. 

So, I knew I wanted to do something Christmas, and I decided to keep the Santa theme, the square and try for some fabric look with less layers for mine.

So, I stamped off this Penny Black Christmas Twosome stamp with Versafine on hot press Arches watercolor paper and started adding layers of paints to it last Sunday. and I did go back and glaze more over the top as the days went by as drying times are really long now here. We seemed to have jumped from summer straight into winter without much of a "fall" there are leaves on the trees here and snow on the ground. eventually I decided that if I was going to actually complete the card during her week I'd have to step on it and finish tinkering so, I used this Paper Rose lots of squares die with the Cross stitched frame to cut it and I had forgotten that the you know center drop piece was going to cut, and I could not really see through the metal frame so, I was trying to eyeball the edge of the painting to have it cut into the blue on three sides but, I managed to just get it off set mostly to the right. And I decided to tape the piece back together on the back side and put this up on foam pop dots over a X stitched looking printed paper from Tim Holtz from a few years ago.


The ribbon here is really 3-D in person you can feel every one of those little puffs of white stitching on it. The tag is from the sweet n sassy mini tags die set and the Joy is from the Hero Arts Hero greetings Christmas messages set. The base on this one is SU cherry cobbler and its 5 1/2" in real life. I am mostly pretty tickled with how this turned out, I wish I could have gotten the beards to be a little less brown and more of a creamy primitive muslin color but, it's still cute and I will send it out. 

And then Angie threw down a "Peace" challenge for the free for all this week yesterday and I decided to go simpler as I was hoping to do just one layer of paints.

So, I stamped this Penny Black Silent night on some Arches hot press and did do a layer of Paints with a few more drips dropped in while it was drying trying for a looser look as the city did not stamp perfectly for me in the centers. when it was dry I cut it with a Spellbinders square die and then used a micron pen along the edge of the square to mimic what frames the scene. The sentiment here is from the really old Stampin' Up Heaven & Nature set. the printed paper is from Moda Scrap and the base here is some textured sundance felt in bright white. this one is also 5 1/2" square and flat in real life. So, that's about it from me so far. I am hoping to you know paint all the things and play in the coffee hop. I do have one drying from last night but, the sun is not up here yet. I hope you are all doing well. Thanks for stopping by.


11.11.2022

Inspired by { Indigo!}

 This week Kia has chosen Indigo as the destination for inspiration this weekend at Splitcoaststampers and I found these salt box house ornaments that I swooned over. and I thought, those would make awesome tags. 

So I had a pile of left over scraps of strathmore 400 series watercolor paper from the pumpkin adventure and I decided to use some of that with the idea here as I wanted to paint the edges. ( this is just left over browns that were on the palette from Daniel smith paints) the thing with that paper is it just resists the paint rather than letting it flow across it like cotton paper does so, the lines are not so smooth but, for the primitive aspect of the design I am thinking it works. 

After the homes were dry I found some off white tags that had been previously cut from scraps in the bin and used some May Arts burlap string for the holes on them. All the homes are up on foam pop dots.

The scallop edge square tags are a die from Papertrey ink tag sale quilted die, the smooth rounded top large tags are from the Ellen Hutson tag trio die set, the long skinny tag on the bottom right is from the My Favorite Things tall tag duo and the skinny tag on the lower left is from the Sizzix XL Library pocket by Brenda Walton. the sentiment here is from the Hero Arts Holly Berries set, the ones where the sentiment was not stamped directly with the Avery Elle kraft pigment ink those were die cut with a Spellbinders die. If you'd like to play along with us, you can find this challenge here at Splitcoaststampers. That's about if from me, I hope you are all doing well. Thanks for stopping by.


11.08.2022

Watercoloring fluffy trees

 This week Angie has chosen this video tutorial from creationsceecee on doing "fluffy" trees found here on YouTube. 

And not too long ago I came across this pack of Fabriano Bianco watercolor paper in my closet. that is really the oldest watercolor paper I own so, I decided to pull out a sheet of it and try this painting on it. I have no clue if this is cotton paper or now but, it does have a lined texture to it. 


Trying to find a frayed brush was the hardest part for me, so I found this one that I had picked up at a yard sale years ago for like a dime that was full of acrylic paint and I have this in my acrylic paint jar. but, It did work for the whisper frayed edge look to the tree. ( I tried it on a scrap first) 


It dried looking like so, and the "delicate" tape tore some of the painting so, I decided to die cut it down smaller. 

I went with an Ellen Hutson using the largest die in the tag trio set. And then I had the bright idea to fish the scrap out of the bin to test the shimmery paint for the bulbs on it, to see how they would show up. both of these sets shown here are from Coliro. You can find the larger 6 color one here on Amazon. I am pretty sure the smaller one came from there too but, its not immediately right there when I ran a search for it. 

Tied some silver & copper elastic cord through the hole and stamped the Simon Says Stamp Circle Sayings sentiment with Versfine Twilight ink. which might have been a little bold but, I do like how it looks here. and that was just dumb luck that I was able to see through the clear stamp to try to avoid the shimmery bulbs on the tree as I inked it up. If you'd like to play along with us, you can find this challenge here at Splitcoaststampers.  I hope you are all doing well, That's about it from me. Thanks for stopping by.


11.04.2022

Inspired by {Wescover}

 This week Julie has shared with us the Wescover site and I happened across this Ronald Hunter painting that I loved the colors of with the distressed looking edges. I decided this would work beautifully for  a Christmas card.

So, then I started looking at my new to me Christmas stamps and stamped off this Hampton Arts cardinal on a pine branch with some Versafine morning mist on Arches hot press watercolor paper and painted it with Dainel Smith watercolors.


This is a first layer of paints and what the stamp looks like in real life. I had changed the cape and hat colors to shades of turquoise with a bit of yellow in the plaid print. at this point after I had looked at this photo in my phone I realized the bird should be looking up not down so I was glad I had some wiggle room with the white space around her.

I the largest die in the waffle flower nested curved rectangles set to cut this and have the chick be looking up. The sentiment here is from the waffle flower Cozy holiday sentiments set, that totally looks like the font Rae Dunn uses on her mugs. ( no clue what that font's real name is) but, I think of it as Rae Dunn ha ha. Added a bit more paint for shading and a white dot of Dr. PH Martins bleed proof white on the eye. The red ribbon here is the real red one that comes in a pack with the garden green ribbon from SU. and the striped paper was from the scrap bin. The base of this card is Gina K. Fresh Asparagus cut to finish out at A6 in real life.  If you'd like to play along with us, you can find this challenge here at Splitcoastampers. That's about it from me, hope you are all doing well & Thanks for stopping by.