4.27.2018

Inspired by {Replacements LTD}

 This weekend Brenda has sent us to the Replacements LTD site for the inspiration challenge seen here., and I grinned like a loon as soon as I seen it because, hee hee I "KNOW" they sell Johnson's Brothers Greendawn.
about 21 ish years ago, I went to an estate sale with some friends and my son was young. I am guessing on the age he was small enough to be in a stroller and not escape from it size. and it was one of those in the beginning things for me I had not been to too many Antique stores or yard sales by that point. so, I really didn't blow money on "stuff" at that time in my life, and I was just walking around this estate sale and found a box filled to the brim with this green dawn china ( it was in a dirt floor under a over hang not really a porch but, in the back yard in the dark kind of a spot you know where you assume all the boxes are full of spiders or something and I picked up a piece and I showed it to my husband and I said. I want this. I think this is the prettiest color green I have ever seen in my life. and he helped me pick up all the boxes and buy them. ( it was a whole 20.00 for tea service for 26 and assorted small pieces) and the lady doing the sale she heard what I said to my husband and she said to me, we have set aside the dinner plates and a few things for one of the grandson's and if he does not want them would you be interested. and I was like oooOOOh you bet. and some time went by and hubs got the call that the grandson did not want the dishes. So, back to that house I went and I came home with several more boxes of this china for another 30 some odd dollars. and that was just the beginning. over time I think my husband has hunted down and found just about every odd shape they made in it. toast racks, for two, for 4, egg cups, double egg cups. etc and so forth. breakfast in bed sized both coffee & tea service sets its a crazy thing that came out at the end of Victorian age so, I have a few of the art deco shapes from the end of the 30's. a little bit of the more modern pieces from the 50's.  the only piece I know I would like more of is the crescent shaped snack size plate and a ladle for the soup tureen if one is out there. He has won auctions in the UK, Australia, Canada, the US. but so far we have never seen a ladle and I have two of the crescent plates now.

my card, the image is from the Inkadinkado sketch line this was stamped with Versafine vintage sepia ink on Neenah earthstone cardstock and has a little bit of zig clean brush and tombo markers on it. the sentiment is from Riley & Co. this panel was cut with a Simon Says Stamp stitched rectangle die. and its (US) A2 size in real life.

a peek into the corner of the kitchen at my house the cabinet on the left was built by the cabinet makers just for this china I had wanted it to be two doors but, they convinced me the stress would be too much for it since it is floor to ceiling. The cupboard to the left of that with wood doors is holding all the tea, coffee, & demitasse cups and saucers, most of the smaller bowls. The freestanding cabinet along the wall is holding some of the larger serving pieces with some crystal mixed in, you cannot see it in this shot but, the other corner behind the table there is one of those triangle shaped display cabinets with more really large pieces in it. (and yes, there are only 2 of us at home now and yes, we still use it everyday)

4.25.2018

WOYWW # 464 {Black Ice continued}

Happy desk peeking day, if you'd like to see more spaces or play along 
the link up for this blog hop starts here at our hostess

 So on Monday after work I had tried the "black Ice" technique for the first time, I had never seen this before and it caught my attention. (the details and how to video are here at SCS) anyways, Tuesday after work I decided to try it some more and I did a couple on "foil" sheet and one on "mirror" sheet. the comparison is the last shot in this post. and this is a quick thing to do in reality but, the thinking thing slows me down. so far I have only tried this on stamp scenes where it is "snowing" in the scene. but, I did see some say bloom images in the gallery that really did end up looking like engraved metal after.
 Where I stopped when I walked away to go start dinner last night. the snowman scene ( both of these stamps are from Penny Black) its the scrap from the top of a 6" square size. and where that sentiment is just sitting is the hole that the pad of paper has a hole punched in the top so stores can hang them... I am debating about if I want the sentiment to be in color or not it will have to wait until the printed paper for behind it is picked out. ( have not gotten that far yet) I did take the one I made Monday night to work on Tuesday to show my friend there and she "had to have" that card and told me I "have to" make a few more of them for the booth.
The one on the left is on Die cuts with a view foil cardstock and the one on the right is from Bazzill its "mirror" cardstock. the mirror cardstock is very dull after the fact and the foil just seems to shine even more than before it is embossed I think that embossing powder is refracting a lot of light through it on the foil. so, as easy as this is to do I think I am going to go look for some larger sheets of "foil" cardstock.

I did do a bunch of die cutting last weekend and a few trial cards (also for the booth that are Christmas that I probably will tinker with some more before I have things that I am pleased with. the tree folded card, I have tried die cutting the tree from printed papers to wall paper over the front of the card like how it is shown on its mfg label but, it only cuts perfectly for the left side of the tree fold. the right side you have to flip the paper upside down in the die on small sheets of prints so, you would never get perfectly lined up prints. ( I will show that later some time after I figure it out all the way. ( I already know the do not kill your paper this a way versions ha ha) Turkey hunting continues this week. Thanks for stopping by, I will be driving all day for work today so, it will most likely be tomorrow before I start poking around. 

4.23.2018

Black Ice Christmas Forest

Today Sabrina has a fun challenge called Black Ice that can be found here as a try a new technique. ( there is a video that explains the how to)
 I am officially Impressed. I have a hated stayzon ink pad that is 12 or more years old that I have never reinked... I used that for the base. it worked. I did use my dirty used Versamark pad and again, I had enough oomph to that pad for it to work. this is a first attempt. and that is saying something because, a whole lot of techniques usually end up being second or third trial to get something that you want to actually turn into a card.

a look at it flat on the desk when it was finished. I think you can click on this photo to see it larger. the clear embossing powder beaded up like little pieces of ice over the top of it. The main image is an old one from Stampin' Up. and the sentiment is from Tim Holtz. The red base is a shimmer from Stardream. The image was stamped on some DCWV foil cardstock and the plaid is unknown. this is 5 1/2" square in real life. and I will do some more of this... and it will probably use up all my silver foil cardstock ( YAY! me, it is not my favorite color choice in these pads) I have been doing google searches trying to find the name of the SU stamp set name but so far no dice, I know there is a snowman and a Cardinal in the set also that look like they are snowing on the images but, they are pretty old and I do not have them in the evernote file as of yet. if you recognize it please holler at me & thanks!

4.20.2018

Inspired by {The Smithsonian Institution}

This week we are poking around in the Smithsonian Institution online to see what we see. The challenge thread can be found here. one of the first things I had seen when I was considering the site was there was a collection at that time arranged around some of the things I had personally seen as a teenager visiting Washington DC. With a high school "Close-Up" group.  besides the things that were organized for us to attend we also had some free time to go exploring and one thing we did was hit the museums. One thing we did was wait for the flag to be on display. it was in a case where a curtain came down and it rolled back out of the way inch by inch to let the flag be seen for a short period of time.This is one of the biggest memories that I have of that, there were of course other things but, the watching peoples faces while they waited for the flag to be visible was something that has stayed with me.

 I had picked up this sentiment from Our Daily Bread Designs when it first came out and I have been waiting I guess for a time to use it. and that is the fun part about the Inspiration challenge is you pretty much get to do what you want. I had this scrap of vellum cardstock on my table left over from some recent winter/Christmas card I made and I tend to play with what ever is in front of me so, it lead me to combining it with this flag background ( also from Our Daily Bread Designs) I like the tattered look the distress inks gave the flag and the softness the vellum ads it was almost like a protective cover for the aging fabric. which then allows the sentiment to really POP for me like this. There is a white cardstock glued to the inside of the back of the card so that a note can be written there.

A peek at old glory and the link goes to the Star Spangled Banner ( as I did do mine as a hanging flag design)
I actually ended up with two cards from the site ( so far) and the first is seen below, I decided to load this but, not make it the main challenge sample because, the inspiration from it is actually more of a mental thing than a visual look. When I first started poking around through the sites collections I did come across this vintage Barbie doll in her swim suit and when I looked at that I knew I had this Emerson stamp (Gourmet rubber stamps bathing suit) sitting on the table for the last few weeks and my brain said, well. those yellow polka dot bikinis really are smaller nowadays aren't they... 

 and so. the image has a little bit of pencils, a yellow marker for the bloom and gel pen for the sun glass lens. I gave her grey hair because, this is not a sentiment I would have thought of 20 years ago when my hair still had color of its own in the strands. I did use a stitched rectangle out of the waffle flower lacy layers A7 set and the card base is from Hero Arts so, its ( US) A2 in real life.
 a peek at this Barbie complete with her heels on too :) So, that is about it for me today. thanks for stopping by.

4.18.2018

WOYWW#463 {tags}

Happy desk peeking day, if you'd like to see more spaces or play along 
the link up for this blog hop starts here at our hostess
 
 So over the last few weeks I had ordered these rounded corner tag dies from Impress from Memory box and when they came they cut a frame ( I knew this going in since I have their circle dies ) so, since I have rectangle dies from ( just about every mfg they are all different sizes) I did not order anything to go with the tags... fast forward. none of my other brands of rectangles really fit them, so I ordered the Memorybox ones that were listed on the back of the packaging as "working" with these tags... the rectangles have square corners... so. to use these together I did have to clip the corners with scissors.
 Just messing around with some scraps and already colored images and sentiments on the table to "see" I do like the shape of these tags and I wish they had made rounded corner rectangles to work with them. but, the amount you clip off with scissors is pretty minimal.
(giraffe's are from My favorite things and the sentiment is probably hero arts, the lace is vintage)

The sneakers are from Stampin up and the sentiment is from Simon Says Stamp ( you got this set) these tags are almost A2 but, I think would fit onto an A2 sized card front. I did not try that yet. Outside of the craft cave the weather here has been really wonky with a little bit of everything. I have been spending more time outside though when I can so, the making things has slowed way down. I did take advantage of the Sizzix ( tax day sale and the Die sale at Ellen Hutson and so I will have a pile of new things to cut this weekend. ) The funny part is I have been mentally whining about not having enough "time" to play with all the cool stuff I already have. Such is life. Hubs is going camping to go turkey hunting this next weekend so, I will have more alone time than I normally do. Thanks for stopping by.

4.14.2018

Inspired by {Cuddle & Kind }

This week Angie has chosen this Cuddle and Kind site for our inspiration hunting and I came across these sweet lambs so..Last Sunday the last Ewe we have had her lamb (its also a boy) every lamb we have this year is a boy so, it was a deliberate choice to choose the pink sample. I recently got these new My Favorite Things ewe and me forever stamps in the mail out they came. they are you know scaled for an A2 sized card so, I decided to pair them with this Concord & 9th say hello die to use up some of the space. The mat piece was cut from a shade of card stock nearly the same color as the gold printed paper and so, I did rub on some tattered rose oxide onto the edges of the die cut to give it a little bit more definition.

 
both the gold shimmer in the hello and the bubbled texture gold are from the recollections line at Micheal's crafts. the base is a shimmery star dream, that button came out of a jar. I did use a MFT die for the sentiment and the sheep I cut with scissors. they were stamped on the same piece as the hello mat so, I just added some color to the legs, ears and fave and drew dots on the "wool" since the lambs at the store have all the dots. 

A closer look at these lambs in the store can be seen here. I had done a print of this to haul home and use for the memory jog and it printed the bows around their necks as red so, I didn't catch it until just now that there really was no red in that shot, and so, I thought I was being pretty smart only coloring one tiny bow red. ha ha. the lambs print as a cream color and the baby's bunting is more of a shade of pink like my card. I probably should just leave the mug shot up on the screen and go back and forth with peeking at it. You can find this challenge here at SplitcoastStampers to play along with us. Thanks for stopping by.

4.11.2018

WOYWW #462 {Happy Happy}

Happy desk peeking day, if you'd like to see more spaces or play along 
the link up for this blog hop starts here at our hostess
 
 So, Last week ( this is totally Leslie's fault) I started poking around on the internet to remember where I seen Katzelkraft stamps for sale online and found them again at frantic stamper and the grumpy penguins have been on my mental wish list for a while so, I poked around in the site some more to find a few more things to justify the shipping costs... ( you get that right?) lol So, I am only about 80 miles from them so ordering on Friday afternoon, gets me happy mail on Saturday afternoon.
 The rubber stamps are just plain rubber so, I ended up playing with the clear gal first. there was a CAS funny theme last week and I knew I could do funny but, I ended up with too many layers to pass for clean... that sentiment is from Riley & Co.

 So a while back ( it takes a couple of weeks) I placed this order from SSS when the neat and tangled sentiment came out and ordered some refills to the oxides and markers I had killed. the circle snow frame has been mostly sold out for a long time so it was fun to see in stock, now that ink pad. this is for doing no line coloring. so as a test I stamped those giraffes on monday right after I shot this and (no I still have not done anything with all those giraffe heads I showed you last week) and so, I set it aside ( it is very faint to see ink) and Tuesday when I got home, that cardstock I could not see the image well enough to color it anymore. so, it is very much an ink that if you buy one of these, it is going to fade so you have to be coloring right away not tomorrow or later.
 So, since today is Hubs hunting buddies birthday I needed a card and I had put away ( or rather pushed to the side most of the things I have showed you) and started this card which I ended up doing two of the sentiments to get the contrast. the back sides of the open spots where you embed the diecuts I have just clear scotch tape on the back side sticky side up.

 How this card turned out the diecut sentiment is up on foam dots and the sheet to the left was glued inside ( sentiment from My Favorite Things) this one is 6" square in real life. and that's about it for me. Thanks for stopping by!
 

4.09.2018

Rainbow Bridge

 So my friend at work had to say goodbye to her male kitty while she was off on vacation. and this is the card that I had made for them when I heard the news. they received it in the mail so, it's safe to post. the image is from Unity Stamps called part of us and the sentiment is from Altenew Beautiful Inside set, the other half of the sentiment is on the inside of the card because, this one is A2 in real life.

This was stamped with Versafine on Neenah solar white and colored with polychromos and prisma pencils with a little bit of gel pen added over the top so the rainbow could sparkle.

4.08.2018

Winter Hills

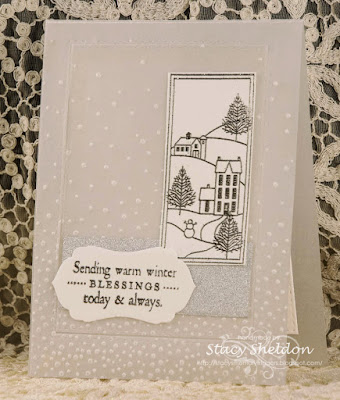
 There is a Dirty Dozen theme each month for Christmas cards and I had seen the April prompt and its been in the back of my mind for a little while now so, when I came across this card in Beth's gallery this morning ( she is this weeks Featured Stamper) I knew exactly what I wanted to do. out came the PTI vellum cardstock and then I started looking for snowflake embossing folders and found this falling snow one and thought OK and then I ended up embossing both the front and the back of the card because, I had already scored the vellum, so I cut that apart and decided I should cut out the centers and have "frames" of falling snow. because, her card has the texture just on the edges right. and then out came this new-ish Vellum adhesive I picked up a while back. ( it has a lot of the usual vellum adhesive things to follow) from my own trial and error I found that the cartridge it rolls from is wider than the adhesive and its centered on the roller not on the edge like how I roll my ATG gun. so, I ended up with boogers of adhesive off the edges of the frame. I did see the glue through that so I used an remover ( the Xyron one) and its also one of those things you have to be really careful not to touch it after trying to flip it over and lay it down because, if you have to pull it up and straighten it, and you touch that adhesive it will pick up the oils from your skin and you will see that.

 So, while I was pushing around the frames and such I had made a few extra's of the heat embossed panels and also had this left over base from what ever last wood grain card I had made and thought oh, I like the white on white with the silvers also. This one I used a SSS Wonky stitched rect. die to cut out the image panel.

 This was the first card I did and I did not get the adhesive total coverage on the frame and where I did not have any, it has bumped. the silver is a scrap of glimmer paper from recollections the frame was cut with a SSS stitched rect. die. the sentiment was cut with a Nellie Snellen tags 3 die. the image I cut out with scissors. The base on this card as Vellum I did cut a second white piece from the Neenah using the same size rectangle and glued it to the inside of the back of the card for a place to write a note.


This one is the best representation of Beth's card with the texture being partial on the edges and the ribbon. I did run the ribbon around the frame and cut it off on the back side of the frame so, it is only doubled on the edges of the frame it does not run full length around that frame. The sentiment on this one was cut with a Waffle flower lacy layers A7 Stitched die. I am not positive anymore but, I think this ribbon may be an older SU one. the embossing powder is also from Stampin up its name is Pewter. each of these cards finished out at A2 in real life.

4.06.2018

Inspired by {Carlyle Avenue}

 This week Julie has sent us looking at the Caryle Avenue store for inspiration where I found these golden bottle brush trees that I just smiled over. ( I hauled home a few from After Christmas sales this January to use as props when shooting Christmas cards)
So, thinking to make it gold I grabbed a toffee colored Versamark pad that shot really yellow looking after processing the photo shot under lights ( its rainy, dark and gloomy here) all of these stamps are from the Papertrey ink joyful Christmas set and the trees ( this is the largest one in the set) are smaller than the old set I have from two paper diva's.

 This was the first one that truck brad is something I found recently at Impress. I thought it made it look like Santa had come to park the truck there like a toy.

 The gold texture paper is one I found at Micheals recently and thought it was really cool ( its not a bright gold more like old gold) and the pink text print came from a pad that was given to me as a gift for Easter that says it is from a co. called craft smith. both of these cards are 5 1/2" square in real life.

a closer look at the tree's which can be found here at the store. I think I may just try a few more of these without the pastels in the morning and maybe gold embossing powder. Thanks for stopping by

4.04.2018

WOYWW #461 {giraffe's}

Happy desk peeking day, if you'd like to see more spaces or play along 
the link up for this blog hop starts here at our hostess

So sometime back in Feb I placed this order with Impress because, I wanted this Giraffe die and I still had money on the Christmas gift card. ( the big one still has like 12.00 left on it so, I will probably spend the rest at the grocery store)  anyways one of the Inspiration challenges went to a site ( my mind is blank this morning that had some art work with bright colored giraffe faces and I thought that is so fun) but, the giraffe die was on backorder and it took a while to arrive. 

 The dog stamp is an Amazon thing that came recently, it reads Blessed is the person who earns the love of an old dog.

 So, on Easter Sunday afternoon I did go open this package and start cutting some skinny smaller print scraps into giraffe heads, used one trio of them on a featured stamper card and had intended to do a Mixed challenge card because, that ones theme this week is using up scraps from the recent VSN and that bright ( the phone washed these colors out) pink/orange scrap is a piece of Yupo that was cut from one of those cards. the dot print is also a scrap from one of those cards. I am mostly pushing this around trying to decide what the words should be so I finally just walked away from it.

so, here is a closer look (the colors are better in real life) and its still just sitting just like this since Sunday. none of that is glued down its just thinking still. I need to do a pet sympathy card  for a friend and I am just in stall mode over that so. you know soon. there won't be much of a choice it will be clear the decks and get it done.
That's about it for me, thanks for stopping by.

4.03.2018

Giraffe trio Congratulations

This week's featured stamper is Miss Jayne from down under in Oz... and the piece I chose to case was this formal dance shot of her son and his friend, I loved the colors and layers of textures and patterns. and every time I looked at it I thought that must have taken forever to create. So changes were to pull the color into the center and keep it you know mostly flat haha. It really does not look much like Jayne's layout at all. but, I had fun doing this. The giraffe die is from Memory Box and the sentiment is from the Clearly besotted message me set. this one is A2 in real life.

4.02.2018

A couple more VSN projects

The theme for this VSN is gardens and I think there were something like 20 projects all together and I think I did at least half of them.
This one below was done for Dawn's challenge which was based on a quote she has in the thread. 

 So, I knew I wanted to use this particular sentiment which has not seen ink in a good long while from me ( Penny Black ) and started flipping through some previously colored flowers and found this one ( SU) and I had die cut it's edges with a frilly scalloped die and every time I picked it up I set it aside. ( it was done on watercolor paper) so, finally I got the idea to cut it out and toss the rest of the wc sheet and I popped it up on foam dots.

Now this one is another one that made me stop and think for a long time. Jan has a challenge to include a garden statue. and The only concrete statue in our garden is actually on the patio. We used to pick it up and put it away every winter and this spring things have been being put out onto the patio again already even though its been way too cold to sit out there in the wind. and after I remembered about that I found this Inkadinkado fine line classic and stamped it in some smokey grey and added some grey pencils to the white spaces. then I happened across this sentiment ( Dylusions) and thought oh, that is funny. Its probably headed to the booth next Nov. as the city mascot here is a Pelican. So for two cards that took 3 times as long to think about ahead of time they are both pretty CAS in the end. Hope you all had a great Easter weekend too, thanks for stopping by.