12.31.2024

Dirty Dozen January 2025 Christmas

 Hi & Happy New Years! This post kicks off the first of the Dirty Dozen Christmas cards that have a prompt to jump start the projects which can be found in the special forums for Fan Club Members at Splitcoastampers. I did of course wait until the last minute to do mine as I could not make a decision about what to do so, I started with finding this sentiment (Unity Stamps Naughty is the new Nice set) and stamping it on some Arches cold press watercolor paper intending to build a road / winter forest scene around it. 

First layers of paints. I did do this quick & loose using paints on the palettes on the table. We've had some recent challenges that did winter scenes for the watercoloring challenge so, I knew these would work and it was a no brainer.

More paints added and the background started looking like a road with a curve to it a little to me but, I didn't want to do a whole painted lines asphalt road so, you know more of a packed snow type road. ( like what you would see here crossing the cascades) 

I did add both some Dr. PH Martins bleed proof white and Windsor & Newton white gouache for snow highlights. I decided there needed to be some mountain peaks in the background also. Yes, I probably should have done that first but, I did not have a plan as I started to paint this.

After the paints dried I added some stickles glitter glue to some of the spots of snow but, as I was taping the backside of the paper and brushed my hand over it moving it around, it mostly fell right off the watercolor paper. ( I don't honestly remember if this has happened before in the past or not so, I am sure I will be just as surprised the next time it happens ha ha) The base here is some Stampin' Up Misty Morning, and this one is finished out at 5 1/2" square in real life. If you'd like to play along with us you can find this challenge here. That's about it from me, I hope you are doing well & Thanks for stopping by.


Watercoloring Fireworks

 This week Kia is sharing this video seen here on YouTube on painting fireworks with watercolors from Bethany Thiele. This starts with tape down your paper and do a sketch for the horizion/ground at the bottom of the scene.

There are a lot of layers to the painting so, there is a lot of add a layer and wait for it to dry from what I remembered and so, I did tape mine down. ( this does not last long for me in most of these photos its cropped to the edge of the tape and that tape is flapping in the wind above the chipboard it's taped to ha ha.


So, I had an idea about what I remembered and started with a layer of paints in the sky and the center of the ground.

a little more paints.

My biggest memory of the video at this point was there was a lot of layering darker colors to the corners.

You are seeing Daniel smith watercolors here on some Arches cold press. I could not remember exactly when the white crayon was supposed to be used so, I decided to do it here before I forgot. I think maybe the paint was supposed to be more dry as I got trails in the paint with mine haha.


So more paint, and I did introduce some black to the horizon line and the top two corners.

Here I decided to add in some white Dr. PH Martins bleed proof white to the bursts of light.

This is where I went off the rails, I started adding some color of the (what I remembered the colors being) of the bursts to the sky in between the white. and it looked odd so I went back and started re watching the video. if you have not done that yet, don't do this like this. that color is supposed to be on the white streaks haha.

So more sky colors went in between the bursts. and I was trying to be careful and not make a muddy sky. ( I had a lot of purple under that yellow and went over the yellow with more purple..

More white went back over the layers of color in the bursts as the previous layers had been buried. And at this point it's drying again so, I am planning to try to add some color to those bursts and stop before I paint a hole in the cotton. 

So, I pulled the tape off to see if I could see besides the obvious more things to fix. And I did end up adding more white and more purple to the centers of the bursts even after the card was on a base. 

The sentiment here I want to say is Savvy Stamps. its on a piece of Neenah cut with a Simon says stamp sentiment strip die. That textured purple is some really old Bazzill. and this is A6 in real life. I am debating adding stickles glitter glue or a shiny gel pen to this for some sparkle but, so far its just a painted scene. You can find this challenge here at SCS to play along with us. Thanks for stopping by.


12.27.2024

Inspired by {Ruby Clay Co.}

 This week as the year winds down to the close the last Inspiration Destination that Amy is sharing is heading to Ruby Clay Company. And as I started poking around in the shop, I happened across this tray and started to smile as I had very similar shades of blue on a palette from doing the winter scene color for the watercolor challenge earlier in the week and decided to just roll with it. 


 abstract things do not come easy to me but, from what I remembered and what I did when I actually walked form the computer to the table are slightly different things. I remembered really loose squiggly sprig type things but, what started coming out of my hand was things that started to look like pine trees haha so, I painted over the tops of them making them bigger and more leaf like. when this dried I thought it needed a little more so I hit it with splatters ( very tiny) and more paint. 

I am thinking there may have been one more layer of paint over this before I die cut this twice with some Penny Black stitched nested frames dies. I did line the edges of the die cutting with an gold paint Deco Color paint pen for Calligraphy. ( these seem to last longer for me than the Krylon paint pens) 

It's almost funny how differently the cell phone (top two photos) sees the colors than the DSLR camera ( bottom shot.) The center part of the panel is up on foam pop dots and the little diecut sentiment ( red lead paperworks) was diecut with some circle die ( probably Hero Arts) The base here is some balmy blue from Stampin' Up! finished out at A2 in real life. I intend to use this as a Thank You card. That's about it from me, if you'd like to play along with us you can find this challenge here at SCS. Thanks for stopping by.


12.25.2024

Merry Christmas

I had a few more Gift Tag ideas to share and I have not been that on the ball with posting this year so, I will probably be doing some catch up posts to clean out my to uploads folders by the end of the year ha ha. Not that it probably makes much difference but, I guess its a little tidier to post things made in one year in that year. So, today I decided on the rest of the gift tags that never made it online. 

The boot here is from Sizzix ( its an old red sized Originals die) the sole has some watercolor paint on it as does the stitching. The enjoy is an Impression Obsession word charm die done on watercolor paper and painted. The Just for you is an Impression Obsession stamp that was heat embossed with some distress powder ( probably barn red) and cut out with scissors. The base tag is a Memory Box Tag you're it die. That chocolate satin ribbon I think is Papertrey Ink. 

This scalloped round base tag is from Mama Elephant the round tag wishes dies, the letter J is from Ellen Hutson and cut from cardstock that was previously sprayed with red inks. That stitched snowflake die is from Lawn Fawn cut on some sparkle cardstock. That ribbon is wired, and very soft in real life. I liked the contrast between that softness and the crunchy snowflake. 


Way back when these charm dies arrived from IO I did cut a few with scrap watercolor papers and add some paints to them. 

Which lead to cutting other word dies and giving them the same treatment. This die is from Simon Says Stamp.

This one with first layers of paints on it, it took a few as I used I am thinking now the cheaper paper. the paint looks pooled up on it. 

The base tags here are Memory Box Tag You're it dies. and they cut a frame and a mat piece so, I have on the back sides of these taped that together and then used a stitched square die to cover up the whole back of it and make it a little more stable if that makes sense. there is some stickles glitter glue added to the laves and berries on these. This is Cheery Lynn designs sentiment. 


What they looked like finished. the gingerbread charm is something I found on Amazon, There are heart brads and jingle bells tied on with the hemp string and that ribbon is really old it is one Martha Stewart used to make and sell at Micheals years ago when our little store first opened. 

The round base tag here is from Papertrey Ink called Tag Sale 4 die, The stitched letter B is an My Favorite Things die and that heart frame is from shoot I want to say cuttlebug but, it may be a really old Sizzix originals die. ( I have envelopes of previously die cut scraps, some are just all hearts and some are just one mfg and those are labeled) Same thing with those bitty poinsettias they probably are Spellbinders from one of the Christmas frame style dies where there is a busy frame with bits and pieces to layer on it. The with love is an lili of the Valley tag stamp and cut with scissors. The little metal made with love charm I have some that came from Joanns and some from Amazon ( bulk) so, I don't know on that one anymore. 


At one point I continued with that whole idea of Happy Gift wrapping season and did some of the scraps as little 3" Square folding cards and this was the first 3 one day 


And these were the second 3. I chopped up some printed papers for those Santa's and the girl. The sparkle 3-d Santa hat is a sticker. I have not actually done the "happy gift wrapping season gifts yet" I think that it may be more fun to gift them early in the fall for the all year long shoppers and I want to have a big stash built up first to do that. 

Some time last summer oh last August one of the Inspiration Challenges I found some Gingerbread Napkins that made me think of doing this, shiny metal looking tag bases for Gingerbread cookies on them. And so for me I was not sure what I wanted to do scale wise and I played with these bits and pieces, and most of them are in an envelope.

But one did end up finished here. The small gingerbread is an Impression Obsession die cut from watercolor paper and painted with Daniel Smith watercolors, the Sheet is an My Creative Time Cookie Sheet tag die and the Enjoy is a word charm die from Impression Obsession. 


 Also around that same time in August there was a free for all challenge to do something Fall, and I had this bird stamp out so, I painted one and then looked for fall colored printed paper to use with him as I thought he turned out kind of fall colored. The bird was cut out with the My Creative time cookie sheet (insert part) of the tag die. The base tag is a Mama Elephant Tags a lot die. 

This one the base tag is oh shoot, something that is not labeled a "tag die" in the files I have started in my computer. Its searchable but, only if you name the photo as a tag die ha ha. This has stitches I can see that but, I am not sure. The noel I do know its a Vintage BigZ die from Tim Holtz. That Primitive star is one of the Impression Obsession ones and looks to be cut from some sprayed red card. The metal little B charm is a Tim Holtz one as is that metal pin it is on. And that has caught me up with the gift tags I had not shared as of yet. Merry Christmas & thanks for stopping by.


12.24.2024

Watercoloring a winter scene

 This week Linda is sharing this quick little video ( drying times excluded) from AhmadArt on YouTube. 

I did sketch a couple of lines with a soluble pencil for the water/reflection area. and added in some paint for the sky.

I was kind of in a hurry and walked away at this point until the next day. this is some Arches cold press watercolor paper and Daniel Smith paints.

Used the same color tried to make it more intense for the background mountain and realized it was way too bright so, I grabbed a paper towel and dabbed some off.

So, it wasn't that great but, it wasn't horrible so I kept it and kept going.

Added in the third hill. maybe a river streak. 


This first round of snow was some Dr. PH Martins bleed proof white. It pretty much faded away when dried so, the next bunch of snow is Winsor & Newton white gouache. 

I did honestly think it was kind of odd that the snow was on the bare tree branches like foliage so, I did mine a little tighter to the branches. Or in the shape the branches were growing I guess. 


My falling snow splatters are all on the very subtle side. I was considering adding some snowtex to this to pop that up and add some depth but, have left it alone so far. 


 The base on this is some Stampin Up blue bayou? something like that cut to A2 in real life. the Sentiment I had diecut a week or so ago and was in a little tray of things on the table.Its the Trendy Merry Christmas from the stamps of life and it looks like its on their to be retired list now. the base is Vellum PTI cardstock and the top layer is some Neenah solar white. That's about it from me, if you'd like to play along with us you can find this challenge here at SCS. Thanks for stopping by & Have  a Merry Christmas!


12.21.2024

Inspired By {Levtex Home}

 This week Denise has chosen this Levtex Home site for the inspiration at Splitcoaststampers and I happened across this pillow. ( seen here) 

 I liked everything about it and in my mind I thought I had wrapping paper nearly the same, so I wrapped my gift and started this tag.

And then I realized that the pillow had deer with the trees haha. This tree was part of a kit of the month from Hero Arts years ago. and the Fa La La La stamp is from RedLead paperworks. the Be Merry & Have joy is a stand alone stamp from Unity Stamps that I think could very well be one of my most used Christmas Sentiments. the pinecone charms came from Amazon. The letter J is a die, the little cardinal bird is an Impression Obsession die. the cotton thread through the hole came off of something I bought recently ( it was holding a price tag more than likely and just happened to be laying on the table ) so, I was in the middle of wrapping so, I decided I would keep going with a woodsy theme and add deer. 

This one the wrapping paper came from Pier1 imports (years ago) the deer is a poppy stamps die cut from watercolor paper and painted real quick. the tag shape is the new Holly Tag from Simonsaysstamp. the sentiment here is from Papertrey Ink. the circle was cut with an Impression Obsession die. That check ribbon is (really old) from Joann's and the red wired felt is either Micheals or Joanns. I tend to pick up rolls when it goes on discounts around the holidays and so. 

Which then lead to this tag, I think the tag die may be a Hero Arts one ( it was in a bin on the table) I ran it through the bigshot inside a Tim Holtz birch folder and added some watercolor to the shadows/texture real quick. The Hohoho is an Impression Obsession die (cut twice and stacked for depth) the little tag is an pinpoint mainstreet one from poppy stamps and I think that letter M was from the ellen huston letterboard set. (but, I do have other letter board die sets so, I could be wrong) That red ribbon is (older) from Micheals. That was about it for being jumpstarted from that pillow but, I do have more tags to share soon. Thanks for stopping by.


12.17.2024

Watercoloring a beginner Christmas house

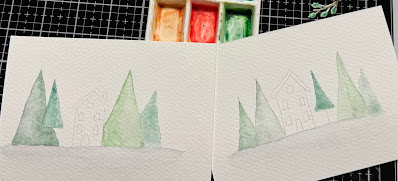
 This week Angie is sharing this beginner Christmas house tutorial seen here on YouTube for the watercolor challenge. I really liked the shapes I seen in the video and the whole almost nordic feel it has this scene so, I kept that part of my sketches and changed up the colors a bit.

I started with a piece of Artist loft watercolor paper that I cut in half. ( which makes 2 pieces about A6 in real life) and I did use an water soluble pencil to do the sketches.


First layers of paint and I did stop here as Hubs needed something ( I have already forgotten what) so, I just let them dry all the way before I continued. I did know I wanted to change up the colors from what I had seen in her video and so, I did try to keep the colors soft.

My houses started looking a little coral colored to me and I was surprisingly enough OK with that. 

I had received a set of these white paint pens from DS (a while ago maybe a couple of years ago?) I lose track of time frequently but, seeing her use hers in the video reminded me I have some.) so, I opened the smallest looking one thinking I would get tiny dots. and I did. ( this is a wet view) and what I found is my colors are pretty faint on these scenes so the dots did show better on the darker painted parts when it was dry. But, I did end up doing most of the dots twice on both of the finished cards as they were so faint.


Both of these cards are A2 in real life. The one on the left was diecut with an Paper Rose Nesting Curved rectangle die and the sentiment was cut with an My Favorite Things angled sentiment strip die as when I placed the (slightly dirty) stamp under the painting. I did not have the painted held down in the Misti yet so, it jumped and blurred so, that one the sentiment was done on a Neenah solar white scrap. The one on the right was diecut with an Avery Elle pierced rounded corner frames die as in my mind these paintings looked a little modern so, I tried to use dies that had a similar vibe to me. The green dotted printed paper is from Maja Designs. I did take a fineliner pen to the one on the right to add in the detailing a little bit without the doodling. I felt like these did not really need that so, I did leave the one alone. That's about it from me. If you'd like to play along with us you can find this challenge here at SCS. Thanks for stopping by.


12.13.2024

Inspired by {Williams Sonoma}

 This week Kia is sharing the Williams Sonoma site (and I have actually been in that store and shopped there many times over the years but, my purchases tend to be cook wear & knives type things) so, I thought it was interesting to see the dishes and I came across this platter. And I thought it would translate into a card front easily enough. But, time is short and daylight is shorter so, my first thought was to paint it and the second was grab the box of previously diecut watercolor scraps and see what is in there. And I fished out this wreath. which I decided to cut up because, it was something that did not diecut perfectly the first time but, had lots of perfectly fine parts. and these pine sprigs and holly/berries.


I added some Daniel Smith (mostly) watercolors to them.

I also had this Penny Black Classy Frames diecut on the table and decided to use it as the "wreath base" to glue the sprigs to. I did try to do corners of it and left some white space. The sentiment was previously stamped and die cut so, I fished that out of one of the envelopes. I want to say that is an "Hero Arts" sentiment but, my other thought was Simon Says Stamp and I don't see this particular sentiment just glancing at the sets in the computer. but, I have HA sets with fonts just like that and slightly different words.

The base here is some Neenah solar white cut to A2 in real life. I know the colors are a little off that does not seem to matter what settings I have my camera on in this no daylight time of the year so, this is close. :) If you'd like to play along with us you can find this challenge here at Splitcoaststampers. I hope you are all doing well & thanks for stopping by.