11.29.2024

Inspired by {the tin bin}

  Hello & Welcome, It's my turn to host the Inspiration challenge as there are 5 Saturdays this month in November and I am traveling today So, the ladies on the team are keeping an eye on things until I am online again. I knew I wanted to do something simple as it was just a busy week and that is just going to continue through the end of the year now right? Their store front can be found here. And their pinterest boards can be seen here. I seen this red house Ornament here in the thread at Splitcoaststampers. ( its the last photo in the thread) and I will have the links up and working after I return. And I loved that and started poking around in my birdhouse stamps. And I was like no no no, and I thought of these bitty almost salt box styled houses from the really old Memory Box village dies set and I had this Penny Black Immense Enjoy die sitting on the table along with this Christmas paper from Kaiser Craft and I thought, I really like this combo, The red texture paper here I think is from Hobby Lobby. ( its not marked the piece I cut) 

And I really liked the colors and thought they went with the primitive vibe of that house. I probably should have tucked in a bitty tree but, I really liked the browns, creams and red combo and I left it off.  seeing two of the homes would fit in the open space of the O here I decided to go with a from our home sentiment and of course I stamped it directly on that printed wood grain. crooked. yes, you knew that was coming right? So, I re-stamped it on a scrap of kraft cardstock and die cut it twice with an Impression Obsession die from the deckled set. I did cut it twice to get it trimmed down on the ends to be more closer to the edges of the stamping. The edges of that piece were inked with some DOX vintage photo ink. And that was about it but, I decided it needed a little more contrast and used a scrap of the red texture for a mat. This one is A7 in real life. That's about it from me, I hope you are doing well & enjoying this long weekend if your in the states. If you'd like to play along with us you can find this challenge here at SCS. Thanks for stopping by.

11.26.2024

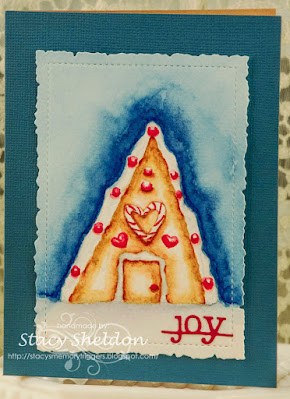
Watercoloring a Gingerbread House

 Hi, & Welcome, It's my turn to host the watercoloring challenge this week and so I had chosen this video of a gingerbread home a few months ago thinking to do quick little tags before baking season started. and with that in mind I was mostly curious about the color combo because, Blue is not something I reach for or think of with Gingers. This video is from Watercolor Relaxation & Coloring ideas and can be found here on YouTube. One thing about it, she does use Windsor & Newton paints and I have Daniel Smith so, I just winged it by doing the snow/frosting pale purple and the blues and browns and reds are different.

I started with the sketch on some Artist Loft (cheap) watercolor paper.


and yes, sketching is not my thing at this point I was ready to dig out a stamp ha ha. but, I kept going.

First layers of brown I did let this dry before I continued.

Second layer of paints. 


I did think it was interesting to watch her do her shadows. It was not anything I have not seen before but, I was impressed with the whole rubbing out the harsh lines she did do.

now once I started adding blue for the sky was when I started to get some pretty hard lines so, I kept adding more water and paint to this trying for that bold color.

Started adding candies to the frosted areas and blurring that thinking its supposed to be the candies would bleed into the frosting right? 

I was almost happy with the depth of color by this time but, I could see the lines while it was wet so, I did right after this add more.

And the more I Looked at it, the more I thought it would be very easy to keep adding paint all week to this. So, I stopped. I did not add the white gel pen or the acrylic paint to the door frame.


When the paint was dry I die cut that panel with the Mama Elephant deckled edge frame die, put foam tape under it and then cut this joy typewriter sentiment (Simon says stamp) from a scrap of red cardstock to add on. The base here is a pre made one A2 and I am guessing its a very old Tim Holtz one. ( mine are all in a drawer together mostly with no packaging. I am trying to use them up. So, that's about it from me. If you'd like to play along with us you can find this challenge here at SCS. Thanks for stopping by.


11.22.2024

Inspired by {World Market}

 This week Amy is sharing the World Market site & pinterest boards and I happened across this window scene pin. And I kept coming back to it. So, I decided to dig out the first window die I ever bought the Poppy Stamps Grand Madison window die and cut it from some artist loft watercolor paper. Taped up the backside with scotch tape so it could be painted. 

It struck me that there was a lot of Brown in that pin so, I started with a wash of some as the first layer on the frame.

So, I you know did this based on what I thought I remembered. and my brain was stuck on mostly woody wreath with round leaves with blue ish undertones. And I decided that I could change the ribbon hanger into a bow. 


And at that point I decided the glass panes should have some color. so, I gave that a wash of very light blue.


and I let it sit at this point I decided to go back to look at the wreath again and I realized there was "pine sprigs" in there also, So. I did add some flicks of another shade of green to be "pine" added a little more red to the bow. I had received some happy mail from Red Lead paperworks earlier in the week and stamped off some of these sentiments from the Christmas Circle words set on scraps so, I had those in my line of site was the paint was drying and I did cut one of the Noel's with a Hero Arts circle die and then inked the edges with some DOX vintage photo ink because, brown. :) I knew the edges of the pin were maybe the sides of the house or door frame something, but I decided that I didn't want to paint the rest of it and just started flipping through some printed paper and I liked the colors of this winter village scene from the Hobby Lobby vintage Christmas pad and that sent everything to more greens than browns. 

The green base here was cut to A7 and that's about it. I am not so sure this paper and colors work with this window and I am very tempted to pull it apart and make a more clean and simple version card but, at the moment this is where I stopped. If you'd like to play along with us you can find this challenge here at SCS. Thanks for stopping by. 


11.19.2024

Watercoloring a Simple snowy bird scene

 This week Linda is sharing this video seen here on YouTube to do a winter scene with a bird on a branch, and she uses a piece of yarn to get the frosty looking branch effect. I have not crochet with yarn in a lot of years but, I have a tiny stash of fancy fibers to tie on gift tags and found a piece of chenille. ( it did not work by the way) so, if you have some yarn maybe try a different one.


I started by cutting a piece of Arches cold press with the largest die in the Mama Elephant Deckled edge frames set and using Indigo & black as a color wash for the background, got the chenille damp, sprinkle don salt, layered a little more water on the string and walked away. ( it's been snowing off and on here the last few days and so, the drying time is in the hours and hours stage. 


When I removed the chenille I had this. So, there was no damp under where it was I may have waited too long to pull it up. I did let this sit overnight and all day while I was at work today.

So, I grabbed a damp brush and tried to make a line of where I thought the string was originally for a branch, added a hint of brown to that and then did the bird based on what I remembered from watching the video a few days ago, My bird sketch I did make a letter D with a bump for the head but, the space for the tail I had painted over so, I did spend a bunch of time adding brown paint to the tail area.


After adding more paint to the bird I decided to splatter the whole thing with some Dr. PH Martins bleed proof white. and then (this is not in this shot) I did drag the brush along the outside of the stitched line on the diecut to take away some of the sky color washed background there. I am not so sure that was any success as of yet but, I did try that. 


 After that dried I did use a piece of textured Bazzill for a mat and then roughed up the edges of that. dug around in my blue ribbons box and found another piece of yard that came from "Fibers by the yard" a long time ago, wrapped it where the painted branch was supposed to be and its mostly floating there with a couple of micro glue dots in a couple of spots. I decided to use an premade card base of Strathmore watercolor paper in an A7 and used it for the base. And I have not decided on the sentiment as of yet so right now this is where I stopped with this one. if you'd like to play along with us, you can find this challenge here at SCS. Thanks for stopping by.


11.17.2024

Thanksgiving Gift Card Holders

 These were built around this printed papers I found in my stash, I knew that I needed something on the A2 size as the place we buy Turkey Thanksgiving gift cards from sells them on post card type paper now rather than just the card. So, I cut up the plaid and word prints, found this orange cardstock and pushed them around on the table for a week or so. and I kept thinking maybe pumpkins maybe leaves. ( I've done leaves a lot over the years) so, I found this Pretty Pink Posh elegant Pumpkins die in the stash and It had not been played with before so, to keep some of the white I decided to cut it from some Artist loft (cheap) watercolor paper. 


And the very first one did not instantly fall apart when I removed it from the die so I decided to tape up the backside of it and keep it as an embedded die, cut a couple more and did the same thing with a few rounds of Daniel Smith watercolors over the top. 

I had some thoughts about leaving no words on the front. ( the inside has the waffle flower Happy Thanksgiving from their set that looks like Farm House font words) mind went blank. but, one of the card front layers I decided it was crooked, lifted it up (so of course the plaid paper ripped) at this point you know all three cards were nearly done so, out came the tin of previously diecut tiny tags and I found this Just for you ( it has to be SU but, who knows what set off hand) and layered those in the same general area where I had the one card rip. I am currently overthinking that idea but, I am also running out of time to come up with some other idea so, I think these are going to stand as is. 

I am really liking this die like this on watercolor paper all taped together and I think I just may do a few more of these while I have everything out. That's about it from me, hope you are doing well. Thanks for stopping by.


Inspired by {the Wreath Shop}

 This week Denise has shared the Wreath shop as the inspiration destination at SCS and I happened across these wings. And although the words say they are metal my brain seen them as barn wood. So, I decided to cut the bottom base layer of these Sizzix Lisa Jones Angel wings as some mostly white woodgrain printed paper, inked the outside edges with DOX vintage photo and then cut the top detailing layer from some vellum so the light could pass through and the woodgrain would peek through.

This sentiment is an old one from Validated and I cut that out with an Lawn Fawn Extra Sentiment banner die. the center of it has an old Stampin Up (not sure what they called theirs but, it looks like an "goosebump" type gem) The base here is some Ellen Hutson linen texture white and its 5 1/2" square in real life. That's about it from me, if you'd like to play along with us you can find this challenge here at SCS. Thanks for stopping by.


11.12.2024

Watercoloring a Snowy Forest scene

 This week Brenda has chosen this video seen here on YouTube by Julia Lis art doing a simple forest scene with trees "out of the box" or oval as it happens. 


I did use an water soluble pencils to do the slightly wonky oval here. 

First layer of paint and I walked away from it at this point to let it dry. this is Indigo and black. 

second layer of slightly deeper shades of the same paints. I was hoping for a reindeer shape to my silhouette and I am thinking this is not too bad. 


added a little more and the first round of white splattering was done with Dr. PH Martins bleed proof white. (which faded when dried) this is some artist loft (cheap) watercolor paper.

More bleed proof white added with also some Windsor & Newton white gouache. ( which also faded away) so, the final card has a bit of Tim Holtz distress picked fence paint ( I think it may be acrylic) and I used an acrylic paint brush to add a few more dots to the finished card below.


The mulberry paper has hints of blues to the grey so, I felt like it blended well with the paints in real life. ( this did not want to photograph for me those blue undertones) the base here is Neenah solar white. The sentiment here is from Red Lead stamps and done with some Versafine ink. this one has finished out at A7 in real life. That's about it from me, if you'd like to play along with us you can find this challenge here at SCS. thanks for stopping by.


11.11.2024

Celebrating CJ Nalley

 This week CJ is the featured stamper at SCS and I happened across this Country living birthday card of hers and Knew I could do something with it as the inspiration. I do have that set but, You have to make at least two changes so, I stamped this Comotion light wrapped cowboy boot with some Versafine morning mist on the cheap watercolor paper. 


First layers of paint.

So, after the first layer dried I did add a second layer and decided to add a wash to the background to help the "glow" pop and was lucky it did not turn green but, it did get some funky lines. I decided I needed some sparkle to the glow and lights and such. 

So I added some stickles glitter glue to the light bulbs and some white gouache to the catch lights on the bulbs. I had saved space for that but, I did goof the blue bulb and so, this was an attempt to even them out. after this dried I did add some stardream gelly roll pen to all those dots around the "glow" and the spur out the top of the boot. 


Because I had changed the them to Christmas I did wrap the red ribbon (May Arts) around a couple of corners as a nod to that sentiment and those red banners she has on the corner of her card. I did use the Simon Says Stamp wonky stitched rectangle die to cut the watercolor panel. The wood grain here is pretty old its from Provo Craft the natural pine print had red splatters. The base here was cut to A6. That's about it from me. Thanks for stopping by.


11.08.2024

Inspired by {Bronner's Christmas}

 This week Kia is sharing the Bronner's Christmas site for Inspiration at SCS and I came across this Ornament seen here. What caught my eye besides the red and white combo was the sparkle and the whole you could do a lot of CAS off of that. 

So, I pulled out this Sue Wilson die from Creative Expressions and cut it from some cheap watercolor paper, painted it red and when that dried.

I decided to go over the top of it with some red-ish sparkle paint and it really does not sparkle that much unless you tilt it just so but, that is on there. 


I had some happy mail arrive that I bought my self for my birthday this year and so, ( you can see that loot pile above haha) in it was this Penny Black Classy Frames die set and that Lisa Horton Rustic Hessian Slimline embossing folder. So, I cut the frame from the same paper as the words were cut from and I grabbed a scrap of what looked like hmmm, possibly Sundance Felt natural white and ran it through the folder. I trimmed it down to the just the piece of the embossing and then cut that at 5 1/2" to make a band for the front of the card. (the cardbase here is totally glittered red on the front and back from Paper Accents) and I hauled home that ribbon from Micheals? or Joanns sometime last summer and the words just got lost so, I grabbed the drop piece end of the embossed panel and tucked it over the ribbon and under the frame to park the words on. I did after the liquid glue dried tuck in some small folded in half glue dots under the parts of the frame that were floating as the ribbon and embossing is not exactly flat here. That's about it from me, If you'd like to play along with us you can find this challenge here at SCS. Thanks for stopping by.

Treasure Hunting

 There is a craft Artisan event in a neighboring town from where I live this weekend and I decided to go to  work late so I could drive out and see it this morning. ( if you're local its at the Merrill civic center) called "Christmas in the Country" and some of the booths in it are the same artists who had some of my favorite booths at Shepherd's market way back when... 


 I have been actively searching for a small metal table for the porch to put between the rocking chairs and I found this one and those 2 old beater/whisks in the simpler times booth. It's not old but, it is sturdy and has good weight to it. The small green pitcher and the gnomes, and the Joy ornament were from the ladies who are a mom & daughter team with lots of has been painted on things, my mind just went blank ( I am so bad with names I do better with faces) The taller green rusty pitcher came out of the booth where they were sewing the pot holders and the Honey was locally sourced by a lady whose husband is a third generation bee keeper. I did see quite a few things that IF I had a huge house they would have followed me home also but, I felt really cool about the things I did find. Izzy approves also :) Hope you all are having a fantastic Friday also. Thanks for stopping by.

11.05.2024

Watercoloring a Loose Gnome

 This week Kia is sharing this very loose expressive gnome tutorial seen here on YouTube from  Joanne Boon Thomas Artist channel and I did watch the video and attempt to do one from memory, the first layer of paint was not too bad.


So, after it dried I attempted to add more paint to it including shadows haha.

and that was pretty much a fail. But, I knew if I could just remember what she did I could probably get it close enough. So, after this. I watched it again. 

This is first layer of paints, I did not try to add any shadows to this and I did take a corner tip of a paper towel to the area under his nose. 


So, this versions second layer I did remember to add some splatters and some of them are pretty hard as they did land on the dried paints. I also left the hat and shoes alone and only added in the blues and purples here for the shadows and highlight the light edges kind of a thing. when this dried I did cut it with an waffle flower rectangle die from the A7 set and used some mostly blue and reds Maja Prints to pull this together for a Christmas card.

The sentiment here is from Unity Stamps and its a sold as a single stamp one. I did use some Versafine to stamp that and then ended up rubbing the edges of the tiny star print paper with some DOX vintage photo. the lace is vintage and this one is 5 1/2" square in real life. If you'd like to play along with us you can find this challenge here at SCS. thanks for stopping by.


11.01.2024

Inspired by {Home is where the boat is}

 This week Julie has chosen the "Home is where the boat is blog" and their collection of Pinterest boards

Where I found this darling decorated gate on the Deck the halls board.  I don't know why it does not show her board where I found it rather than the place where she pinned it from but, I am not going to fight with the site to give me the right link. 

So, I started with this Impression Obsession gate die cutting it from a scrap that I thought was black but realized after the fact that it was more of a dark grey. (it's been over cast and storming here all day)

And then I pulled out the entire box of "Christmas Foliage dies" ha ha looking for small pieces to play with that card above is A2 in real life so, although the gate is much larger than the fence from IO it's not a huge gate by any means. I did consider making this a tag rather than a card but, as I was poking around I found this half a wreath in the Hero Arts Kit of the month from November 2022 and used that as the main base to the garland, adding in holly leaves from both the Spellbinders Noel & Joy sets, the poinsettias here are from the Spellbinders Holly frame set and the Be Merry is from the Spellbinders naughty or nice set. That tied hemp string was something that almost went onto the pinecone card from this morning and then I added some opal pearl liquid pearls to the centers of the flowers. I did dig out my old Tim Holtz bricks background but, I had this cut and scored piece of woodgrain sitting on the table for a while now and decided I liked how that looked as a more clean-er version of the IC shot. That's about it from me, if you'd like to play along with us you can find this challenge here at SCS. Thanks for stopping by.